You see a photo and immediately think of an elaborate pastry, a delicate technique you haven’t mastered yet. In reality, lemon crinkles are among the most accessible cookies you can make—one bowl, a fork, and ingredients you almost always have on hand. This gap between the polished appearance and the ease of execution is exactly their charm.

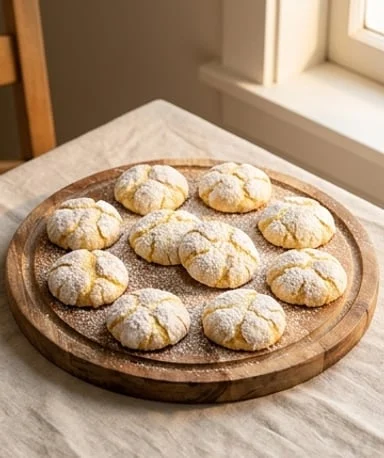
The first thing that strikes you is the matte white of the powdered sugar on the cracked surface, like fresh snow on rugged terrain. As you bring the baking sheet close to the oven, the scent of warm lemon mixed with the golden dough is almost intoxicating. The surface yields slightly under your finger, but the inside barely resists—still warm, soft, almost creamy. A result that looks like a pastry chef’s effort but comes together in less than an hour.
Why you’ll love this recipe
Ingredient Notes
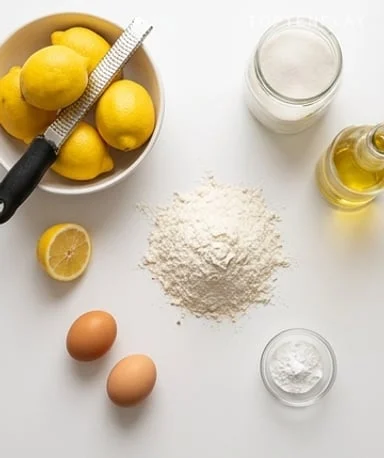
Everything you need: fresh lemons (zest is essential), an egg, flour, neutral oil, and powdered sugar for the signature coating.
- Zest of 2 lemons : This carries the bulk of the fragrance, much more than the juice. The essential oils in the zest are concentrated and survive baking, unlike juice which loses some of its acidity under heat. Use unwaxed lemons if possible—otherwise, scrub the skin vigorously under hot water before zesting.
- Juice of 1 lemon : It provides acidity and helps hydrate the dough. Its role is to balance the sweetness of the sugar and amplify the zest without dominating. If lemons are small or not very juicy, press two—better to have a slightly more moist dough than a too-subtle flavor.
- 80 ml neutral oil : Oil replaces butter here, and it’s a choice that changes the texture entirely. Where butter makes cookies tender but crumbly and prone to drying out quickly, oil maintains moisture longer. Sunflower or grapeseed both work—avoid olive oil, whose flavor would overpower the lemon.
- Powdered sugar for coating : Its role goes far beyond decoration: it creates the characteristic cracks. During baking, the dough expands and spreads while the powdered sugar layer resists and fissures. The coating must be generous and uniform—too thin a layer gives smooth cookies, not cracked ones.
- 250 g flour + 8 g baking powder : The leavener makes the cookies rise just enough to cause cracking. The proportions are calibrated: too little baking powder and the cookies stay flat without cracking; too much, they rise too quickly, the texture becomes dry and airy. Do not substitute with bicarbonate alone without adjusting quantities.
The dough takes ten minutes
Start by whisking the egg with the sugar until the mixture lightens slightly and becomes frothy—a few minutes by hand are plenty, no need for a mixer. The oil incorporates easily next, followed by the lemon zest and juice: at this point, the mixture already gives off a bright, fresh smell that bodes well. Add the flour, baking powder, and salt all at once, and mix just enough for the dough to be homogeneous. Overworking the dough develops gluten and makes the cookies elastic rather than tender. So stop as soon as the flour streaks disappear. The resulting dough is soft, slightly sticky, and that’s exactly what you want.
Chilling, a crucial step
Cover the bowl and let the dough rest in the refrigerator for 30 minutes. This resting time may seem trivial, but it really changes how easy the dough is to shape. Cold dough rolls into balls without sticking to your hands, holds its shape better on the baking sheet, and spreads in a more controlled way during baking. Warm dough, on the other hand, sticks to everything it touches, flattens too quickly in the oven, and yields thinner cookies. If you’re in a hurry, 15 minutes in the freezer can substitute for the fridge, but 30 minutes in the cold is the most reliable option for a dough that handles well.
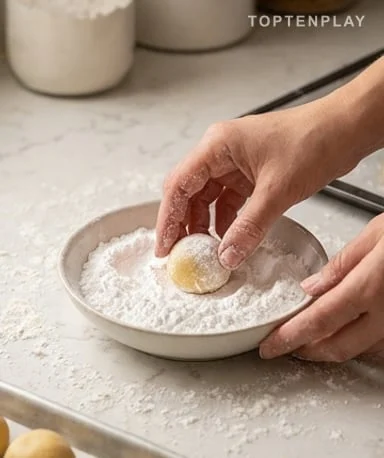
Coating, the decisive move
Take small portions of dough—about a level tablespoon—and form balls between your palms. The size should be uniform so all cookies bake at the same rate. Roll each ball generously in powdered sugar: the goal is not a light white dusting, but a thick, even coat that completely covers the surface. It’s this resistance between the dough rising and the sugar staying in place that causes the cracks during baking. Place the balls on a baking sheet lined with parchment paper, spacing them at least 4 cm apart—they will spread and double in diameter in the oven.
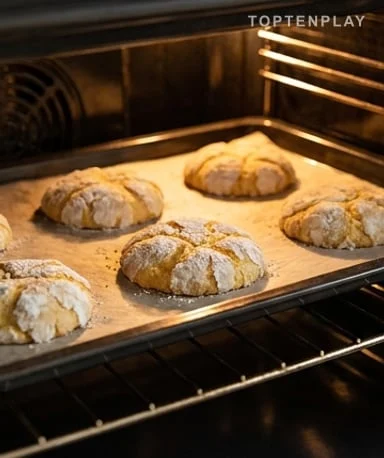
In the oven, without checking every two minutes
Bake at 180°C for 10 to 12 minutes. The transformation is visible to the naked eye: the balls gradually flatten, the surface cracks in several places, and the edges start to brown slightly. The inside, meanwhile, remains puffed and matte—a sign it’s still soft. Resist the urge to extend baking when they still seem a bit soft in the center: that’s normal and intentional. The cookies continue to cook on the hot baking sheet after leaving the oven, and this residual heat finishes setting them without drying them out. Let them cool for 5 minutes on the sheet before moving them.
Tips & Tricks
- Remove the cookies when the center still seems slightly soft: they finish cooking on the hot sheet out of the oven, and this margin prevents ending up with dry rather than soft cookies.
- Don’t skimp on the powdered sugar: a thin coating gives a smooth surface instead of the expected cracks. The thicker and more uniform the coating, the more pronounced and regular the cracks.
- Use only fresh lemons—the zest is irreplaceable. Bottled lemon juice can work for acidity, but without zest, the flavor is flat and the recipe loses its identity.
- Store the cookies in an airtight container at room temperature: the oil in the dough keeps them soft for 2 to 3 days, but air dries them out quickly.

Why don’t my crinkles crack during baking?
The main cause is a too-thin coating of powdered sugar: the dough rises but doesn’t meet enough resistance to crack. Roll each ball generously until you get a thick, even white coat. Dough that is too warm at the shaping stage can also be a problem—if it warms up during shaping, put it back in the cold for a few minutes before continuing.
Can I replace the oil with butter?
Technically yes, but the result will be different: butter gives a slightly denser texture and a richer flavor, but the cookies dry out faster. Oil is a deliberate choice here to keep the crinkles soft for longer. If you opt for melted butter, use the same amount in grams (75g).
Can the dough be prepared in advance?
Yes, and it’s even convenient: the dough keeps for up to 48 hours in the refrigerator, well covered. The longer rest slightly intensifies the lemon flavor, which is no disadvantage. Just shape and bake when you want.
Can bottled lemon juice replace fresh lemon?
For the juice, in a pinch, but the zest is irreplaceable—and it carries the bulk of the flavor. Without zest, the crinkles will have a very muted lemon taste, almost neutral. A fresh lemon is truly essential here.
How should I store baked crinkles?
In an airtight container at room temperature, they stay soft for 2 to 3 days. The oil in the dough acts as a natural moisturizer and slows drying. Avoid refrigeration, which makes them dull and slightly rubbery.
Can crinkles be frozen?
Baked cookies freeze very well for up to 2 months in a sealed bag—thaw at room temperature for about 20 minutes before serving. You can also freeze the dough balls already coated in powdered sugar and bake them directly from frozen, adding 2 to 3 minutes to the baking time.
Craquelés au Citron
French
Cookies & Small Cakes
Soft-centered cookies, slightly crispy on the surface, with an intense fresh lemon flavor. A simple dough made in one bowl, yielding results worthy of a pastry shop thanks to the powdered sugar coating that creates the characteristic cracks.
Ingredients
- 1 egg
- 100g sugar
- 80ml neutral oil (sunflower or grapeseed)
- 2 unwaxed lemons (zest of both + juice of one)
- 250g flour
- 8g baking powder
- 1 pinch salt
- 80g powdered sugar for coating
Instructions
- 1Whisk the egg with the sugar in a bowl until frothy and slightly lightened.
- 2Add the oil, then the zest of both lemons and the juice of one. Mix until smooth.
- 3Add the flour, baking powder, and salt all at once. Mix until no flour streaks remain, without overworking the dough.
- 4Cover the bowl and refrigerate for 30 minutes.
- 5Preheat the oven to 180°C. Line a baking sheet with parchment paper.
- 6Form dough balls the size of a level tablespoon. Roll each ball generously in powdered sugar until thickly and evenly coated.
- 7Place the balls on the sheet, spacing them at least 4 cm apart.
- 8Bake for 10 to 12 minutes: the edges should be lightly golden, the center still slightly puffed.
- 9Let cool for 5 minutes on the sheet before transferring to a wire rack.
Notes
• Do not extend baking even if the center seems soft: the cookies continue to cook on the hot sheet out of the oven.
• A generous coating of powdered sugar is essential for cracks—a thin layer gives a smooth surface.
• The dough keeps for 48 hours in the refrigerator covered, so you can prepare it the day before.
• Variation: add 1 teaspoon vanilla extract or 1 tablespoon poppy seeds for a different version.
Nutrition Facts (per serving, estimated)
| 110 kcalCalories | 2gProtein | 16gCarbs | 4gFat |