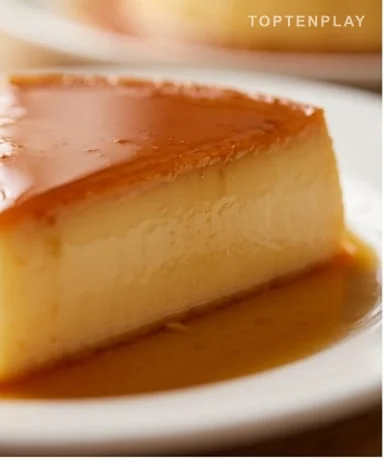
There are desserts you make once and never stop making again. The Venezuelan flan is one of them — not because it’s complex, but because it’s perfect. A denser and creamier texture than classic flan, a caramel that slowly flows onto the plate, and an ingredient list that always surprises with its simplicity.
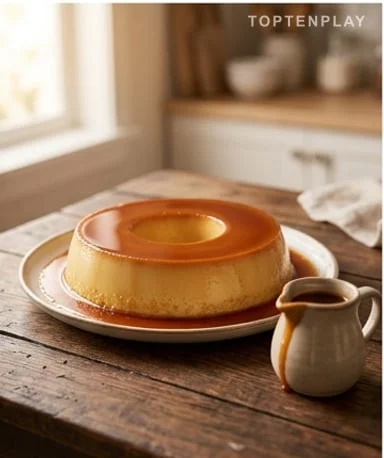
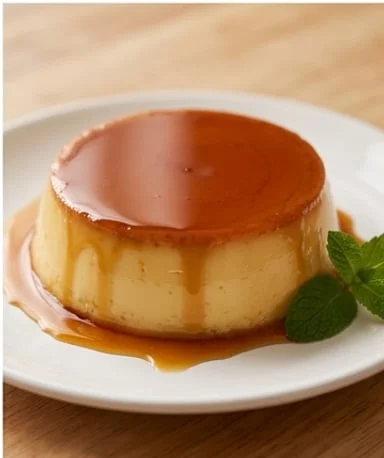
When it comes out of the refrigerator, the flan trembles slightly when you touch the mold. That’s a good sign. The caramel, dark amber in color, has formed a thin liquid layer at the bottom — it will settle on top when unmolded, shiny and slightly sticky. The first spoonful reveals an almost silky texture, dense without being compact, with that milky sweetness that condensed milk brings. The vanilla scent is subtle but present, the sweet base of a dessert that doesn’t need to show off.
Why you’ll love this recipe
Ingredient Notes
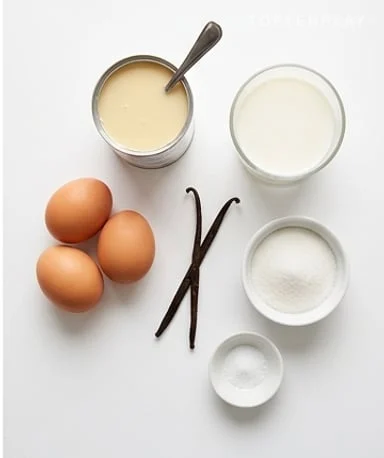
Five basic ingredients — yet the result is spectacular. Everything hinges on technique, not the shopping list.
- Sweetened condensed milk (400 g) : It gives the Venezuelan flan its characteristic richness and denser texture than the classic version. It brings both sugar and concentrated fat that makes the mixture creamy. Choose a standard brand, never light — ‘light’ versions give less firm set and less silky texture after cooking.
- Whole milk (400 ml) : It thins the mixture and balances the richness of condensed milk without overpowering it. Semi-skimmed works but the result will be slightly less creamy. Skimmed milk is to be avoided: the texture becomes too light and loses the characteristic meltiness we’re looking for.
- 4 whole eggs : Eggs structure the flan during cooking — they make it hold once unmolded. Too many eggs and the result becomes firm, almost rubbery. Too few, and the flan collapses. Four for 400 ml of milk is the right ratio. Take them out of the refrigerator in advance to avoid thermal shock in the preparation that could cause slight premature coagulation.
- White sugar (150 g, for caramel) : Regular white sugar is perfect here — it caramelizes predictably and gives a clear amber color. Brown or cane sugar caramelizes differently and can give a more pronounced taste, not always desirable on such a delicate dessert. The two tablespoons of water at the beginning slow down crystallization and give more control over the color, especially when you’re not yet experienced.
- Vanilla extract (1 teaspoon) : It subtly flavors the base without dominating. A real vanilla bean scraped is better if you have one: infuse the seeds in warm milk for ten minutes before adding the eggs. Liquid extract works very well too. Synthetic vanillin aroma, on the other hand, leaves an artificial note that comes out unpleasantly after cooking.
Caramel, a matter of seconds
Caramel is the step that scares the most, and it’s often the one that gets rushed. Pour the sugar with a drizzle of water into a heavy-bottomed saucepan, place over medium heat, and don’t touch. The temptation to stir is strong — you must resist. The sugar first melts at the edges, then in the center, forming golden areas that gradually spread. The color changes quickly: from pale yellow to golden, then amber, then dark brown. It’s between light amber and medium amber that you should stop — you recognize the right moment by the slightly toasted smell rising from the pan, almost nutty, before it tips into bitter. A too-light caramel will lack depth. A too-dark caramel will be frankly unpleasant. Pour immediately into the mold and tilt to cover the entire bottom before it sets. The dry crackle of hot caramel against the cold mold signals that the texture is starting to solidify — you only have a few seconds. Let cool completely before pouring anything over it.
Mixing without getting carried away
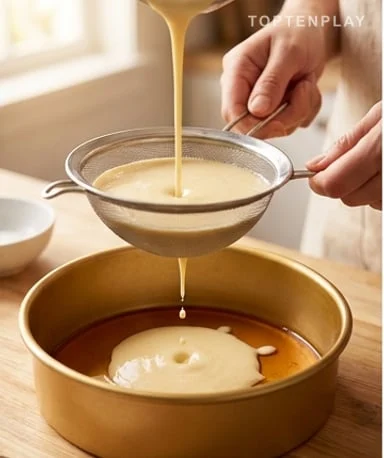
The classic mistake with this flan is whisking the mixture as if for an omelet. Air bubbles incorporated during whisking end up in the final texture as small cavities — the flan loses its smoothness and takes on a consistency closer to scrambled eggs rather than cream. Crack the eggs into a large bowl, mix gently with a fork or whisk in slow movements, just to combine. Add the condensed milk slowly while mixing, then the whole milk, vanilla, and pinch of salt. The mixture should be homogeneous and pale yellow, almost cream-colored. Then strain through a fine sieve — this step is not optional. It catches the chalazae (the small white filaments around the egg yolk) and any lumps, and guarantees a visually and texturally flawless result.
The transformative cooking
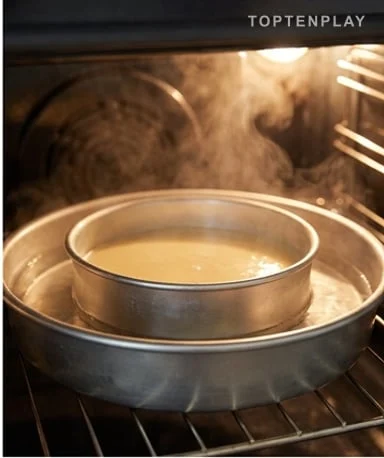
The water bath is not a chef’s whim. It’s about keeping the flan at a maximum temperature of 80-85°C at the core — well below boiling point — to coagulate the eggs slowly and evenly. Direct cooking, even at 160°C, heats the edges too quickly and produces a grainy texture on the outside while the center remains under-set. Place the mold in a large deep dish, pour hot water halfway up the mold, and bake at 160°C in a preheated oven. The duration is 50 to 60 minutes depending on the depth of the mold: a wide, shallow mold cooks faster. To check doneness, take the water bath out of the oven and gently shake the mold. The edges should be fully set; the center still slightly jiggly, like a panna cotta. If the center is still liquid, put back for five minutes and retest. If everything is firm and rigid, the flan is overcooked — it will be okay, but the texture won’t be as silky.
Resting, the non-negotiable step
Take the flan out of the water bath and let it cool to room temperature, about one hour. Then, into the refrigerator for at least six hours. Overnight is even better. This resting time serves two essential purposes. First, the texture consolidates and stabilizes — a flan unmolded too early collapses or breaks on the plate. Second, the solidified caramel at the bottom of the mold gradually liquefies in contact with the flan’s moisture: this is what gives that flowing, amber, shiny caramel when unmolded. A flan taken out after only two hours will still have partially solid caramel that won’t flow. To unmold, run a thin knife blade all around the mold, place a inverted deep plate on top, and flip with a decisive motion. The caramel then slowly flows over the sides, golden brown, with that shine that makes all the difference between a successful flan and a merely correct one.
Tips & Tricks
- Never whip the flan mixture. Even with the best intentions, vigorous whisking incorporates air bubbles that give a porous and grainy texture after cooking. Mix with a fork or whisk with slow movements, just enough to combine the ingredients — no more.
- Always strain the mixture before pouring into the mold. The fine sieve removes chalazae and small lumps invisible to the eye that would create texture irregularities once cooked. It’s two seconds of work for a visually flawless result.
- Check doneness by shaking the mold, not by piercing with a skewer. A skewer doesn’t tell you about the jiggle of the center — yet it’s precisely this slight gelatinous tremble that indicates perfect cooking. If everything is rigid, it’s already too late.
- Plan for a full night of rest rather than the minimum six hours. The longer the flan rests, the more the caramel liquefies and the more the texture consolidates in the cold. A flan prepared the evening before for the next day’s lunch is always superior to a flan made in the morning for lunch.
Can I replace whole milk with semi-skimmed milk?
Yes, semi-skimmed works, but the final texture will be slightly less creamy. Whole milk provides fat that contributes to the characteristic meltiness of Venezuelan flan — a detail that matters on such a simple dessert. Skimmed milk should be avoided: the result becomes too light and loses structure.
How do I know if the caramel is the right color?
Aim for a medium amber, comparable to the color of dark honey or amber whiskey. The reliable indicator is the smell: a slightly toasted note, almost nutty, signals you’re at the right stage. As soon as this smell appears, pour immediately — the caramel continues to cook for a few seconds off the heat, and it tips very quickly towards bitter.
Why does my flan have bubbles and a grainy texture?
That’s almost always a sign that the mixture was over-whisked. Air bubbles incorporated during mixing get trapped in the batter and create those small cavities during cooking. The solution is simple: mix gently, with a fork or whisk in slow movements, and always strain the mixture through a fine sieve before pouring into the mold.
Can I unmold the flan after two or three hours?
Technically possible, but the result will be disappointing. After only two or three hours, the caramel at the bottom of the mold is still partially solid and won’t flow when unmolded. The flan texture itself won’t have had time to set — it risks breaking or collapsing on the plate. Six hours minimum, a full night for a truly clean result.
Can I cook the flan without a water bath?
It’s not recommended. The water bath maintains a maximum temperature of about 100°C around the mold, allowing slow, even cooking of the eggs. Without a water bath, the direct heat of the oven cooks the edges too quickly and produces a grainy, dry texture on the outside. If you don’t have a large dish, any deep dish larger than the mold will work for a water bath.
Can I flavor the flan with something other than vanilla?
Yes, and that’s where the recipe becomes fun to customize. A teaspoon of instant coffee dissolved in warm milk gives a very mild coffee flan. Melted white chocolate (about 80g) incorporated into the mixture yields a more indulgent version. Coconut milk as a partial replacement for whole milk (200ml) adds a subtle exotic note without altering the base texture.
Ultra Creamy Venezuelan Flan
Venezuelan
Dessert
The Venezuelan flan is the creamiest, meltiest version that exists. Five ingredients, precise technique, and the result always impresses when unmolded — shiny caramel included.
Ingredients
- 150 g white sugar
- 2 tbsp water (for caramel)
- 4 whole eggs
- 400 g sweetened condensed milk (1 standard can)
- 400 ml whole milk
- 1 tsp vanilla extract
- 1 pinch salt
Instructions
- 1Pour the sugar and water into a heavy-bottomed saucepan. Heat over medium heat without stirring until you get a medium amber caramel — honey color, with a slightly toasted smell. Pour immediately into the flan mold and tilt to cover the entire bottom. Let cool completely.
- 2In a large bowl, crack the eggs and mix gently with a fork without whisking. Add the sweetened condensed milk while pouring slowly, mix, then incorporate the whole milk, vanilla, and salt. The mixture should be homogeneous and pale yellow.
- 3Strain the mixture through a fine sieve to remove egg filaments and any lumps. Pour gently into the caramelized mold.
- 4Place the mold in a large deep dish. Pour hot water into the dish halfway up the mold to create a water bath. Bake at 160°C (preheated oven) for 50 to 60 minutes.
- 5Check doneness by gently shaking the mold: the edges should be set, the center still slightly jiggly. Remove from the water bath and let cool to room temperature for one hour.
- 6Cover with plastic wrap and refrigerate for at least 6 hours, ideally overnight. To unmold, run a thin knife blade around the mold, place an inverted deep plate on top, and flip with a decisive motion. Serve chilled.
Notes
• Never whip the flan mixture: air bubbles incorporated give a grainy texture after cooking. Mix with slow movements.
• The fine sieve before pouring into the mold is essential for a smooth result without texture defects.
• A too-light caramel will lack depth; a too-dark caramel will be bitter. Aim for a medium amber color — remove from heat as soon as the slightly toasted smell appears.
• The flan keeps in the refrigerator for up to 3 days, covered with plastic wrap. The texture improves slightly after 24 hours.
Nutrition Facts (per serving, estimated)
| 395 kcalCalories | 11 gProtein | 64 gCarbs | 11 gFat |