Salmon loaf — two words that make half of people run away before even putting on an apron. That’s the reputation of this dish: dated, dry, a post-war relic you eat because you have no choice. Yet, this six-ingredient salmon loaf, forty-five minutes in the oven and costing next to nothing, has become one of those requested dishes in my kitchen.
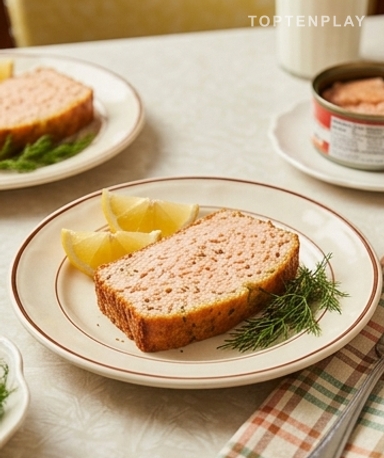
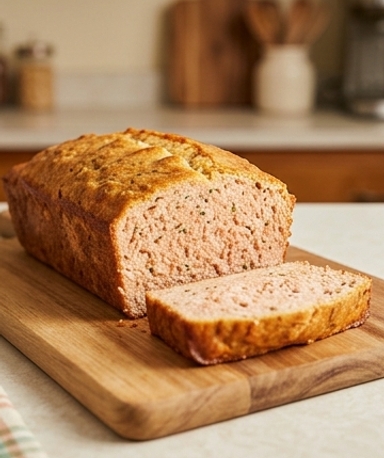
Take it out of the oven, let it sit for two minutes. The crust is golden like light caramel, slightly cracked on top, with that warm cracker smell mixed with salmon and dried herbs that has had time to settle during cooking. When you slice it, the blade passes without resistance into a pink and compact interior — one that holds well but doesn’t crumble. It’s soft, warm, and smells like the cooking of someone who has time on their hands.
Why you’ll love this recipe
Ingredient Notes
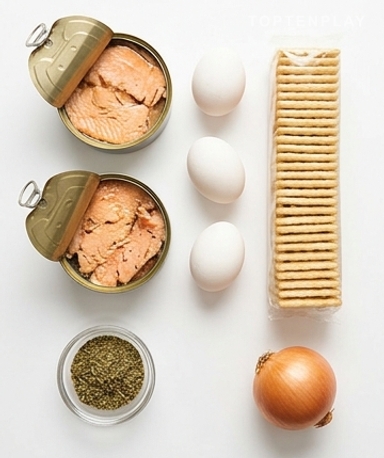
Six simple pantry ingredients are enough to prepare this 1950s American classic: canned salmon, eggs, crackers, and a few aromatics.
- Canned salmon : Get sockeye red salmon if you can find it — the color is much nicer and the taste more pronounced. Otherwise, classic pink salmon works very well. Drain it carefully and remove the bones with your fingers; it takes thirty seconds.
- Salted crackers like Tuc or Ritz : They are the binder and the seasoning at the same time. Crumble them coarsely by hand, not into a fine powder — you want to feel a few small fragments in the crumb. Ritz crackers bring a light buttery taste that pairs beautifully with the salmon.
- Eggs : Two whole eggs, beaten before incorporating. They provide the structure. Without them, the loaf falls into crumbs at the first slice.
- Onion : Half an onion, preferably grated. When grated, it completely disappears into the mix without being noticed, but it adds depth. Finely chopped, its presence is more assertive. It’s up to your preference.
- Dried herbs : Dill and parsley, if you can. Dill with salmon has always been a natural pairing. Otherwise, a blend of herbes de Provence will do — the result will be less precise but still good.
Why this dish deserves a real chance
The first time I prepared this salmon loaf, I didn’t quite believe in it. An old American fifties dish, a recipe found at the back of an old family cookbook — it didn’t promise much. But there is something in the way the crackers slowly absorb the salmon juices during cooking, something melting and comforting that you don’t really suspect before tasting. It’s the kind of dish you prepare on a pressure-free Saturday afternoon, eat lukewarm with a green salad and bread, and go for a second slice wondering what makes it so satisfying. Not spectacular. Just good, deeply.
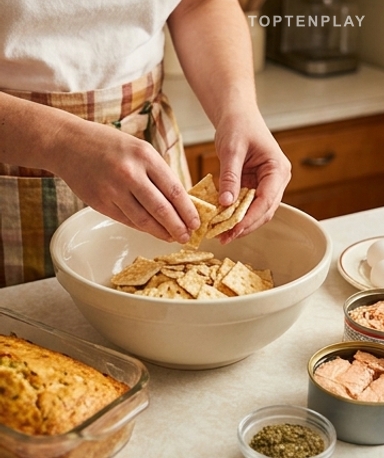
Preparation: the secret is not to overwork the mixture
Crumble the crackers in your hands directly over the bowl — no need for a blender, a few fragments the size of a fingernail are perfect. Add the flaked salmon, beaten eggs, grated onion, and herbs. Now mix with your hands. Not a minute more than necessary. The mixture should remain a bit uneven — if you work it too much, the texture becomes compact and heavy when cooked, and you lose that fluffiness we’re looking for. You just want everything combined so it holds together when you shape the loaf in the pan.
In the oven, it does all the work for you
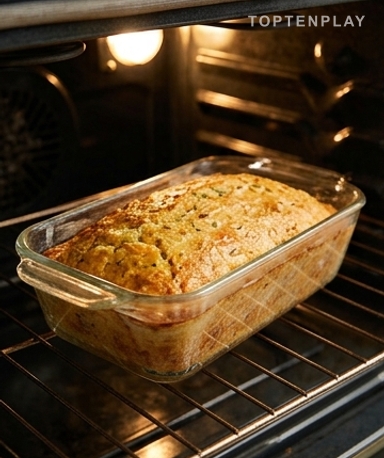
Pour the mixture into a buttered loaf pan and press down lightly with the back of a spoon. The top won’t be perfectly smooth — that’s fine. Those little irregularities brown in the oven and create that slightly crunchy crust. Bake at 180°C. After twenty minutes, the smell of buttery crackers and herbs starts to fill the kitchen, warm and familiar. That’s a good sign. After forty-five minutes, the surface is light bronze, almost caramel, and the loaf has pulled away slightly from the sides of the pan.
The part everyone skips: the five-minute rest
Take the pan out of the oven and resist. Five minutes. Maybe ten. The salmon loaf needs this time to firm up before slicing — if you slice too early, the pieces collapse and the interior, still too soft, won’t hold on the plate. This rest is the difference between a beautiful, clean, pink, and compact slice and something that gets crushed. Use the time to make a quick sauce: a spoonful of thick crème fraîche, the juice of half a lemon, and fresh dill if you have some. Simple. That’s enough.
Tips & Tricks
- Draining the salmon well is non-negotiable. A can that is too wet makes the loaf soft in the middle and the crust never forms properly — take the time to squeeze the fish in your hands before adding it.
- The loaf keeps in the fridge for two days without any problem. Sliced cold with whole-grain mustard, it’s even better than when it first comes out of the oven — the flavors have had time to blend.
- If the surface cracks too much during cooking, cover it with aluminum foil for the first twenty minutes. This happens with fast-heating ovens and has no impact on the taste.

Can I use fresh salmon instead of canned salmon?
Yes, about 350g of cooked and flaked fresh salmon perfectly replaces the two cans. Simply poach it in simmering water for 8 to 10 minutes before adding it. The result is more delicate, but the original recipe is designed for canned salmon — that’s what gives it its characteristic moistness.
Why does my salmon loaf crumble when sliced?
Two possible reasons: either the salmon wasn’t drained enough and the mixture was too wet, or you didn’t let the loaf rest long enough after baking. Five to ten minutes in the pan before taking it out is essential for the structure to firm up.
Can I prepare this salmon loaf in advance?
Absolutely. Assemble the mixture the day before, pour it into the buttered pan, cover with plastic wrap, and refrigerate. The next day, bake it directly — allow 5 extra minutes of cooking time if the pan comes from the cold.
How to store leftovers and how to reheat them?
Wrap the slices in plastic wrap and keep them in the refrigerator for up to two days. To reheat, place in the oven at 160°C for 10 minutes, covered with foil so it doesn’t dry out. Cold with whole-grain mustard is also a very good option.
What to serve with salmon loaf?
A green salad with a lemony vinaigrette is the classic accompaniment. For a sauce, a crème fraîche with dill and lemon is a natural choice — just mix two tablespoons of thick crème fraîche with lemon juice and fresh or dried dill.
Can I freeze this dish?
Yes, in individual slices wrapped in plastic wrap and then placed in a freezer bag. Keeps for up to a month. Thaw in the refrigerator overnight and reheat in a gentle oven. The texture will be slightly less firm than fresh, but perfectly fine.
Retro Baked Salmon Loaf
American
Main course
A salmon loaf that is moist inside and golden on the surface, prepared with six pantry staples. The comforting 1950s recipe, as simple as it is effective.
Ingredients
- 2 cans (400g drained) canned salmon (pink or red salmon)
- 100g salted crackers like Tuc or Ritz, coarsely crumbled by hand
- 2 whole eggs, beaten
- 1/2 (about 60g) medium onion, finely grated
- 1 tablespoon fresh lemon juice
- 1 teaspoon dried dill
- 1 teaspoon dried parsley
- to taste salt and freshly ground black pepper
- a little butter for the pan
Instructions
- 1Preheat the oven to 180°C (fan oven). Generously butter a standard loaf pan.
- 2Carefully drain the salmon by squeezing it in your hands over the sink. Flake it into a large bowl and remove any visible bones.
- 3Add the coarsely crumbled crackers, grated onion, beaten eggs, lemon juice, dill, and parsley. Season with salt and pepper.
- 4Mix by hand until the mass is homogeneous. Stop as soon as everything is incorporated — do not overwork.
- 5Pour into the buttered pan and pack down lightly with the back of a spoon. Leave the top slightly irregular.
- 6Bake for 40 to 45 minutes, until the surface is golden like light caramel and the edges slightly pull away from the pan.
- 7Let rest for 5 to 10 minutes in the pan before unmolding and slicing.
Notes
• Storage: 2 days in the refrigerator wrapped in plastic wrap. Reheat at 160°C for 10 minutes covered with foil.
• Make ahead: assemble the mixture the day before in the pan, wrap, and refrigerate. The next day, bake directly, adding 5 minutes to the cooking time.
• Cheesy variation: sprinkle 50g of grated Emmental cheese on top during the last 10 minutes of baking to get a golden, crispy crust.
Nutrition Facts (per serving, estimated)
| 200 kcalCalories | 17gProtein | 11gCarbs | 9gFat |