It’s a grey autumn Sunday, and you’ve got an hour to kill. You don’t feel like making a puff pastry with complicated folding, or a cake that requires special equipment. The layered apple tart is exactly that: an ordinary recipe that yields an extraordinary result.
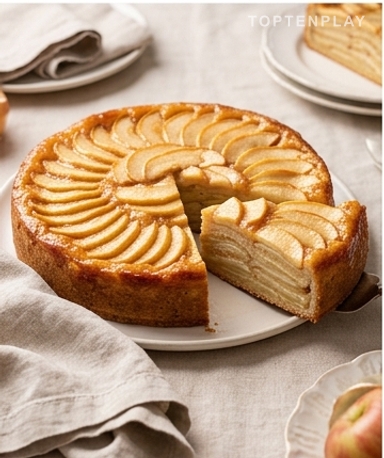
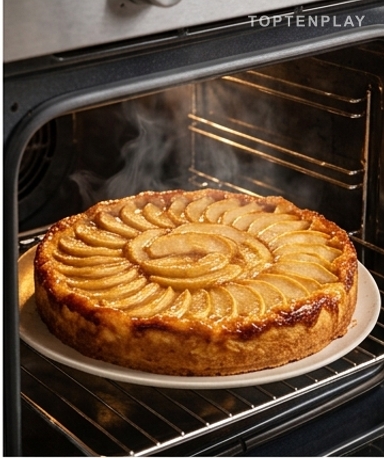
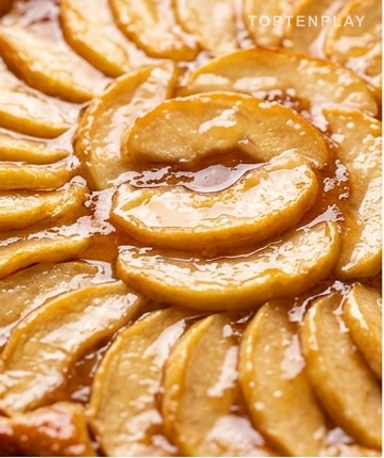
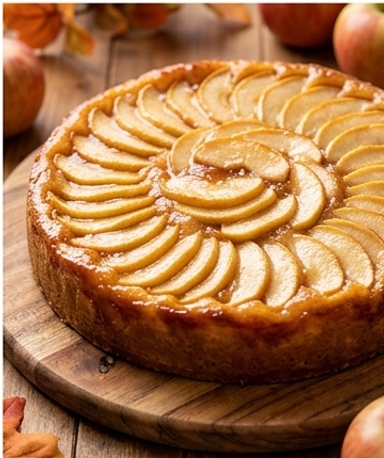
The first thing that strikes you is the color. Not just ‘golden’ — golden like a light caramel, with a surface lacquered by a peach jam glaze that catches the light. The top slices are slightly translucent at the edges and soft at the core. The smell coming out of the oven blends cinnamon, vanilla, and the caramelized sugar of the apples — the kind of scent that draws people into the kitchen without being called. And when you cut the first slice, the alternating layers of batter-apples-batter-apples appear, compact and melting at the same time.
Why you’ll love this recipe
Ingredient Notes
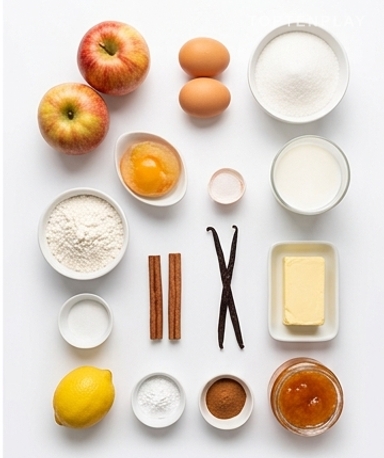
Everything you need for this tart: apples, a light vanilla-cinnamon batter, and a touch of peach jam for the finish.
- The apples : Go for Golden Delicious, Cox’s Orange Pippin, or Pink Lady. Goldens are the easiest to work with: they hold up well during baking without turning into applesauce, and their mild flavor pairs perfectly with cinnamon. Avoid Granny Smith — too tart, they unbalance the sugar in the batter.
- Peach jam : This is what gives the surface that glassy look. Heat it for 30 seconds in the microwave to liquefy it slightly before brushing it on — it spreads much better. Any brand will do, as long as it’s real jam and not industrial glaze.
- Cinnamon and vanilla : The duo that creates the scent. Use ground cinnamon here, not sticks — it needs to melt into the batter. Liquid vanilla extract is perfect, but if you have a pod lying around, scrape the seeds in: the difference is visible with those little black specks in the cake.
- Melted butter : 60 grams, melted and cooled — not hot. If it’s still piping hot when you pour it over the eggs, you risk partially cooking them and getting a grainy batter. Let it rest for 5 minutes after melting, that’s all.
Why the tiered effect isn’t complicated at all
The technique looks intimidating on paper. In practice, it’s just an alternation: batter, apples, batter, apples. No need for a ruler, no need for millimeter precision. The batter is liquid and naturally seeps between the slices during baking — it does the work for you. The only thing to remember: finish with a neatly arranged layer of apples on top. That’s what creates the look once the tart is baked.
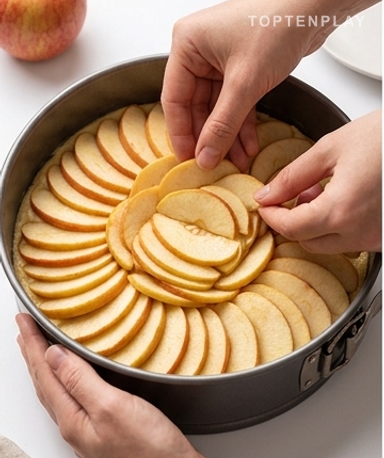
The part everyone rushes: slicing the apples
Thick slices result in a tart where the apples don’t cook uniformly and the batter doesn’t distribute well between layers. Aim for 3 to 4 millimetres. No need for a mandoline if your knife is decent — just take your time. Pour the lemon juice over the apples immediately after slicing: it prevents browning and adds a slight acidity that contrasts with the sweetness of the batter. The smell of lemon-soaked apples at that moment is already promising.
What happens during those 60 minutes in the oven
The oven at 180°C is the perfect temperature to let the batter set without burning the apples on top. Around 40 minutes in, you’ll start to smell the fruit sugar caramelizing slightly — that’s the signal that it’s progressing well. The tart is ready when the surface shows a clear golden brown, like light caramel, and a knife blade comes out clean from the center. If the top browns too quickly, place a sheet of foil loosely over it.
The final glaze: two minutes that almost nobody does
Most people skip this step. That’s a mistake. Warmed peach jam, brushed onto the still-warm tart, penetrates the apples slightly and creates that lacquered finish seen in bakeries. A thin layer is enough. The peach flavor almost disappears when cold — just a hint of fruitiness remains that highlights the apples without masking them.
Tips & Tricks
- Wait until the tart is completely cold before unmolding, at least 30 minutes. When hot, the structure is fragile and it may break coming out of the tin.
- If you prepare the tart the day before, don’t apply the glaze until serving — it keeps the shine intact and prevents the surface from softening in the fridge.
- The batter should be fluid, almost like a slightly thick crepe batter. If it’s too dense, it won’t seep between the layers well — add a few milliliters of milk if needed.
Can I prepare this tart the day before?
Yes, and it’s actually recommended. A night in the fridge allows the flavors to settle and the texture becomes more melting. Wait until the next morning to apply the jam glaze — it will keep all its shine for serving.
What variety of apples should I choose?
Golden Delicious is the safest choice: they hold up well during baking without turning to mush and their sweetness pairs perfectly with cinnamon. Cox’s Orange Pippin or Pink Lady also work very well. Avoid Granny Smiths, which are too acidic for this recipe.
How do I know if the tart is properly cooked?
Two signs: the surface should be a clear golden brown and a knife blade inserted into the center should come out clean and dry. If the top browns too quickly before the 60 minutes are up, cover loosely with aluminum foil.
Can I replace the peach jam?
Absolutely. Apricot jam gives an almost identical result — it’s actually the classic choice in French pastries. You can also use plum or apple jam. The main thing is that it should be clear so as not to darken the look of the tart.
Can this layered apple tart be frozen?
Yes, but without the glaze. Freeze the slices individually in plastic wrap; they will keep for up to 2 months. Thaw at room temperature and apply the jam at the last moment once the tart is defrosted.
My oven runs hot — how should I adjust the baking?
Reduce the heat to 170°C and start checking after 50 minutes. The knife test remains the best indicator. If the tart colors too quickly on top but the inside is still wet, it’s a sign of a too-hot oven — cover and continue baking gently.
Layered Apple Tart
French
Dessert
A soft tart with a vanilla-cinnamon batter and layers of melting apples, finished with a shiny peach jam glaze. Simple to make, spectacular when sliced.
Ingredients
- 6 (about 900g) Golden Delicious or Cox’s Orange Pippin apples
- 150g caster sugar
- 3 eggs
- 150g flour
- 150ml milk
- 10g (1 sachet) baking powder
- 60g melted butter, cooled
- 1 teaspoon liquid vanilla extract
- 1/2 teaspoon ground cinnamon
- 1 lemon (juice)
- 2 tablespoons peach jam (for the glaze)
Instructions
- 1Preheat the oven to 180°C. Grease and flour a 22-24 cm round cake tin.
- 2Peel the apples, remove the core and cut into thin slices of 3-4 mm. Drizzle immediately with lemon juice.
- 3Whisk the eggs with the sugar until the mixture is frothy and slightly pale.
- 4Add the vanilla, cinnamon, cooled melted butter, and milk. Mix well.
- 5Stir in the flour and baking powder. Mix until you have a smooth, fluid batter.
- 6Pour a thin layer of batter into the tin. Arrange a layer of apple slices. Repeat the alternation, finishing with a beautiful layer of neatly arranged apples on top.
- 7Bake for 60 minutes, until the surface is a rich golden brown and a knife comes out clean from the center.
- 8Lightly heat the peach jam and brush the surface of the still-warm tart using a pastry brush.
- 9Leave to cool for at least 30 minutes before unmolding and serving.
Notes
• Storage: 3 days in the refrigerator covered with plastic wrap. It’s often better the next day.
• Variation: Replace one apple with a pear for a more complex flavor profile, or add 30g of almond flour to the batter for extra softness.
• Make ahead: The tart can be prepared and baked the day before — apply the glaze on the day, just before serving.
Nutrition Facts (per serving, estimated)
| 320 kcalCalories | 7gProtein | 55gCarbs | 9gFat |