Have you ever ordered a Wendy’s Frosty and wished there was one in your fridge at 10 PM? That’s no longer a problem. Five minutes, four ingredients, and you have something that truly tastes like the original — without leaving the house.
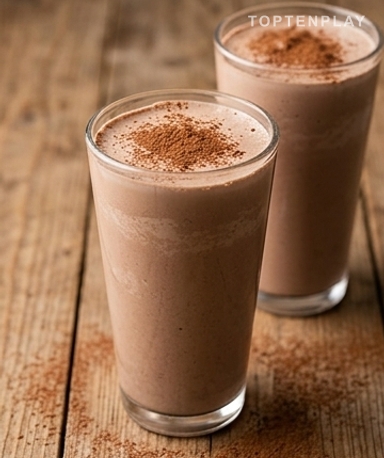
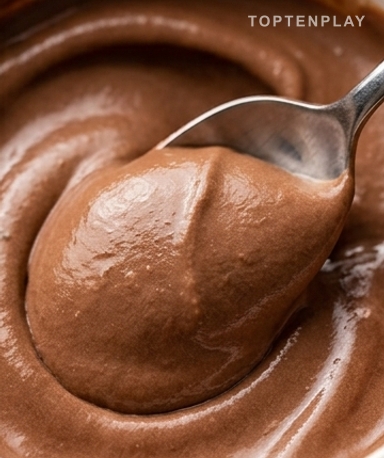
The color is that of melted dark chocolate, almost brown, with that glossy sheen that promises something thick and rich. The texture? Somewhere between ice cream and a milkshake, neither too liquid nor too solid — a spoon sinks in with a slight resistance, like a dense mousse. The smell of cocoa blends with a touch of vanilla, sweet and rounded. It’s cold, creamy, and can be sipped as much as it can be eaten.
Why you’ll love this recipe
Ingredient Notes
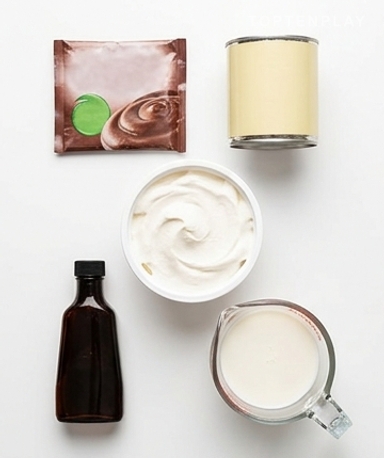
Four ingredients are enough to recreate the legendary Wendy’s Frosty at home.
- Instant chocolate pudding : This is the backbone of the recipe. It provides both the chocolate flavor and, most importantly, the natural thickening that gives the Frosty its characteristic consistency. Grab a standard size of about 100g, in instant powder — not the cook-and-serve kind. The brand doesn’t matter much.
- Sweetened condensed milk : Do not replace it with evaporated milk — it really isn’t the same thing. This is what brings the sweetness and creamy richness. Half a can is enough for two generous servings. The rest keeps in the fridge for a few days in a closed jar.
- Stabilized whipped topping (Cool Whip type) : The secret to the texture. It lightens the whole thing without making it liquid. Look for stabilized whipped cream in a tub — get the plain version, not vanilla. If you can’t find it, homemade heavy whipped cream will also work.
- Whole milk : This is solely used to adjust the final consistency. Start with less than planned and add as you go depending on the desired thickness. Semi-skimmed works too, but the result will be slightly less smooth.
Laying the foundation
Pour the pudding powder into a large bowl with the sweetened condensed milk. Mix with a fork — no need for an electric whisk. Within seconds, the powder is absorbed and you get a dense, chocolate-brown paste that sticks slightly to the sides of the bowl. This is your base. It should be smooth, with no visible lumps. Add the milk in a thin stream, spoon by spoon, continuing to mix. You are looking for a thick texture, not liquid — think of a very firm stirred yogurt.
The trick that changes everything
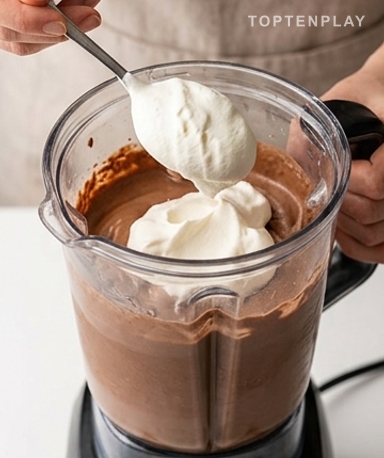
Fold in the whipped topping with a spatula, not a whisk. The movement should be slow, lifting the mass from the bottom as if you were folding cake batter. If you whisk vigorously, you break the air bubbles and lose the lightness. You’ll almost hear a dull thud when the cream melts into the chocolate base. The mixture lightens slightly and takes on a caramelized brown hue, almost like very concentrated café au lait.
Thirty seconds in the blender
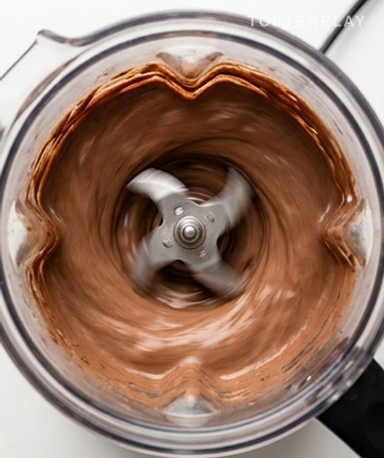
Pour everything into the blender. Blend at maximum power for twenty to thirty seconds — no more. The sound should change in a few seconds: from a growling sound at the start, it moves to something smoother and more steady when the texture is achieved. Stop as soon as it’s homogenous. Taste it. Too thick? A splash of milk. Too liquid? Fifteen minutes in the freezer before serving. The perfect consistency clings to the spoon without dripping.
Presentation makes the difference
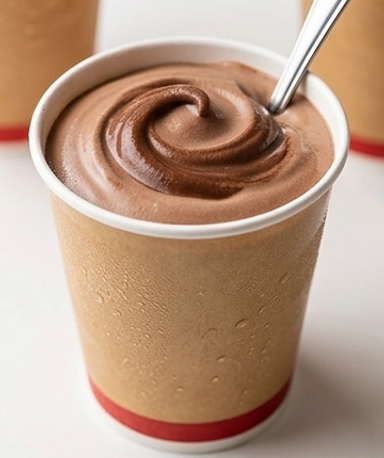
Put your glasses in the freezer five minutes before serving. A wide straw or a long spoon, depending on the final thickness. If you have time, cover the glasses with plastic wrap and let them rest for twenty minutes in the freezer: the texture firms up further and the experience gets even closer to the original. Serve immediately — the Frosty starts to melt after fifteen minutes at room temperature, and it quickly loses what makes it interesting.
Tips & Tricks
- Don’t skip the condensed milk thinking the pudding’s sugar will be enough — without it, you get an ordinary milkshake, not that dense, rich side that defines the Frosty.
- To intensify the chocolate taste without extra sugar, add a small teaspoon of unsweetened cocoa powder to the base. It really changes the depth of the flavor.
- If you’re making this for kids and want an even more solid version, pour into popsicle molds and freeze for two hours — you get Frosty pops that hold up well.
Can the Frosty be prepared in advance?
Yes, but with a limit. You can prepare the mixture and keep it in the freezer for up to 2 hours before serving. Beyond that, it hardens too much and becomes difficult to work with. Take it out 5 minutes before putting it in the blender.
How to replace Cool Whip if unavailable?
Whip 200ml of very cold heavy liquid cream (min. 30% fat) until firm. It’s not stabilized like Cool Whip but works perfectly in this recipe. Work quickly and keep the mixture cold.
How to get an even thicker texture, like the real Frosty?
After blending, pour into glasses and place in the freezer for 20 to 30 minutes. The texture firms up without completely hardening and gets even closer to the Wendy’s original, which is served at a very low temperature.
Can I make a vanilla version?
Absolutely. Simply replace the chocolate pudding with an instant vanilla pudding. The result is milder, less intense, but just as creamy. You can also mix both for a marbled version.
Can I use sugar-free pudding to lighten the recipe?
Yes, and it’s even a popular WW option. With sugar-free pudding and skimmed milk instead of whole milk, you cut the calories roughly in half. The texture remains very decent, just slightly less creamy.
Homemade Wendy’s Style Frosty
American
Dessert
The famous Wendy’s frozen chocolate milkshake recreated at home in five minutes, with only four ingredients and no technique.
Ingredients
- 100g (1 sachet) instant chocolate pudding powder
- 150g (½ can) sweetened condensed milk
- 200g stabilized whipped topping (Cool Whip type or whipped cream in a tub)
- 100ml whole milk
Instructions
- 1In a large bowl, mix the pudding powder and sweetened condensed milk with a fork until you get a thick, smooth paste without lumps.
- 2Add the milk in a thin stream while mixing. The texture should remain dense — adjust the amount of milk according to desired thickness.
- 3Fold in the whipped topping with a spatula, gently lifting the mass from the bottom without whisking, to preserve the air bubbles.
- 4Pour the mixture into a blender and blend at maximum power for 20 to 30 seconds until smooth.
- 5Taste and adjust: a splash of milk if too thick, or 15 minutes in the freezer if too liquid.
- 6Pour into glasses that have been in the freezer for 5 minutes and serve immediately with a wide straw or long spoon.
Notes
• Storage: ideally consume within 20 minutes. Keeps up to 2 hours in the freezer, but will require a quick blend before serving.
• Light version: replace standard pudding with sugar-free pudding and whole milk with skimmed milk to reduce calories by about 40%.
• To intensify the chocolate flavor without extra sugar, add a teaspoon of unsweetened cocoa powder to the base before blending.
Nutrition Facts (per serving, estimated)
| 530 kcalCalories | 8gProtein | 82gCarbs | 18gFat |