

Do you remember the last dish that made you close your eyes at the first bite? Not a Michelin-star restaurant dish — just something hot, crispy, with that sauce that sticks a bit to your fingers. These honey garlic glazed chicken cutlets are exactly that: no-fuss comfort food, with a panko crust that cracks under your teeth and a sweet-savory glaze you’d want to finish with a spoon.
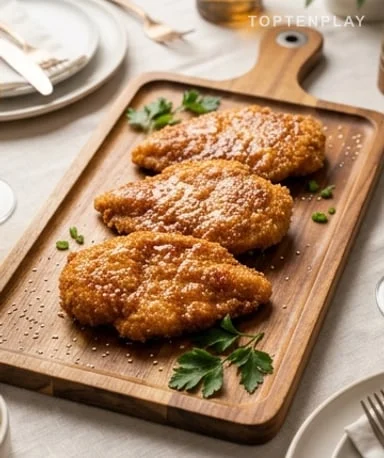
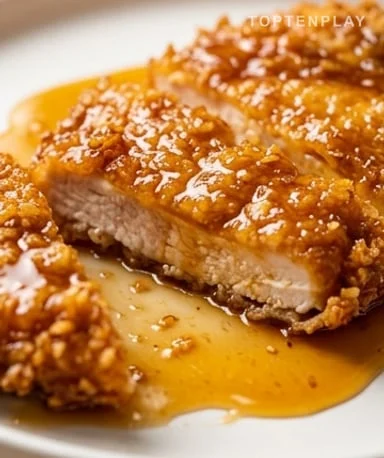
On the cutting board, the cutlets shine with a deep amber-brown, the still-warm glaze forming small glossy pools around each piece. The smell filling the kitchen blends caramelized honey, garlic sautéed in a hot base, and that slightly toasted note of golden panko. When cut, the crust resists for a fraction of a second before giving way with that dry, satisfying sound you don’t always expect from a glazed dish. The meat underneath remains tender, almost juicy — the exact opposite of the dry meat you fear with thin fillets cooked in a pan.
Why you’ll love this recipe
Ingredient Notes
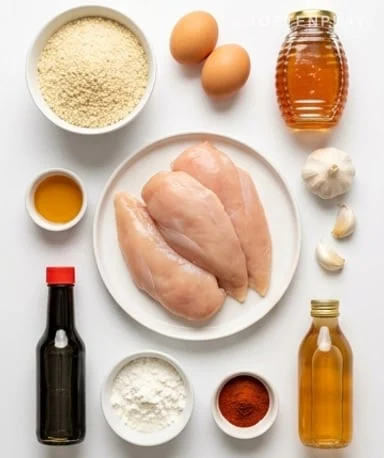
Everything you need for the crispy breading and sweet-savory glaze.
- Panko : It’s not just bigger breadcrumbs — panko is made from crustless bread, giving it a flaky, very airy texture. During cooking, it absorbs less oil and browns much more evenly. Do not substitute with fine breadcrumbs: you would lose the texture difference that makes this dish special.
- Liquid honey : It plays two roles: sweetener and caramelizing agent. Its sugars transform under heat, giving the glaze that deep amber color with a slight bitterness at the finish that balances the soy sauce. Choose a neutral honey — acacia or wildflower — rather than a strong chestnut honey that would overpower the garlic.
- Low-sodium soy sauce : It provides salt, of course, but above all umami — that depth of flavor that gives the glaze complexity far beyond simple sweet and savory. The low-sodium version is recommended because reducing the sauce concentrates sodium quickly. With regular soy sauce, the result can become frankly too salty.
- Cornstarch (cold water slurry) : It’s the texture control tool for the glaze. Always dissolve it in cold water before adding to the hot sauce — otherwise it forms lumps that are hard to undo. Add the slurry in a stream while stirring: a few seconds make the difference between a perfect coating glaze and a sauce too thick that clumps on the bottom of the pan.
- Fresh garlic : Garlic powder won’t give the same result here — fresh minced garlic releases a much more powerful aromatic oil that perfumes the entire sauce during cooking. Prefer mincing it finely rather than pressing: the small pieces remain present in the glaze and add visual and taste character to each bite.
- Apple cider vinegar : It balances the honey by providing a slight acidity in the aftertaste. Without it, the glaze can feel heavy and one-dimensional, especially if your honey is particularly sweet. Rice vinegar is a valid alternative, with a milder, less fruity profile.
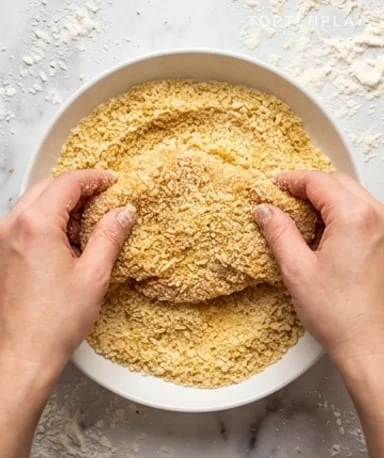
Breading: the step we often rush
Before even thinking about breading, pat the cutlets dry with paper towels. This step that many skip is crucial: surface moisture prevents the flour from adhering properly, causing the breading to peel off mid-cooking. Once dried, each cutlet goes through flour — tap off the excess — then beaten egg, then panko, pressing lightly with your palm so the flakes really stick. Season the panko with salt, pepper, and paprika before coating the meat, not after: spices incorporate better into the mass than onto an already moist surface. If you have ten minutes, let the breaded cutlets rest flat on a wire rack before cooking — the breading adheres even better once slightly air-dried.
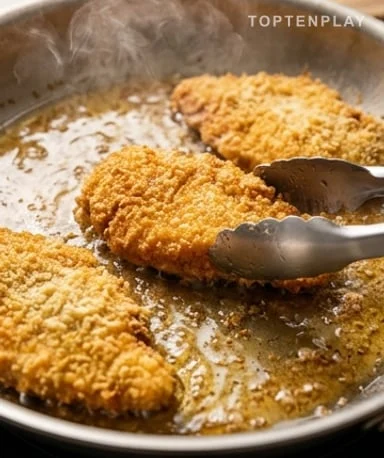
The pan: where everything really happens
Heat the oil over medium-high heat until a panko grain dropped in sizzles immediately — that’s the signal the temperature is right. If the oil isn’t hot enough, the cutlets absorb grease instead of browning, and you get a soft, heavy crust. Place the cutlets without crowding — two at a time in a large skillet, no more — to avoid dropping the temperature. The sound should be a clear, constant crackle, not a timid whisper. Cook for three to four minutes per side depending on thickness: the crust should be a deep golden brown, almost hazelnut, before flipping. Never cover the pan during cooking: trapped steam would instantly soften everything you just built with the panko.
The glaze deserves time to build
While the cutlets finish resting on a rack, prepare the glaze in a small heavy-bottomed saucepan. Sauté the minced garlic in a drop of oil over medium heat — no more than thirty seconds, just until it becomes translucent and releases its aroma, never browning, because burnt garlic makes the whole sauce bitter. Add honey, soy sauce, and vinegar, bring to a gentle boil while stirring. The sauce begins to smell strong, almost pungent, with that typical caramelized honey base that rises to the nostrils. Then pour in the cornstarch slurry in a stream while stirring: in fifteen to twenty seconds, the sauce goes from liquid to coating, with that texture that coats the back of a spoon. If it thickens too much, a tablespoon of hot water is enough to loosen it.
The final coating: thirty seconds to not ruin the crust
Transfer the cooked cutlets to the saucepan or pour the hot glaze directly into the wiped skillet, whichever is more practical. Quickly coat each piece by flipping once — no need to coat multiple times, the sauce is thick enough to stick in one pass. At this point, the kitchen smells like salted caramel and toasted sesame if you added the sesame oil at the end of the sauce. Serve immediately, sprinkled with chopped parsley or snipped chives — the green contrasts nicely with the lacquered brown of the sauce and brings welcome freshness. These cutlets are eaten hot, without waiting: they lose their crispness in a few minutes in the sauce.
Tips & Tricks
- Always dry the meat before breading: surface moisture prevents flour from adhering and causes the breading to peel off during cooking.
- Don’t press the cutlets against the pan with a spatula to speed things up — this expels juices and you end up with dry meat before even applying the glaze.
- Prepare the glaze after cooking the cutlets, not before: the sauce thickens quickly with cornstarch and does not wait well hot. It reheats in thirty seconds if needed.
- If your cutlets are thicker than 1 cm, finish cooking in the oven at 180°C for five minutes after pan-searing — the crust stays intact and the meat cooks through without risk of burning the breading.
Can chicken be replaced with turkey?
Yes, without any recipe adjustments. Thin turkey cutlets (about 1.5 cm thick) behave exactly like chicken: same breading time, same pan cooking. Choose even slices for uniform cooking.
How to keep the crust crispy after applying the glaze?
Two essential reflexes: coat the cutlets in the glaze just before serving, never in advance, and do not let them sit in the sauce. A quick coating on each side is enough — the sauce is thick enough to stick without drowning the panko.
Can these cutlets be baked instead of pan-fried?
It’s possible, but the result will be less crispy. Place the breaded cutlets on a rack set over a baking sheet, brush with oil, and bake at 210°C for 18-20 minutes, flipping halfway. Apply the glaze only in the last three minutes to prevent it from caramelizing too much and burning.
Can the breaded cutlets be prepared in advance?
Yes, up to 4 hours in advance. Place them flat on a wire rack (never stacked) and refrigerate uncovered: the dry air of the fridge firms up the breading and even improves adherence during cooking. Do not wrap them tightly, as that would be counterproductive.
Can the glaze be made in advance?
Not ideally. Cornstarch continues to thicken as it cools, resulting in a gelatinous texture that’s hard to fix. If you must prepare ahead, make the liquid base (honey, soy sauce, vinegar, garlic) in advance and add the cornstarch slurry only when heating the sauce.
What to serve with these cutlets for a complete meal?
Plain basmati rice or soba noodles absorb the excess glaze on the plate very well. To balance the sweet-savory side, a simply sautéed green vegetable — broccoli, green beans, or bok choy — brings the freshness and lightness that this dish lacks.
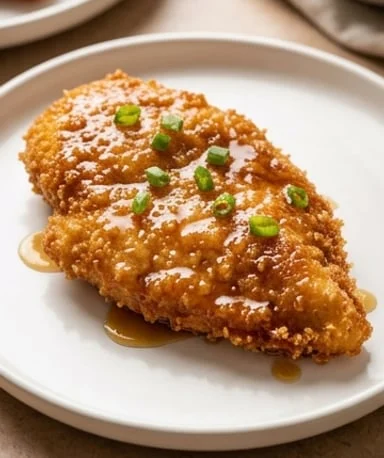
Crispy Honey Garlic Glazed Chicken Cutlets
Asian Fusion
Main course
Chicken cutlets breaded in Japanese panko, pan-fried to perfect crispiness, then coated in a thick, glossy honey-garlic-soy glaze. A comforting dish ready in 35 minutes, with a sauce that sticks to the crust without softening it.
Ingredients
- 4 thin chicken cutlets (about 150 g each, ~1.5 cm thick)
- 125 g all-purpose flour
- 2 eggs, beaten
- 150 g panko breadcrumbs
- 1 tsp salt
- ½ tsp ground black pepper
- ½ tsp sweet paprika
- 60 ml vegetable or canola oil
- 170 g liquid honey (acacia or wildflower)
- 60 ml low-sodium soy sauce
- 3 garlic cloves, finely minced
- 1 tbsp apple cider vinegar (or rice vinegar)
- ½ tsp ground ginger (optional)
- 10 g cornstarch, dissolved in 30 ml cold water
- 1 tsp sesame oil (optional)
- 1 bunch flat-leaf parsley or chives, snipped, for serving
Instructions
- 1Pat the chicken cutlets dry on both sides with paper towels. Prepare three shallow bowls: the first with the flour mixed with salt, pepper, and paprika; the second with the beaten eggs; the third with the panko.
- 2Coat each cutlet in the flour, tapping off the excess, dip in the beaten egg, then press firmly into the panko on both sides to form an even crust. Place the breaded cutlets on a wire rack.
- 3Heat the oil in a large skillet over medium-high heat. When a panko grain sizzles immediately on contact, place two cutlets without crowding. Cook for 3 to 4 minutes per side until deep golden brown. Transfer to the rack. Repeat with the remaining two cutlets.
- 4In a small heavy-bottomed saucepan, sauté the minced garlic in a drizzle of oil over medium heat for 30 seconds, without letting it brown. Add honey, soy sauce, vinegar, and ground ginger if using. Bring to a gentle boil while stirring.
- 5Pour in the cornstarch slurry in a stream while stirring continuously. The glaze thickens in 15 to 20 seconds — stop as soon as it coats the back of a spoon. Stir in sesame oil off the heat if desired.
- 6Transfer the cutlets to the warm glaze and flip each once to coat evenly. Serve immediately, sprinkled with snipped parsley or chives, with rice or noodles.
Notes
• For thick cutlets (over 1.5 cm), finish cooking in the oven at 180°C for 5 minutes after pan-searing to ensure they cook through without burning the breading.
• Honey can be replaced with an equal amount of maple syrup for a woodier, slightly less sweet glaze.
• Breaded cutlets can be stored raw on a wire rack in the refrigerator for up to 4 hours before cooking — do not wrap them to avoid softening the breading.
Nutrition Facts (per serving, estimated)
| 575 kcalCalories | 40 gProtein | 60 gCarbs | 17 gFat |


