

The smell of onions melting in hot fat, that sweet, caramelized rise that fills the kitchen in minutes — it’s the signal that something serious is being built. Braised veal shoulder with onions is one of those dishes that doesn’t need defending: it explains itself at the table, when the fork slides through the meat without resistance. The best part: you’ll spend less than half an hour actually cooking.
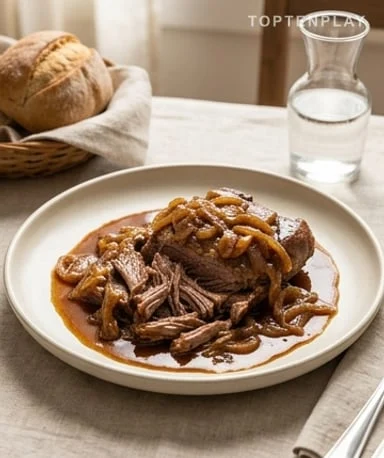
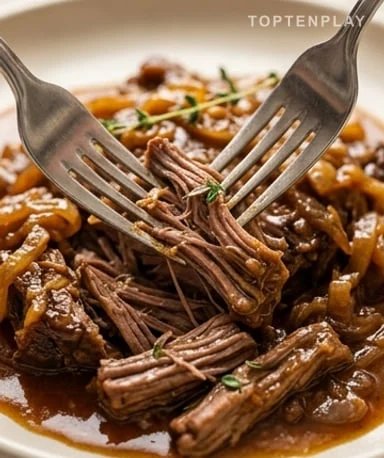
On the plate, the meat doesn’t cut — it falls apart. The fibers separate under light pressure, each bite coated in a dark sauce with amber highlights, neither too thick nor too thin. The onions have practically melted into the braising liquid, a few translucent strands still perceptible under the tooth, slightly sweet, almost confit. The aroma rising from the warm dish blends the richness of dissolved collagen, the earthy sweetness of reduced broth, and the subtle herbal background of thyme — a smell that whets the appetite before you even sit down.
Why you’ll love this recipe
Ingredient Notes
Few ingredients, nothing extravagant — that’s precisely where the intelligence of this dish lies.
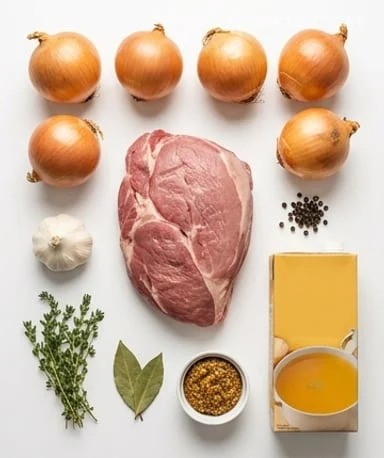
- Veal shoulder (1.8 kg) : This is the ideal cut for braising: well-marbled, rich in connective tissue, it releases its collagen during long cooking, and it’s precisely this collagen that gives the sauce that velvety texture without adding anything. Avoid lean cuts like fillet or nut — they’d dry out before tenderizing. If you have the choice, take it bone-in: the braising will be even richer, even if carving at the table becomes an exercise in precision.
- Spanish onions (4 large) : Their role here goes beyond accompaniment: they naturally thicken the sauce by melting, bring a sweet sweetness that balances the richness of the veal, and capture the meat juices deposited on the bottom of the pot. Spanish onions are preferred for their large size and natural sweetness — less pungent than classic yellow onions, they caramelize more evenly. In a pinch, sweet Cévennes onions or ordinary yellow onions work very well.
- Chicken broth (750 ml) : The braising liquid has two simultaneous missions: prevent the meat from drying out during cooking and, by slowly reducing, form the base of the final sauce. A good store-bought broth is fine, but if you have homemade, the difference in taste is noticeable. Choose low-sodium if possible — reduction concentrates salt, and you can always adjust at the end of cooking, never at the beginning.
- Mustard (2 tbsp) : Used as a rub before searing, not for its heat but for its structure. Mustard forms a thin aromatic layer on the meat that promotes browning and adds a slight acidity that cuts through the richness of the braise. Whole-grain mustard adds little pockets of flavor too. If you don’t have any, smoked paprika rubbed on the meat gives a different but equally satisfying result.
- Garlic (4 cloves) : The garlic here must absolutely not burn — it would be bitter and ruin the entire fond. Prefer whole cloves lightly crushed rather than finely minced: they release their aroma gradually into the warm liquid without ever sticking. After two and a half hours of braising, they are completely soft and can be mashed into the sauce for even more roundness.
- Bay leaves and thyme : These herbs don’t perfume — they structure. Bay brings a slightly woody and camphor-like note, thyme a herbal lightness that prevents the sauce from becoming too heavy. They work in the background, discreet but indispensable. Remove them before serving, and if you only have dried herbs, reduce quantities by half.
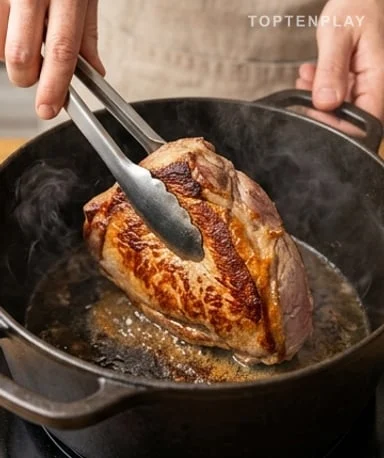
Searing is where everything is decided
Take the meat out of the fridge at least thirty minutes before starting. Cold meat placed in a hot pan immediately drops the temperature and starts boiling in its own juices rather than browning. Dry it thoroughly with paper towels — surface moisture is the direct enemy of the golden crust. Then rub the shoulder with mustard on all sides, salt generously, pepper. Heat olive oil in your cast-iron pot until it just begins to shimmer, then place the meat without moving it for four to five minutes. You hear the sear’s impact, that clear, steady sizzle that gradually subsides as the crust forms — that’s a good sign. Turn when the meat releases on its own, without forcing. Brown each side, including the ends, until uniformly dark brown. These brown bits stuck to the bottom of the pot are gold — they will become the base of your sauce.
The onions need you to trust them
Once the meat is set aside on a plate, lower the heat and add the onions to the same pot without cleaning it. They will first sizzle on contact with the still-hot fat, then gradually soften and take on color. Don’t rush them. The temptation is great to turn up the heat to go faster, but burnt onions give a persistent bitterness that won’t leave. Count about ten minutes over medium-low heat, stirring occasionally, until they are golden and translucent. At that moment, add the crushed garlic and scrape the pot bottom with a spatula to release the seared bits — an operation that smells intensely of meat juice and caramelized onion mixed, and literally forms the aromatic base of your sauce.
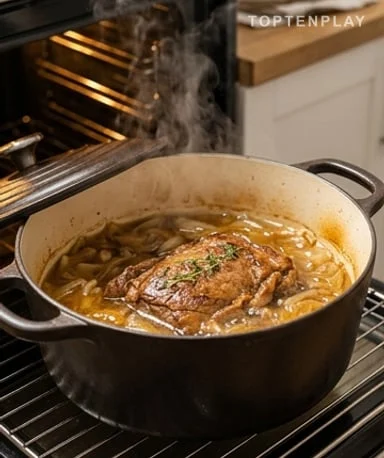
In the oven, patience does more than talent
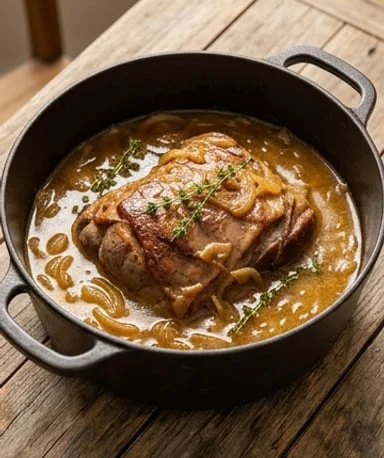
Return the meat to the pot, pour in the hot broth until it comes halfway up the meat, slip in the bay and thyme, cover tightly, and put in the oven at 160°C. Hot but not violent — that’s the principle of braising. At this temperature, collagen slowly melts over two to three hours without the meat drying out. After one hour, take a quick look: the liquid should be gently simmering, with a few lazy bubbles on the surface. If it’s boiling vigorously, lower the temperature by about twenty degrees. The meat is done when you can insert a fork and pull it out without resistance, when the fibers separate at the slightest pull. Generally between two hours and two and a half depending on the thickness of the piece — a little longer if you have a bone-in cut.
The sauce deserves ten minutes of attention
Carefully remove the meat — it will be fragile — and place it on a cutting board. Cover it with aluminum foil to rest while you finish the sauce. Remove the herbs and reduce the braising liquid over high heat, uncovered, for five to eight minutes. The sauce will gradually thicken, going from a clear, mobile liquid to something coating, almost glossy. Taste and adjust salt only at the end of reduction — not before, because concentration changes the salt balance unpredictably. If you like a smoother sauce, briefly blend with an immersion blender to incorporate the melted onions. If you prefer to see the pieces, leave it as is.
Plate simply and let the sauce speak
Slice or shred the meat according to your preference — with a good well-braised piece, both options yield very satisfying results. Arrange it in a shallow dish or directly in the pot at the center of the table, with the sauce poured generously over the top. A touch of chopped flat-leaf parsley or fresh thyme just before serving adds a note of green without weighing down. For a side, homemade mashed potatoes absorb the sauce remarkably well. Sautéed green beans with garlic or a root vegetable gratin also work great. What matters is not to overwhelm the flavors with a too-assertive side — the sauce should remain what it is: the heart of the dish.
Tips & Tricks
- Take the meat out 30 to 45 minutes before starting — a room-temperature piece sears evenly and develops a better crust in less time, preserving more juice inside.
- Don’t lift the lid during braising, except to check once halfway — each opening drops the internal temperature of the pot and lengthens cooking time in a hard-to-recover way.
- Prepare this dish the day before if hosting: refrigerate the entire pot overnight, the next day the solidified fat on the surface is easily removed with a spoon and the sauce is even more concentrated after slow reheating.
- If your sauce remains too thin after reduction, off the heat, whisk in a teaspoon of mustard directly into the warm liquid — it emulsifies slightly and gives body without flour or starch.
Can I use a different veal cut instead of shoulder?
Shoulder remains the best choice for this type of long braise, because its collagen content keeps it tender over time. Veal shank also works very well and gives an even more gelatinous sauce — then allow a bit more cooking time. Avoid lean cuts like fillet or nut: they inevitably dry out before tenderizing.
How do I know when the meat is done?
The most reliable test is the simplest: stick a fork into the thickest part and pull it out. If the meat falls apart without resistance and the fibers separate easily, it’s ready. If you have to force it, put the pot back in the oven in twenty-minute increments.
Can I prepare this dish the day before?
Not only is it possible, it’s even recommended. Chilling overnight in the refrigerator solidifies the fat on the surface, which is easily removed with a spoon — the sauce is cleaner and more concentrated. Reheat covered at 140°C for 45 minutes to an hour, adding a splash of broth if needed.
What pot should I use for a good result?
An enameled cast-iron pot is ideal: it accumulates and distributes heat very evenly, which is exactly what braising needs. A stainless steel pot with a thick bottom also works. Avoid thin dishes or too-light pans that create hot spots and risk burning the bottom.
Can I freeze leftovers?
Yes, and this dish freezes particularly well. Portion the shredded meat with its sauce into airtight containers and freeze for up to three months. Thaw overnight in the fridge, then reheat slowly on the stovetop over low heat — the texture remains very satisfying.
The sauce is too thin after reduction, what to do?
Without adding flour or starch, off the heat, whisk in a teaspoon of mustard directly into the warm liquid — it emulsifies slightly and gives body. Another option: briefly blend the sauce with an immersion blender to incorporate the melted onions, which naturally thicken it.
Braised Veal Shoulder with Onions
French
Main course
A veal shoulder slowly braised with melting onions and fragrant broth, until the meat falls apart with a fork. The sauce, naturally thickened by collagen and confit onions, needs nothing else.
Ingredients
- 1.8 kg boneless veal shoulder
- 4 large Spanish onions (about 800 g), diced
- 750 ml low-sodium chicken broth
- 4 garlic cloves, whole and lightly crushed
- 2 tbsp whole-grain mustard
- 75 ml olive oil
- 2 bay leaves
- 2 sprigs fresh thyme
- salt and freshly ground black pepper
Instructions
- 1Remove veal shoulder from refrigerator 30 to 45 minutes before starting. Pat dry thoroughly with paper towels, rub all over with mustard, then season generously with salt and pepper.
- 2Preheat oven to 160°C (convection or conventional).
- 3Heat olive oil in a large cast-iron pot over high heat until shimmering. Add the shoulder and sear without moving for 4 to 5 minutes until a deep golden brown crust forms. Turn and brown all sides, including ends. Transfer meat to a plate.
- 4Reduce heat to medium-low. In the same pot without cleaning, cook the onions, stirring occasionally, for 10 minutes until translucent and lightly golden.
- 5Add crushed garlic, stir, and scrape the bottom of the pot with a spatula to release the browned bits. Cook for another 2 minutes.
- 6Return meat to the pot. Pour in hot broth until it comes halfway up the meat. Add bay leaves and thyme.
- 7Cover tightly and place in the oven at 160°C for 2.5 to 3 hours, depending on thickness. Halfway through, check that the liquid is gently simmering — if boiling too hard, lower to 150°C.
- 8Carefully remove meat and place on a cutting board. Cover with aluminum foil. Remove herbs from the pot and reduce the braising liquid over high heat, uncovered, for 5 to 8 minutes until it coats a spoon. Adjust salt.
- 9Slice or shred the meat as desired, generously coat with sauce, and serve immediately.
Notes
• Reheated the next day, this dish is even better: the sauce is more concentrated and the meat even more tender. Refrigerate the entire pot and remove the solidified fat from the surface before reheating covered at 140°C for 45 minutes.
• For a smoother, more coating sauce, briefly blend with an immersion blender after removing the herbs — the melted onions naturally thicken without added flour.
• This dish freezes very well. Portion the meat with its sauce into airtight containers, up to 3 months. Thaw overnight in the fridge and reheat gently on the stovetop.
• Recommended sides: mashed potatoes, creamy polenta, sautéed green beans with garlic, or simply good country bread to soak up the sauce.
Nutrition Facts (per serving, estimated)
| 415 kcalCalories | 38 gProtein | 9 gCarbs | 25 gFat |


