

Have you ever craved chocolate on a Sunday afternoon, with the oven busy with something else, and impatience starting to win? This air fryer brownie answers exactly that. Less than 35 minutes, a crackly crust that a conventional oven rarely reproduces, and a gooey center that stays wobbly until the last piece.
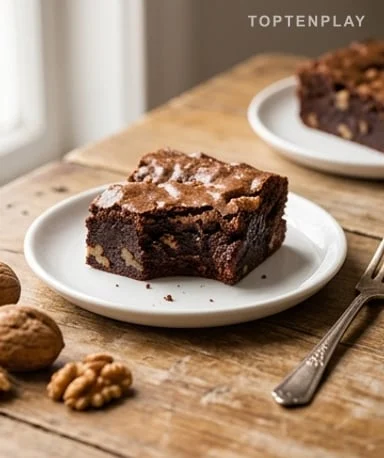
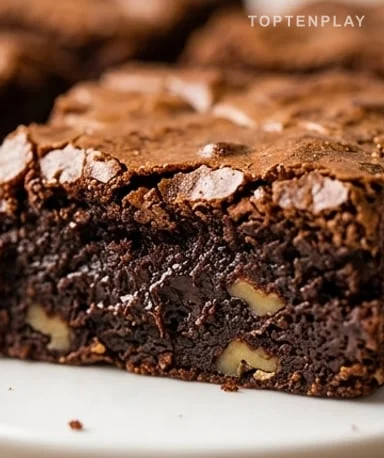
What stands out first is that surface—cracked, slightly shiny, almost lacquered by the caramelized coconut sugar. Underneath, the chew is dense but not heavy, with walnut pieces that provide just the right resistance under the tooth. The smell escaping from the air fryer at the end of cooking—hot chocolate, vanilla, a hint of brown butter—is enough to bring everyone in the apartment. It’s the kind of brownie you cut poorly because you don’t wait long enough.
Why you’ll love this recipe
Ingredient Notes
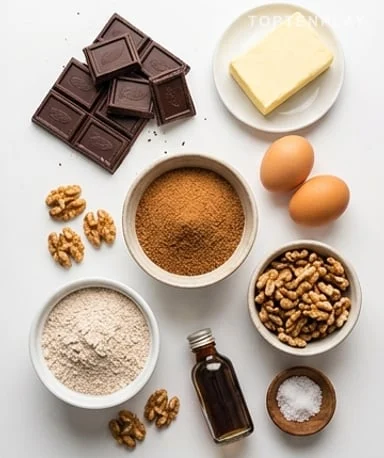
Dark chocolate 70%, butter, eggs, coconut sugar, spelt flour, and walnut halves: the short list of a brownie that means business.
- Dark chocolate, 70% minimum : This is what structures the whole recipe. Below 70%, the chocolate’s own sugar content unbalances the batter: it becomes more liquid, more unpredictable to bake, and the taste flattens into uniform sweetness. Use a baking chocolate, not a snacking bar—the difference is felt in the first bite.
- Butter : It provides the fatty binder that gives the brownie its dense texture and that particular chew. Salted butter works very well here—the salt amplifies the bitter notes of the chocolate. For a lactose-free version, coconut butter is a direct substitute: same proportion, same melting behavior.
- Coconut sugar : Its slightly caramelized flavor, more complex than ordinary brown sugar, deepens the chocolate rather than simply sweetening. Its lower glycemic index is a secondary advantage. Standard brown sugar works if you don’t have it—the result will be a bit less nuanced, but still perfectly fine.
- Spelt or whole wheat flour : It absorbs moisture differently from classic all-purpose flour and gives a slightly denser crumb, which is perfect for a brownie. Absolutely avoid cake flour with baking powder—it would puff up the batter where we don’t want it, turning a fudgy brownie into a spongy cake.
- Walnut halves : They add crunch in a texture that would otherwise be monotonously homogeneous. Roughly crush them by hand, not with a knife: irregular pieces create size contrasts that make each bite different. Pecans are an interesting alternative if you want a more buttery, less tannic note.
- Pure vanilla extract : Next to chocolate, you don’t detect it directly—that’s not its role. Vanilla rounds out the bitterness of cocoa and balances the background aromas, like a seasoning that unifies without imposing itself. Avoid synthetic vanillin, which leaves a recognizable artificial note, especially when heated.
Melt the chocolate without rushing it
The first step is melting the chocolate with the butter—and this is where many mess up without knowing it. In a bain-marie, the water must not touch the bottom of the bowl and must definitely not boil; gentle steam is enough. In the microwave, work in 20-second bursts, stirring between each: the chocolate continues to melt from thermal inertia even out of the microwave, and a mere ten seconds too many can cause it to seize and take on a dry, dull texture that can’t be fixed. The result you’re aiming for is a smooth, shiny, almost satiny mixture with a consistency close to warm ganache. The smell at this stage—melted chocolate, slightly warm butter—is a signal that everything is going well.
Build the structure with the eggs
Let the chocolate mixture cool for a full two minutes before adding anything. If the eggs hit a mixture that’s too hot, the whites immediately start to coagulate and the batter becomes grainy instead of silky—an error that’s hard to correct later. First add the coconut sugar and mix vigorously for one minute: friction helps dissolve the crystals and the batter thickens, taking on a darker hue. The eggs come next, one at a time, with a quick whisk between each. The batter will shift from a shiny color to a matte, velvety, almost opaque one: that’s the emulsion forming. Add the vanilla extract at this stage.
The flour: the most decisive step
Sift the flour directly into the bowl—not for show, but because unincorporated lumps create pockets of different texture during baking, floury areas that clash in the bite. Mix with a rubber spatula in slow, bottom-to-top motions, as if folding rather than beating. As soon as the last white streak disappears, stop. This is truly not a suggestion: overworked brownie batter develops the flour’s gluten network, and during baking, that results in a rubbery, elastic texture that has nothing to do with the sought-after fudginess. Fold in the nuts at this stage, reserving a few pieces to scatter on top—they will lightly toast during baking and add an extra roasted note.
Master the temperature in the air fryer
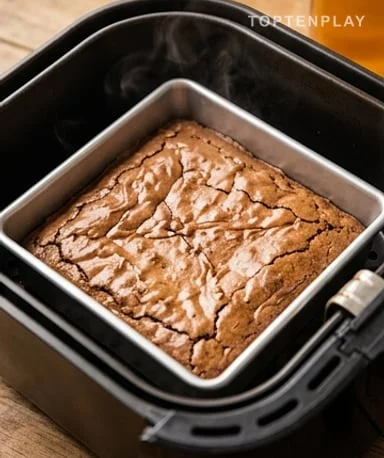
Preheat the air fryer to 160 °C for 3 minutes—these 3 minutes really count, because a cold basket changes the first minutes of baking and shifts the entire planned timing. Lightly butter your pan, then pour in the batter, smoothing the surface with the back of a damp spoon. Aluminum conducts heat better than silicone: in aluminum, reduce the time by 1 to 2 minutes; in silicone, stick to 18 minutes. Do not exceed 160 °C even if you’re in a hurry—at 180 °C, the crust forms too quickly, traps internal steam, and the center remains raw or cracks like a star when cut. Around the 10th or 11th minute, a smell of hot chocolate mixed with slight caramelization begins to escape: that’s the crust forming, and it’s a good sign.
Test the doneness and respect the rest
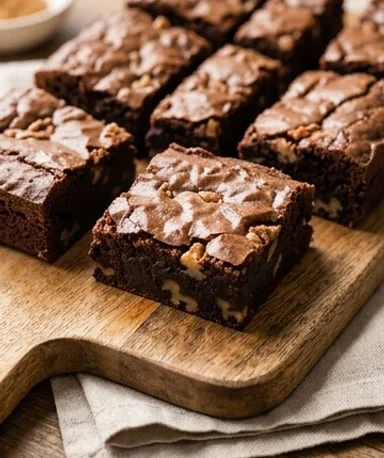
At 16 minutes, insert a toothpick into the center of the brownie. It should come out with moist, slightly sticky crumbs—no liquid batter dripping, but definitely not dry or clean. A clean toothpick means an overbaked brownie: the window is narrow and worth watching. If the batter is still liquid, put it back for 2 minutes and test again. Once out of the air fryer, resist the urge to unmold immediately. The brownie continues to cook internally during the 10-minute rest, and the center that seemed still wobbly will firm up just enough. Unmold onto a wire rack, wait until the surface is warm to the touch, and cut with a knife dipped in hot water for clean slices.
Tips & Tricks
- Use a pan with at least 1 cm of space on each side of the basket: air must circulate freely around the pan for convection to work properly—a too-tight pan creates uneven baking zones.
- Store the brownie at room temperature under plastic wrap rather than in the refrigerator: cold solidifies the chocolate fats and gives a pasty, compact texture that loses all original fudginess.
- If you prefer an even gooier center, take the brownie out at exactly 15 minutes and let it rest for 15 minutes instead of 10: residual heat finishes the work without drying out the center.
- For clean unmolding, let the pan rest on a cool surface for 10 minutes before flipping: the slight thermal contraction helps the brownie release from the walls without sticking.
Can I use milk chocolate instead of dark chocolate?
Technically yes, but the result will be different. Milk chocolate contains much more sugar and milk powder, making the batter more liquid and the baking less predictable—the brownie will tend to be sweeter and less fudgy. If you want to soften the taste, prefer a 60% dark chocolate rather than going all the way down to milk chocolate.
My air fryer doesn’t have a precise 160 °C setting—what temperature should I choose?
If your appliance offers 150 °C or 160 °C, choose 160 °C and start checking at 15 minutes. If the next setting is 170 °C, reduce cooking time to 14–15 minutes and start testing at 13 minutes. The idea is never to exceed an effective 165 °C: beyond that, the crust dries too quickly and the center remains raw.
Does the recipe work without walnuts?
Yes, without any problem—the brownie remains fudgy and tasty. The walnuts mainly provide textural contrast, not structure to the batter. You can replace them with pecans, chopped toasted hazelnuts, or simply omit them for an all-chocolate brownie.
How should I store the brownie and how long does it keep?
Store at room temperature, wrapped in plastic or in an airtight container, for up to 3 days. Avoid the refrigerator: cold solidifies the chocolate fats and gives a compact, pasty texture that loses all original fudginess. To reheat, 15 seconds in the microwave is enough to restore the initial softness.
Can I double the recipe for a larger pan?
Yes, but adjust the container: a 20 cm pan works for doubling. However, the baking time increases by 3 to 5 minutes and you’ll need to test more carefully with a toothpick, as heat takes longer to reach the center of a thicker layer. Ensure the pan still leaves at least 1 cm of space on each side in the basket.
Can the brownie be prepared in advance?
The raw batter can be prepared 24 hours ahead and stored in the refrigerator in the pan, covered with plastic. Take it out 20 minutes before baking to bring it to room temperature—cold batter placed directly in the air fryer alters timing and may leave the center too raw. The baked brownie is often better the next day once fully cooled.
Air Fryer Chocolate Walnut Brownie
American
Desserts
A dark chocolate 70% brownie cooked in the air fryer: crackly crust, fudgy center, chopped walnuts. Ready in 35 minutes, no complicated techniques.
Ingredients
- 100 g dark chocolate 70% minimum, chopped or in pistoles
- 60 g butter (or coconut butter for a lactose-free version)
- 2 large eggs, at room temperature
- 80 g coconut sugar or brown sugar
- 40 g spelt flour or whole wheat flour, sifted
- 1 pinch fine salt
- 60 g walnut halves, roughly chopped
- 1 tsp pure vanilla extract
Instructions
- 1Melt the chocolate and butter together in a bain-marie or microwave in 20-second bursts, stirring between each, until smooth and shiny. Let cool for 2 minutes.
- 2Add the coconut sugar to the chocolate mixture and mix vigorously. Incorporate the eggs one at a time, whisking well after each, then add the vanilla extract.
- 3Sift the flour and salt directly into the bowl. Fold with a spatula in slow bottom-to-top motions just until no white streaks remain—do not overmix.
- 4Fold in the chopped nuts, reserving a few pieces for topping.
- 5Preheat the air fryer to 160 °C for 3 minutes. Lightly butter a 15 cm square pan (silicone or thin aluminum). Pour in the batter, smooth the surface, and scatter the reserved nuts on top.
- 6Bake for 16 to 18 minutes at 160 °C. At 16 minutes, test with a toothpick: it should come out with moist, sticky crumbs, not liquid batter.
- 7Let rest in the pan for 10 minutes before unmolding. Cut into 6 squares once the surface is warm to the touch.
Notes
• In an aluminum pan, reduce cooking time by 1 to 2 minutes: aluminum conducts heat better than silicone.
• Never exceed 160 °C: a higher temperature forms the crust too quickly and leaves the center raw.
• Store at room temperature, wrapped in plastic, for up to 3 days. Avoid the refrigerator, which hardens the chocolate fats and stiffens the texture.
• For an even gooier center, bake for 15 minutes and extend the rest to 15 minutes: residual heat finishes the job.
Nutrition Facts (per serving, estimated)
| 260 kcalCalories | 5 gProtein | 22 gCarbs | 17 gFat |


