That morning, it’s the smell that wakes you before the alarm. A scent of melted butter and golden dough travels through the hallway and settles into the sheets. It’s the weekend — and these mini yogurt brioches are worth taking the time for.

The crumb stretches into long golden threads when you tear the first still-warm brioche. It’s soft under your fingers, almost silky, with that slight resistance that characterizes a properly worked leavened dough. The crust emits that little dry, satisfying crack of well-browned viennoiseries. The plain yogurt makes all the difference here: it provides persistent moisture that prevents the crumb from drying out after an hour.
Why you’ll love this recipe
Ingredient Notes
Nothing complicated: flour, yogurt, eggs, butter and yeast. It’s the yogurt that makes all the difference.
- Plain whole yogurt : This is the key ingredient. It provides moisture without weighing down the dough, and its slight acidity interacts positively with the yeast. Whole yogurt consistently gives better results than a low-fat version, which lacks body.
- T45 flour : Finer and higher in gluten than T55, it gives a more elastic, stringy crumb. T55 also works — the texture will be slightly denser, but the result is still perfectly respectable.
- Soft butter : Really soft — not melted, not still cold from the fridge. Taken out two hours before starting, it’s incorporated in small pieces and disappears into the dough to give it that characteristic melt-in-the-mouth quality that can’t be simulated otherwise.
- Active dry yeast : One packet is enough for 500 g of flour. It must be rehydrated in warm milk — between 35 and 40°C, no more, no less. Too hot, the yeast dies. Too cold, it remains inert. Let it foam for a few minutes before incorporating: that’s the only reliable sign it’s active.
- Eggs : Two whole eggs in the dough, plus one yolk reserved for the egg wash. This beaten yolk, brushed on just before baking, is responsible for that amber, shiny color that makes you want to bite in even before you do.
Yeast does not forgive approximation
It all starts with the yeast and milk. The milk must be warm — dip a finger, you should feel a pleasant warmth without burning, around 38°C. Mix, let rest for five minutes. If a light foam forms on the surface, the yeast is alive and ready. If nothing happens, throw it out and start again with fresh yeast: it won’t recover during baking. This step takes three minutes and conditions everything else. On a weekend, you have time to do it right.

Twenty minutes of kneading is really necessary
The dough is sticky at first. That’s normal, don’t add flour right away — it would harden the crumb. After five minutes of kneading, it starts to come away from the sides. After ten, it’s smooth, homogeneous, and begins to have character. The soft butter is incorporated last, in small pieces, until it completely disappears into the mass. At this stage, the dough is supple, slightly shiny, and comes cleanly off your hands. It already smells of butter and yeast — a sweet, slightly fermented scent that heralds what’s to come.
Rising: two hours you can’t cut short
Cover the bowl with a clean cloth and place it in a warm spot — near the oven, in a turned-off oven slightly preheated to 30°C, or simply on the countertop if your kitchen is warm. The dough must double in volume. In winter, count two hours. In summer, sometimes one hour is enough. Poorly risen dough will give compact brioches, without that stringy texture we’re after. This is the part where you let go and do something else — coffee, the paper, a series.
Shaping is where it becomes real
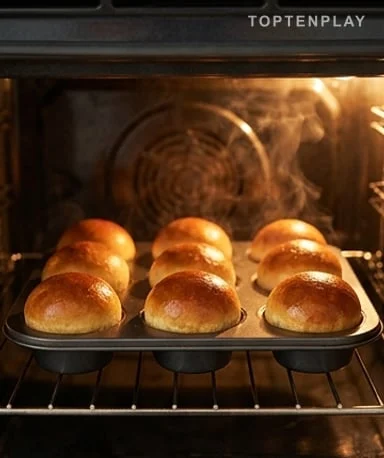
Once the dough has doubled, punch it down with your fist. That contact with the inflated mass that deflates gently under pressure is strangely satisfying. Divide into 12 portions of about 75 to 80 g each. Shape each ball by rotating the dough under your palm on a lightly floured surface — the top should be perfectly smooth, without folds. Arrange them in a muffin tin or on a baking sheet, spacing them well. A second rise of 45 minutes is necessary. Then brush with egg yolk using a brush, carefully, without pressing. Bake at 180°C for 18 to 20 minutes.
Tips & Tricks
- If the dough is too sticky during kneading, lightly moisten your hands rather than adding flour — too much flour compacts the crumb and ruins the softness.
- To check if the brioches are done, tap the bottom of a brioche: if it sounds hollow, they’re ready. A probe thermometer should read 88 to 90°C at the center.
- These brioches keep for 2 days in an airtight container at room temperature, and freeze very well. 30 minutes at room temperature is enough to thaw them, or 20 seconds in the microwave for a softness close to just out of the oven.

Can I use Greek yogurt instead of plain yogurt?
Yes, Greek yogurt works very well and gives an even richer crumb. The texture will be slightly denser, which is not a defect — some prefer it that way. Avoid flavored yogurts, which add too much sugar and mask other flavors.
My dough didn’t rise. What happened?
In 90% of cases, the yeast is to blame: either the milk was too hot (above 40°C, it dies), or the yeast was too old and no longer active. Before starting over, always check that your yeast foams well in warm milk before incorporating it — that’s the only reliable indicator that it’s alive.
Can I prepare the dough the day before?
Absolutely, it’s even a good idea. After kneading, place the covered dough in the refrigerator overnight for a slow cold rise. The next morning, let it come to room temperature for 30 minutes before shaping, then proceed with the second rise normally. The result is often even better — slow fermentation develops more flavor.
How should I store the brioches to keep them soft?
In an airtight container at room temperature, they keep for up to 2 days without losing texture. Avoid the refrigerator, which accelerates staling. To restore a softness close to just out of the oven, 20 seconds in the microwave is enough.
Can I freeze them?
Yes, they freeze very well. Wait until they are completely cooled, then place them in a freezer bag, removing the air. They keep for up to 2 months. To serve, let them thaw at room temperature for 30 to 45 minutes or reheat in a 150°C oven for 8 minutes.
Can I customize the recipe with flavors or fillings?
Easily. A teaspoon of vanilla extract or the zest of an untreated lemon can be incorporated directly into the dough and completely change the flavor profile. You can also slip a few chocolate chips or raisins into each ball during shaping — children especially appreciate this version.

Ultra-Soft Mini Yogurt Brioches
French
Bakery & Pastries
Small homemade brioches with a stringy, airy crumb, made incredibly soft thanks to plain yogurt. Perfect for a weekend breakfast or a indulgent snack.
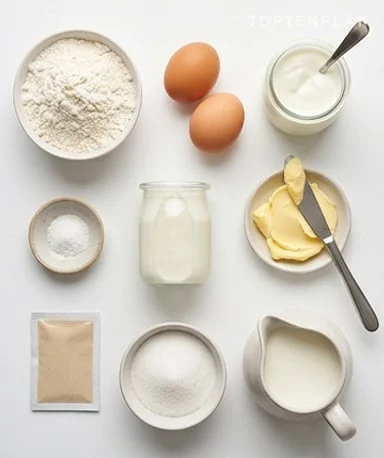
Ingredients
- 500 g T45 or T55 flour
- 125 g plain whole yogurt (1 pot)
- 2 whole eggs
- 1 egg yolk (for egg wash)
- 80 g granulated sugar
- 80 g soft butter (taken out 2h before)
- 10 cl warm milk (about 38°C)
- 1 packet active dry yeast (7 g)
- 1 pinch fine salt
Instructions
- 1Mix the active dry yeast with the warm milk in a bowl. Let rest for 5 to 10 minutes until a light foam appears on the surface.
- 2In a large bowl, combine the flour, sugar and salt. Make a well and add the 2 whole eggs, the plain yogurt and the milk-yeast mixture.
- 3Knead the dough by hand for 10 minutes until it is homogeneous and starts to come away from the sides.
- 4Incorporate the soft butter in small pieces and knead for another 10 minutes. The dough should become smooth, supple and slightly shiny.
- 5Cover the bowl with a clean cloth and let rise in a warm place for 1h30 to 2h, until the dough doubles in volume.
- 6Punch down the dough with your fist, then divide it into 12 equal portions of about 75 to 80 g each.
- 7Shape each portion into a smooth ball by rotating it under your palm on a lightly floured surface.
- 8Place the balls in a muffin tin or on a baking sheet lined with parchment paper, spacing them well. Cover and let rise for another 45 minutes.
- 9Preheat the oven to 180°C. Gently brush the brioches with egg yolk using a brush.
- 10Bake for 18 to 20 minutes until the brioches are well browned. Tap the bottom of a brioche: if it sounds hollow, they are done.
- 11Let cool slightly on a wire rack before serving.
Notes
• The milk should never exceed 40°C to avoid killing the yeast. When in doubt, test with your finger: warm but not hot.
• If the dough sticks during kneading, lightly moisten your hands rather than adding flour — too much flour compacts the crumb.
• For a flavored version, add 1 teaspoon of vanilla extract or the zest of an untreated lemon directly into the dough.
• The dough can be prepared the day before and kept in the refrigerator for a slow cold rise, which develops more complex flavors.
Nutrition Facts (per serving, estimated)
| 242 kcalCalories | 6 gProtein | 37 gCarbs | 7 gFat |