Dry oven-baked turkey should never leave a kitchen. The reason it happens almost every time is the lack of brining — that thirty-minute step that everyone skips because no one ever explained why it is essential. With a little salt, sugar, and patience, you are going to serve cutlets that your guests will ask for again and again.
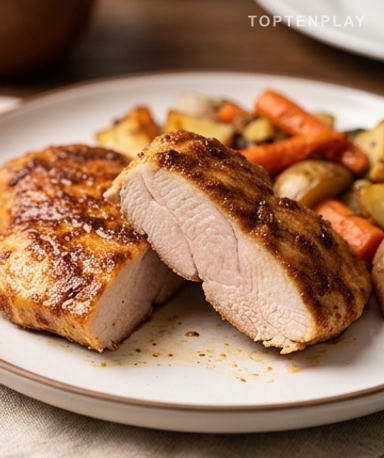
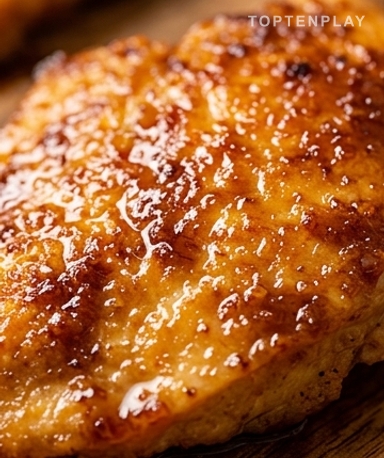
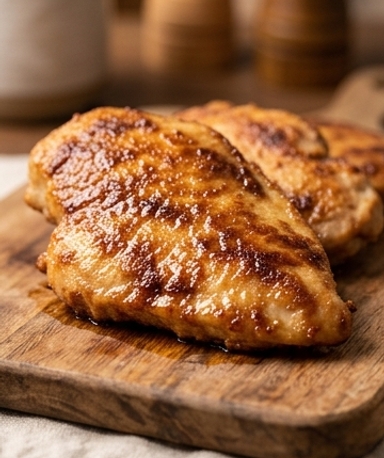
Coming out of the oven, the crust displays that precise amber caramel color — not burnt, not pale, exactly in between. The surface is slightly glazed, with small solidified patches where the brown sugar has caramelized under the broiler. When slicing, the knife glides effortlessly, revealing white and moist meat that has nothing to do with the compact, bland cutlet one imagines when hearing the word turkey. The scent of toasted mustard and warm paprika lingers in the kitchen for a good fifteen minutes after dinner.
Why you’ll love this recipe
Ingredient Notes
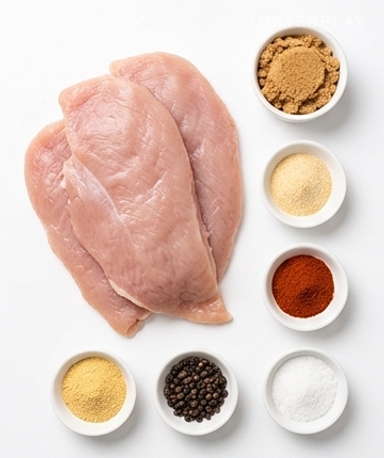
The full lineup: turkey cutlets and a minimalist sweet-spicy rub that is enough to change everything.
- Turkey cutlets : Get boneless cutlets about 2 cm thick. Too thin, and they dry out before the crust is ready. Too thick, and you’ll have to extend the cooking time and monitor with a thermometer. Go for the butcher counter rather than frozen — the final texture is night and day.
- Brown sugar : It appears twice in the recipe: in the brine, where it balances the salt, and in the rub, where it caramelizes under the broiler. Classic brown cane sugar works very well, no need to look for anything special.
- Dry mustard powder : Not mustard from a tube — it doesn’t have the same effect at all. The powder provides a slight bitterness and depth that cannot be reproduced otherwise. It’s easily found in the spice aisle of supermarkets.
- Kosher salt : Larger grains than table salt, so it’s less aggressive for the same quantity. If you use fine salt instead, reduce the quantity by half in the brine — otherwise, the cutlets will be far too salty and it’s impossible to fix.
- Paprika : Sweet paprika, not smoked. It gives the crust its reddish color and a background warmth without dominating other flavors. Smoked paprika can work, but it completely changes the aromatic profile of the dish.
Make the brine first — and wait until it is truly cold
Water, kosher salt, brown sugar, peppercorns. Bring to a boil for a few minutes, just long enough for everything to dissolve completely — you’ll see the liquid go from cloudy to a clear, translucent gold. Then add the ice cubes. This is important: if you plunge the cutlets into a brine that is still lukewarm, you start cooking the meat even before the oven, and the whole point of the operation disappears. Wait until it’s cold at the bottom of the bowl. Once the cutlets are in, thirty minutes is enough. Two hours is the maximum — beyond that, the texture begins to change in the wrong way.

Dry the cutlets as if your crust depends on it
Because it absolutely does. A wet cutlet coming out of the brine, you apply the rub on it, and the moisture prevents the caramel from forming — you get a surface that steams rather than browns. Take the cutlets out of the brine, place them on paper towels, and really pat them dry. Both sides, the edges, everywhere. You’ll feel the surface become slightly rough under your fingers — that’s exactly what we’re looking for. If your cutlet has a visible fatty edge, make a few slits in it before applying the rub. Otherwise, it will curl up in the oven and cook unevenly.
Massage the rub in without holding back
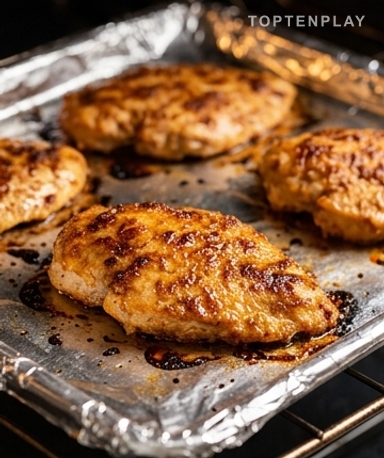
Brown sugar, garlic powder, dry mustard, paprika — mix in a small bowl and apply to both sides. Really massage it into the meat. Don’t just sprinkle. The rub must adhere, not just sit on the surface. You can feel the sugar crunching slightly under your fingers, the spices already starting to release something even before the heat. Place the cutlets on the tray lined with foil and bake at 200°C for 16 minutes. No need to turn them halfway through.
Do not take your eyes off the oven under the broiler
After 16 minutes, turn on the broiler. This is where the crust forms — and where disasters happen if you leave to reply to a message. Brown sugar caramelizes very quickly under direct heat. Two to three minutes maximum. You are looking for that slightly solidified light caramel shade, with small bubbles forming on the edges. No darker than that. Take the cutlets out and let them rest for 3 to 5 minutes before cutting — if you slice immediately, the juices escape and you lose half the benefit of the brine.
Tips & Tricks
- Invest in a meat thermometer if you don’t have one yet: at 74°C at the center, it’s done, and you never have to guess again. Probe the center of the thickest cutlet for a reliable result.
- Leftovers reheat very well — wrap them in foil with a splash of chicken broth, and put them in the oven for 10 minutes at 160°C. The texture stays surprisingly close to how it was the night of the meal.
- The rub can be prepared in double or triple batches effortlessly. Store the surplus in a closed jar and you have seasoning ready for weeks without thinking about it.
Is the brine really mandatory?
No, you can skip it and simply add a teaspoon of kosher salt directly into the rub. But the result will be significantly less juicy. The brine restructures the meat’s proteins and allows it to retain moisture during cooking — that’s what makes all the difference compared to an ordinary cutlet.
How do I know if the cutlets are cooked through?
With a meat thermometer. Turkey is cooked at 74°C in the center — probe the middle of the thickest cutlet. It’s the only reliable method: the color and cooking time vary depending on the thickness of each piece.
I don’t have kosher salt. Can I use table salt?
Yes, but reduce the quantity by half. Table salt has a much finer grain and is therefore more concentrated by volume. With the same quantities as kosher salt, the brine would be far too salty and the cutlets would be inedible.
How long can you leave the cutlets in the brine?
Between 30 minutes and 2 hours. Less than 30 minutes, and the brine doesn’t have time to act. Beyond 2 hours, the texture of the meat starts to become mushy — the salt has overworked the proteins. Do not leave overnight.
How to reheat leftovers without drying out the turkey?
Wrap the cutlets in foil with a splash of chicken broth and heat for 10 minutes in the oven at 160°C. Avoid the microwave, which heats unevenly and dries out the meat quickly. Leftovers keep for up to 4 days in the refrigerator.
Ultra-Juicy Oven-Baked Turkey Cutlets
American
Main course
Tender and juicy turkey cutlets thanks to a thirty-minute express brine, coated in a sweet-spicy rub and caramelized under the broiler in just a few minutes.
Ingredients
- 4 (about 800g) boneless turkey cutlets (~2 cm thick)
- 500 ml water
- 60 g (¼ cup) kosher salt
- 30 g (2 tbsp) brown sugar — for the brine
- 1 tsp black peppercorns
- 300 g ice cubes
- 30 g (2 tbsp) brown sugar — for the rub
- 1 tsp garlic powder
- 1 tsp dry mustard powder
- 1 tsp sweet paprika
Instructions
- 1In a saucepan, bring the water, kosher salt, 30g of brown sugar, and peppercorns to a boil until completely dissolved.
- 2Remove from heat, add the ice cubes, and let cool completely.
- 3Plunge the turkey cutlets into the cold brine. Cover and refrigerate for at least 30 minutes, 2 hours maximum.
- 4Preheat the oven to 200°C. Line a baking sheet with aluminum foil.
- 5Remove the cutlets from the brine and dry them thoroughly with paper towels. Score the fatty edge if present.
- 6Mix the remaining 30g of brown sugar, garlic powder, dry mustard, and paprika. Massage this rub on both sides of each cutlet.
- 7Arrange on the tray and bake for 16 minutes.
- 8Place under the broiler for 2 to 3 minutes while watching closely, until the crust is golden and caramelized.
- 9Let rest for 3 to 5 minutes before slicing and serving.
Notes
• Storage: up to 4 days in the refrigerator in an airtight container, or 3 months in the freezer.
• Reheating: wrap in foil with a splash of chicken broth, 10 minutes in the oven at 160°C. Avoid the microwave.
• Variation: a pinch of cayenne pepper in the rub for heat, or a teaspoon of dried thyme for a more herbal profile.
Nutrition Facts (per serving, estimated)
| 285 kcalCalories | 43gProtein | 13gCarbs | 6gFat |