Most sheet pan brownie recipes disappoint: too thin, too dry, too much like an ordinary chocolate cake. This one was tested fifteen times to avoid exactly those pitfalls. The result is 24 thick, fudgy pieces with that crackly, shiny top that makes all the difference.
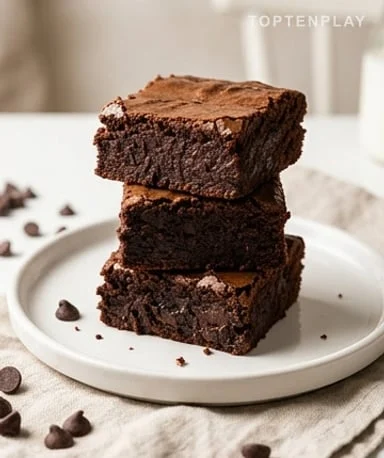
The shiny thin crust that forms on top during baking is a sign that the sugars have migrated upward — and that’s what gives this almost lacquered texture, slightly crisp to the tooth before giving way to a nearly moist interior. The edges of the pan cook a little faster and become chewy, almost caramelized. The center remains just set, dense, with a melt-in-your-mouth feel. No fuss, just intense chocolate in every bite.
Why you’ll love this recipe
Ingredient Notes

Baking chocolate, cocoa, butter, oil, two sugars: the combination that makes all the difference.
- Baking chocolate (115 g) : A square of dark chocolate at 60-70% melted with the butter. It provides that straightforward, slightly bitter flavor that cannot be replicated with cocoa alone — the foundation of the entire aromatic structure.
- Butter + oil : Butter gives flavor, oil gives moisture. In such a large pan, butter alone leaves the edges slightly dry. This small addition of oil changes everything without altering the taste.
- White sugar + brown sugar : White sugar is responsible for the shiny, crackly top. Brown sugar adds a slight molasses note and retains moisture in the crumb — a detail that matters greatly over several days.
- 4 whole eggs + 1 yolk : The extra yolk enriches the texture without weighing it down. It is what maintains that almost gooey center even after the brownie has cooled.
- Dutch-processed cocoa powder : Less acidic than natural cocoa, it gives a darker color and a milder, deeper chocolate flavor. The difference is noticeable from the first bite.
Melt the chocolate with the butter
It all starts with melting the chopped chocolate with the butter and oil. Using a double boiler or microwave in 30-second intervals, the goal is a smooth, shiny, homogeneous mixture. Let it cool for a few minutes — you don’t want to add eggs to a hot mixture, as they would instantly curdle and ruin the final texture. That moment when the chocolate slowly melts into the warm butter is a scent all its own, almost cocoa-like and fatty, foreshadowing what’s to come.

Add the eggs without overdoing it
First add the sugars, then the eggs one by one, and finally the extra yolk. Whisk vigorously — not too long, one minute is enough — to dissolve some of the sugar and slightly aerate the mixture. This is the step that determines the shiny top: suspended sugar rises to the surface during baking and forms that characteristic crust. Over-whisking incorporates too much air and makes the result more like cake. Under-whisking leaves the surface matte and dull.
Flour and cocoa, quick and simple
Sift the flour and cocoa together, then fold them in with a spatula using slow, enveloping motions. Stop as soon as no streaks of flour remain. Not a stir more. Overdeveloping gluten turns a fudgy brownie into an elastic, rubbery one. Stir in the chocolate chips at the end. The final batter should be thick, shiny, almost difficult to pour — exactly as it should be.
Baking: decide in advance
Oven at 175°C, preferably with fan/convection. The 23×33 cm pan needs about 32 to 38 minutes. The difference between fudgy and dry often comes down to 5 minutes. The foolproof method: insert a toothpick halfway between the edge and the center — it should come out with a few moist crumbs attached, not clean, not coated in raw batter. The surface should be set and slightly puffed, but it will sink as it cools. That’s normal and intended.

Tips & Tricks
- Do not cut before completely cool. When warm, brownies deform and stick to the knife. One hour at room temperature, or 20 minutes in the refrigerator, gives clean slices with neat edges.
- For perfectly even squares, use a long, smooth knife run under hot water between each cut — it glides without crushing.
- These brownies freeze very well, individually wrapped in plastic. Taken out the day before and left at room temperature, they regain their original texture without reheating.
- Dutch cocoa can be replaced with natural cocoa, but the flavor will be slightly more acidic and the color less deep. Not a dealbreaker, but noticeable.

How do I know when the brownies are done?
Insert a toothpick halfway between the edge and the center of the pan — it should come out with a few moist crumbs, not clean, not coated in liquid batter. The surface should be set and slightly puffed, but it will sink as it cools: that’s normal and intended.
Can I substitute natural cocoa for Dutch-processed cocoa?
Yes, it works, but the result will be slightly more acidic and the color less deep. Dutch-processed cocoa (like Van Houten or Valrhona) is milder on the palate and gives that gentle, intense chocolate flavor we’re aiming for — if you have a choice, go with it.
Encore une histoire pour vous
Turkish Cabbage Stew (Kapuska)
Prep Time 15 minutes Cook Time 45 minutes Total Time 60 minutes Servings 4 portions You have half a cabbage lingering in the vegetable…
Encore une histoire pour vous
Strawberry and speculoos mousse
Prep Time 15 minutes Cook Time 0 minute Total Time 15 minutes + 30 min in fridge Servings…
Voir ici
Apple and Yogurt Flan
Prep Time 10 minutes Cook Time 40 minutes Total Time 50 minutes Servings 6 servings The classic Parisian…
Voir ici
Fresh Strawberry and Mint Mousse
Prep Time 25 minutes Cook Time 5 minutes Total Time 3 hours (including 2h30 in the refrigerator) Servings…
Voir ici