Garlic hitting a hot pan — that brief, almost violent sizzle, followed by a fragrance that invades the entire kitchen in seconds. This is the beginning of this honey-garlic chicken, and that moment alone makes you want to stay in the kitchen. A stress-free weekend dish, with the kind of sauce you finish with a spoon.
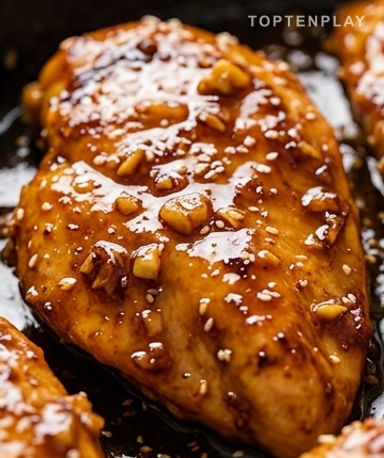
The sauce has taken on a deep amber color, somewhere between light caramel and date syrup. It sticks slightly to the spatula, glossy, with bits of candied garlic that have lost their bite and gained a melting sweetness. The chicken, brown on the edges and tender in the center, soaked up this sweet-and-savory mixture throughout the cooking process. As you lift the lid, the steam rises all at once — it smells like warm soy, slightly burnt honey, and that undefinable something we simply call delicious.
Why you’ll love this recipe
Ingredient Notes
All the ingredients for honey-garlic chicken: simple, effective, nothing superfluous.
- Chicken breasts : Get thick fillets if possible — fillets that are too thin dry out quickly. If you can’t find any, boneless chicken thighs work even better: more fat, more tenderness, and much less risk of overcooking.
- Honey : A liquid wildflower honey will work just fine. Avoid chestnut honey or a honey with too strong a fragrance — it will overpower everything else. Basic supermarket honey does the job perfectly here.
- Soy sauce : Classic soy sauce, not low-sodium. The low-sodium version results in a bland sauce that doesn’t hold up well during cooking. If you’re watching your salt intake, just use less rather than opting for the light version.
- Garlic : Three fresh cloves, hand-minced rather than pressed. Pressed garlic cooks too fast in the pan and risks burning before the sauce is even added. Coarsely chopped, it stays present without dominating.
- Sesame oil : Optional depending on the recipe, but really interesting. It’s what gives that little toasted note in the background of the sauce. One teaspoon — no more, or it will overwhelm everything else.
Sear, don’t cook
The pan must be really hot before putting anything in. Pour the olive oil, wait until it starts to shimmer slightly at the edges, and only then place the breasts. The sound should be immediate — a deep crackle, not a limp silence. Five minutes per side without touching. This is where the light caramelized golden-brown crust forms, which will then hold the sauce. If you move the chicken too early, you break that. Patience.
The sauce enters the scene
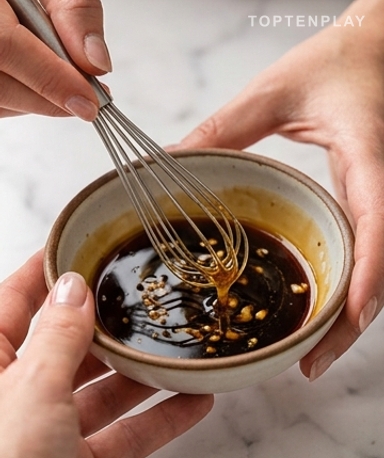
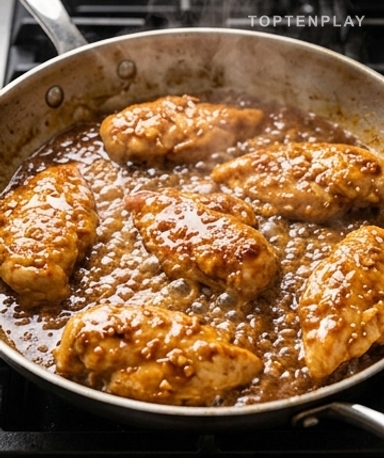
While the chicken browns, mix the honey, soy sauce, minced garlic, and sesame oil (if using) in a bowl. The mixture is dark, almost brown, with little bits of garlic floating in it. When both sides of the chicken are well-seared, lower the heat to medium-low and pour the sauce directly into the pan. It sings loudly for two seconds — that characteristic sizzle of sugar meeting a hot surface. Then it calms down, and the scent completely changes.
Fifteen minutes covered
Lid on the pan, low heat, and let it go. The sauce will slowly thicken around the chicken, coating it and penetrating it. From time to time — about every five minutes — lift the lid and baste the chicken with the sauce from the bottom using a spoon. This gives it that glossy glaze seen in photos. After fifteen minutes, the sauce should have the consistency of a light syrup: it coats a spoon and drips slowly. If it’s still too runny, remove the lid and let it reduce for two minutes uncovered.
The final check
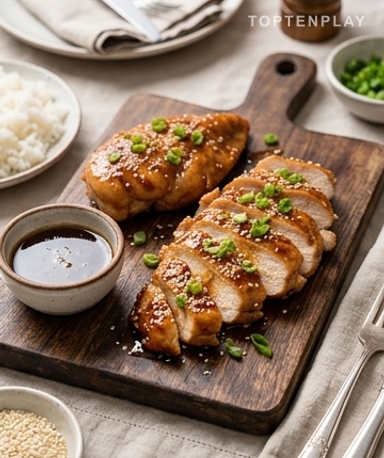
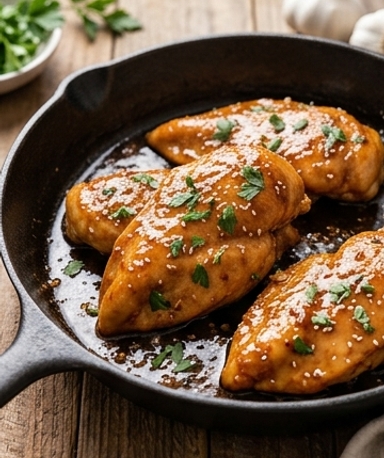
Insert a knife into the center of the thickest breast — the meat must be white, without any pink tint. Don’t rush this step. Once everything is cooked, sprinkle with fresh chopped parsley or thinly sliced green onions. Just for the color contrast and the herbal freshness that balances the sweetness of the sauce. That bright green over the amber glaze is also what makes you want to photograph the plate before eating.
Tips & Tricks
- Do not skip the browning step even if you are in a hurry — it’s this brown crust that gives depth to the sauce later. Chicken that isn’t seared results in a flat sauce.
- If the sauce thickens too quickly before the chicken is cooked, add two tablespoons of hot water directly to the pan. This loosens it without diluting the flavors.
- To marinate in advance: put the fillets with all the sauce in a sealed bag in the fridge for up to four hours. The meat will be more flavorful and tender when cooked.
Can I use chicken thighs instead of chicken breasts?
Yes, and it’s actually recommended. Boneless, skinless chicken thighs are fattier, so they are more tender and less likely to dry out during cooking. Cooking time remains the same, but still check that the meat is cooked through to the center.
How do I prevent the sauce from burning in the pan?
The critical point is the heat — it must be really low once the sauce is added. Honey contains sugars that burn quickly at high temperatures. If the sauce caramelizes too strongly on the edges, immediately lower the heat and add two tablespoons of hot water.
Can I prepare this dish in advance?
The chicken keeps very well in the refrigerator for up to three days in an airtight container with its sauce. To reheat, a pan over low heat with a splash of water is enough — the microwave also works but can dry out the meat slightly.
The sauce seems too liquid at the end of cooking — what should I do?
Remove the lid and let it reduce for two to three minutes over medium heat while basting the chicken regularly. The sauce thickens quickly once exposed to air. If it’s still too thin, a small teaspoon of cornstarch diluted in a little cold water solves the problem in thirty seconds.
What should I serve this honey-garlic chicken with?
Basmati rice or jasmine rice absorb the sauce perfectly — it’s the classic side. Steamed vegetables (broccoli, green beans) or mashed potatoes work very well too. Avoid very sweet side dishes that would double up on the honey flavor.
Can I add vegetables directly to the pan?
Yes, bell pepper strips or zucchini slices fit in well — add them after searing the chicken, just before pouring the sauce. Harder vegetables like carrots should be pre-sautéed for a few minutes alone so they don’t remain too crunchy.
One-Pan Honey Garlic Chicken
Asian
Main Dish
Golden chicken breasts simmered in a glossy, caramelized honey-soy-garlic sauce. Ready in 35 minutes, only one pan to wash.
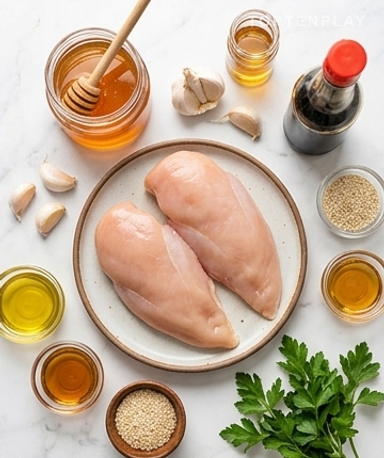
Ingredients
- 4 (approx. 700g) chicken breasts, skinless
- 80ml (¼ cup) liquid honey
- 60ml (¼ cup) soy sauce
- 3 cloves fresh garlic, finely minced
- 1 tablespoon olive oil
- 1 teaspoon sesame oil (optional)
- ½ teaspoon salt
- ¼ teaspoon ground black pepper
- 2 tablespoons fresh chopped parsley or green onions, for serving
Instructions
- 1Heat the olive oil in a large pan over medium-high heat until shimmering.
- 2Season the chicken breasts with salt and pepper on both sides.
- 3Place the chicken in the pan and cook for 5 minutes without moving it, until the side is golden like light caramel.
- 4Flip the breasts and cook for an additional 5 minutes on the other side.
- 5In a bowl, whisk together the honey, soy sauce, minced garlic, and sesame oil.
- 6Lower the heat to medium-low and pour the sauce over the chicken.
- 7Cover and simmer for 12 to 15 minutes, basting the chicken with the sauce every 5 minutes.
- 8Remove the lid and check for doneness — the meat should be white in the center and the sauce should be glaze-like.
- 9Sprinkle with parsley or green onions and serve immediately with rice.
Notes
• Storage: keeps up to 3 days in the refrigerator in an airtight container with the sauce. Reheat over low heat with a splash of water.
• Crispy variation: at the end of cooking, remove the lid and turn the heat to high for 2 minutes to glaze the surface of the chicken.
• Make-ahead: marinate the chicken in the sauce (without cooking) for up to 4 hours in the fridge — the meat will be more fragrant and tender.
Nutrition Facts (per serving, estimated)
| 310 kcalCalories | 38gProtein | 22gCarbs | 8gFat |