The smell arrives before everything else. That mixture of warm vanilla and baking cocoa starts filling the entire kitchen in less than twenty minutes. That’s marble cake: a discreet classic that succeeds every time without ever making a fuss.
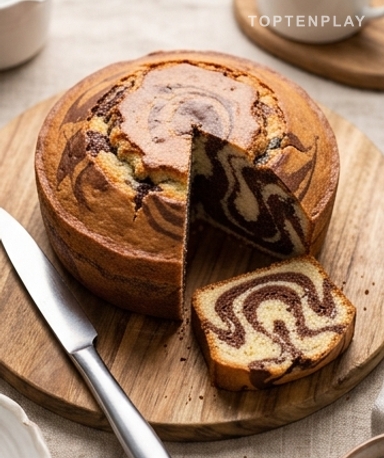
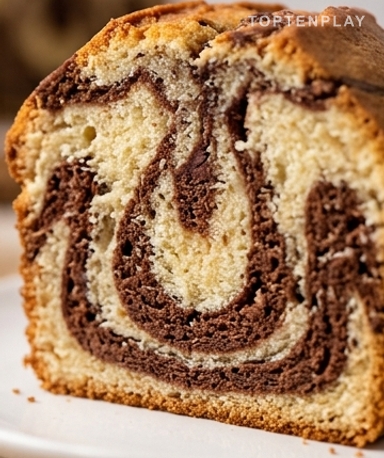
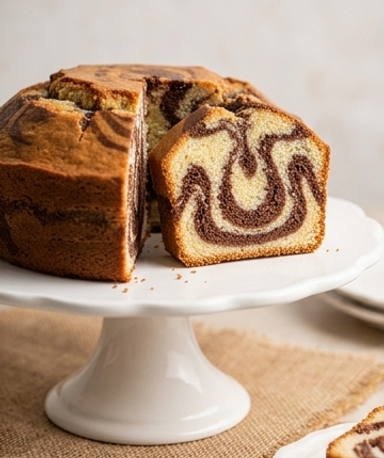
Look at this slice. The crust is golden like light caramel, slightly domed in the center—a sign that the baking powder did its job. Inside, swirls of chocolate brown and vanilla cream intertwine without truly merging, making every slice unique. The crumb yields under your fingers: flexible, a bit dense, not at all dry. It’s exactly what you look for on a weekend when you’re taking your time.
Why you’ll love this recipe
Ingredient Notes
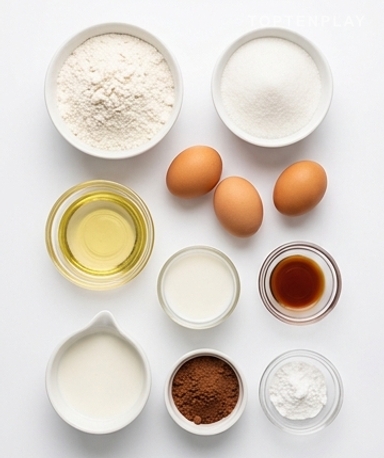
All the ingredients for a classic marble cake: flour, eggs, cocoa, and vanilla, gathered before being transformed.
- Cocoa powder : Use unsweetened cocoa, not hot chocolate powder like Nesquik. The difference in taste is huge. Basic Van Houten works perfectly. Two tablespoons are enough: we are looking for a balance with the vanilla, not a disguised chocolate cake.
- Vegetable oil : This is the secret to long-lasting moistness. Melted butter gives a denser texture that firms up as it cools. Oil remains liquid even when cold—keeping the cake soft the next day, and even the day after. Use sunflower or rapeseed oil, neutral in taste. Absolutely no olive oil.
- Vanilla extract : Two teaspoons, and real vanilla if possible—not artificial vanillin aroma that smells like heated plastic. The difference is clearly noticeable once baked. A small bottle from your supermarket’s organic brand is more than enough.
- Warm milk (to dissolve the cocoa) : Warm milk dissolves the cocoa without lumps and allows it to be easily incorporated into the batter. Two tablespoons are enough. Warm water works just as well if you don’t have milk on hand.
Two bowls, not one — and that’s where it all begins
The logic of this recipe is simple: you prepare one single base batter, then you split it in two. In the first bowl, nothing changes—that’s the vanilla batter. In the second, you incorporate the cocoa diluted in warm milk. When you add this mixture, the batter gradually turns from beige to deep chocolate brown; it’s quite beautiful to watch. To assemble, start by mixing all dry ingredients together in a large bowl. In another, whisk the eggs, oil, milk, and vanilla until smooth. Pour the wet into the dry and mix just enough for the batter to be smooth. No more. Over-mixing activates the gluten and makes the cake rubbery. A few residual lumps at the bottom of the bowl are normal, leave them be.
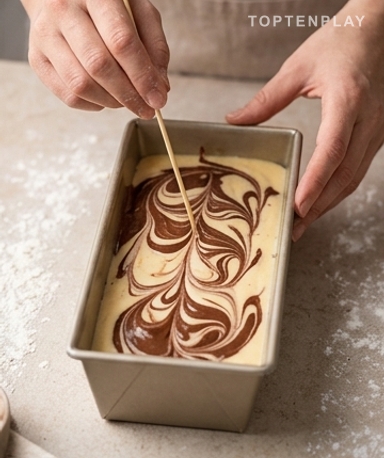
The part everyone gets wrong: the marbling
This is where 90% of a beautiful visual is decided. The classic mistake: pouring all the vanilla batter on one side, all the chocolate on the other, then mixing brutally. Result—a uniform grey cake, with no contrast. The right method is to alternate. Pour a ladle of vanilla at the bottom of the mold, a ladle of chocolate on top, more vanilla, more chocolate. Then run a knife through making slow, large S shapes, two or three times maximum. The batter is thick, it resists a bit under the blade, and the two colors slide against each other without really blending. That’s exactly what we want: contrast, not grey.
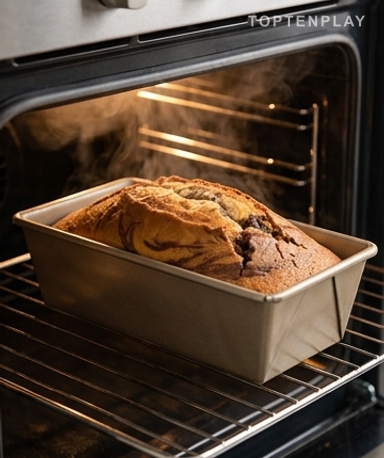
45 minutes in the oven — no more, no less
Preheat your oven to 170°C. An oven that’s too hot will crust the outside before the inside is cooked; it’s the classic trap. At 170°C, the heat penetrates gently and the cake rises steadily. Around the 35-minute mark, the smell changes: it becomes more intense, almost caramelized, with a light note of toasted cocoa taking over. That’s the signal it’s getting close. To check the doneness, insert a toothpick into the center—if it comes out clean or with a few dry crumbs, it’s done. If it comes out wet with batter stuck to it, leave it for another 5 minutes. Don’t trust the color of the crust; it browns before the inside is ready.
Cooling: the part we always skip wrongly
Let the cake rest for 10 to 15 minutes in its mold before removing it. While hot, it is still fragile and can break. By cooling a bit, it firms up and the crust naturally detaches from the edges. Flip it onto a wire rack—not a flat plate—so that air can circulate and the bottom stays dry. Wait another 20 minutes before cutting. The slices will be clean, the crumb will have had time to stabilize, and the taste will be more balanced than right out of the oven. On the weekend, we have time. That’s the whole point.
Tips & Tricks
- Do not mix the batter for more than 30 seconds after adding the liquids to the dry ingredients. Over-worked flour develops gluten and the cake becomes chewy instead of meltingly soft—this is irreversible once it happens.
- Take the eggs and milk out of the fridge 30 minutes before starting. Room temperature ingredients incorporate better together and result in a more homogeneous batter—it’s not a myth, it really changes the final texture.
- For an even more contrasted marbling when sliced, add an extra tablespoon of cocoa to the chocolate batter. The brown will be more intense and the swirls will stand out more—especially useful if your cocoa is a bit old and has lost its strength.
Can I replace the vegetable oil with melted butter?
Yes, you can use 160g of melted butter instead of 180ml of oil. The result will be slightly denser and richer in taste, but the cake will dry out faster. Oil remains the best choice if you want a marble cake that lasts several days.
How long does marble cake keep?
Well wrapped in plastic wrap or in an airtight container, it keeps for 3 days at room temperature without losing its moisture. In the refrigerator, it hardens—best to avoid it. For longer storage, freeze it in individual slices (up to 2 months) and let thaw at room temperature.
My marble effect disappeared during baking — what happened?
Two classic causes: either you over-mixed the two batters in the mold (2-3 knife passes are enough, no more), or the batters were too liquid when pouring. Also, make sure to alternate layers rather than pouring the two batters side by side.
Can I prepare the cake the day before?
Yes, and it’s actually a good idea. Marble cake is better the day after baking—the flavors have developed and the texture is more homogeneous. Let it cool completely before wrapping it, and keep it at room temperature.
I don’t have a loaf pan, what can I use instead?
A 20-22 cm round mold works very well—adjust the baking time to 35-38 minutes instead of 45. A springform pan gives a lower and more regular cake, with a beautiful circular slice that reveals the marbling well.
Can I add chocolate chips to the batter?
Absolutely, it’s a great variation. Stir 80 to 100g of dark chocolate chips into the vanilla batter just before assembling the cake in the mold. They will melt slightly during baking and add pockets of melting chocolate when sliced.
Moist Vanilla-Chocolate Marble Cake
French
Dessert
A classic marble cake with a soft crumb and well-contrasted vanilla-chocolate swirls. Easy, quick to prepare, and stays moist for several days.
Ingredients
- 250g (2 tasses) flour
- 200g (1 tasse) sugar
- 2 c.à.c. baking powder
- ¼ c.à.c. salt
- 3 eggs (at room temperature)
- 180ml (¾ tasse) vegetable oil (sunflower or rapeseed)
- 240ml (1 tasse) milk (at room temperature)
- 2 c.à.c. vanilla extract
- 2 c.à.s. unsweetened cocoa powder
- 2 c.à.s. warm milk (to dissolve the cocoa)
Instructions
- 1Preheat the oven to 170°C. Grease and flour a 25cm loaf pan or a 20cm round mold.
- 2In a large bowl, whisk together the flour, sugar, baking powder, and salt.
- 3In another bowl, whisk the eggs, oil, milk, and vanilla extract until well combined.
- 4Pour the liquid ingredients into the dry ingredients. Mix just until you get a smooth batter—do not over-mix.
- 5Divide the batter into two equal parts in two bowls.
- 6Dissolve the cocoa powder in the warm milk until smooth, then stir this mixture into one of the two bowls of batter.
- 7In the mold, alternate layers of vanilla and chocolate batter. Run a knife through making 2-3 large S shapes to create the marble effect—no more.
- 8Bake for 40 to 45 minutes. Check doneness with a toothpick inserted into the center: it should come out dry.
- 9Let rest for 15 minutes in the mold, unmold onto a wire rack, then wait another 20 minutes before slicing.
Notes
• Storage: 3 days at room temperature well wrapped in plastic wrap. Do not refrigerate, as the cake will harden.
• Freezing: freezes very well in individual slices for up to 2 months. Thaw at room temperature for 1h.
• Variation: add 80g of dark chocolate chips to the vanilla batter for melting pockets when sliced.
Nutrition Facts (per serving, estimated)
| 400 kcalCalories | 7gProtein | 48gCarbs | 22gFat |