The aroma reaches you even before you open the oven. That blend of warm cheese and herbs escaping through the door seal—it’s the sign that it’s working. Little tuna flans: quick to make, elegant on the table, and no one will guess it only took you 10 minutes of prep.

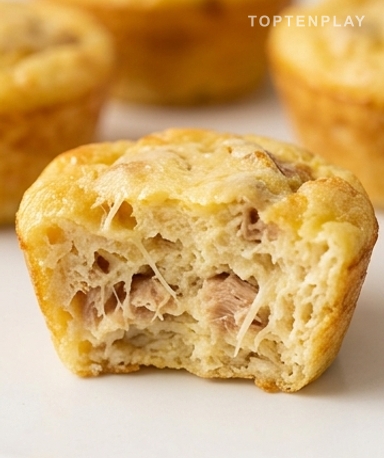
Placed in their ramekins or unmolded on a slate board, they have that golden ochre hue—the color of a shortbread fresh from the oven, with slightly darker edges and a puffed surface, still a bit jiggly. When you plunge a fork in, it resists for a second, then gives way completely: the interior is creamy, moist, with flakes of tuna distributed throughout. The scent is reminiscent of a quiche, but lighter, more delicate. In individual ramekins, the effect is sophisticated without you having to struggle with anything.
Why you’ll love this recipe
Ingredient Notes
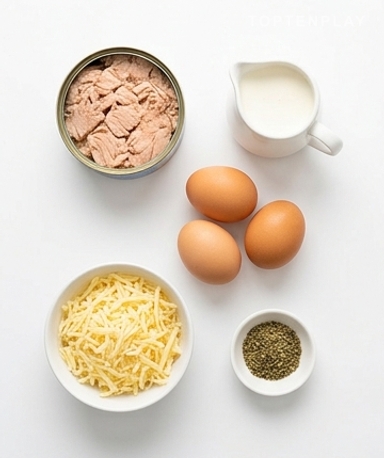
Just a few everyday ingredients are enough to prepare these melting and flavorful flans.
- Canned tuna in water : Not in oil — in water. Oil weights down the mixture and creates a greasy result that doesn’t set well. Drain it thoroughly: press the lid down hard and let it drain over the sink for a good thirty seconds. The final texture depends directly on this.
- Heavy cream : Low-fat cream (15%) results in more watery flans that don’t hold their shape as well. Use heavy cream (30%); it provides that melt-in-the-mouth quality that makes all the difference. If you only have light cream, compensate with a spoonful of Greek yogurt or fromage blanc.
- Grated cheese : Standard supermarket grated Emmental or Gruyère works perfectly. This isn’t the time to break out an 18-month Comté — its flavor would overpower the tuna. For more stretch, grated mozzarella is a great option.
- Flour (optional) : One tablespoon is enough. If you like your flans a bit wobbly in the center, skip this ingredient. With flour, they are firmer and easier to unmold. Without it, they are creamier and more delicate. Both versions are worth trying.
Drain the tuna like you have an important appointment
This is the step people rush and regret. Canned tuna retains water even after a quick drain — and that water goes into your mixture, ending with flans sitting in a puddle at the bottom of the mold. Use the lid, press hard, and let it drain for thirty seconds. Then, flake the tuna with a fork in your bowl. Aim for coarse crumbs, not a paste — irregular pieces create texture zones in the flan, which is exactly what we want.
Whisk the mixture, pour into molds, and you’re done
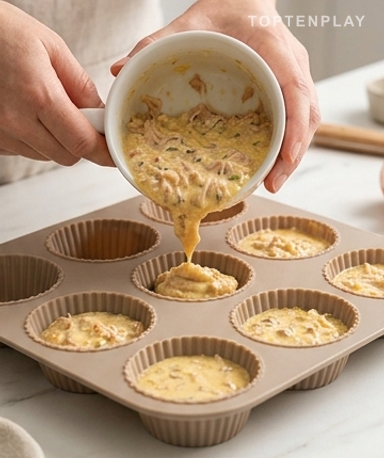
In a bowl, beat the eggs with the cream using a fork — no need for an electric whisk here. You just want to incorporate them, not whip a mousse. Add the cheese, season generously with salt, then gently stir in the tuna. At this stage, the smell is already pleasant — something slightly marine, milky, and warm. Pour into silicone muffin molds or lightly oiled ramekins. Fill three-quarters full, no more: the mixture rises slightly during baking.
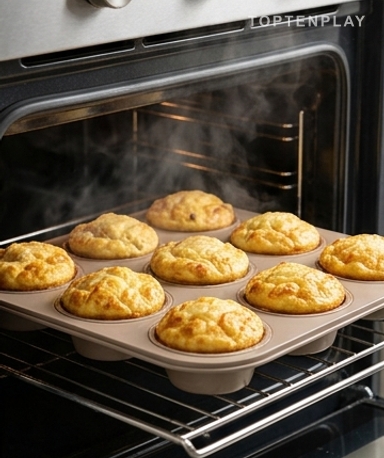
Bake at 180°C and don’t check for 20 minutes
Preheated oven, molds in, and don’t touch a thing. The temptation to open and check is strong — resist. The flans need stable heat to set evenly. After 20 minutes, check: the surface should be light caramel in color, slightly domed, with edges starting to pull away from the sides. If the center still wobbles significantly when you move the mold, give it another 3 to 5 minutes. The cheese on top forms that slight crust that cracks gently under the fork — that’s the sign.
Wait 5 minutes before unmolding — seriously
Straight out of the oven, the flans are fragile. The mixture is still very hot and shrinks slightly as it cools — which is what naturally releases them from the sides. Unmold immediately and they might break or leave half of themselves in the mold. Five minutes on the counter, and they hold perfectly. Run a thin blade around the edges if using ramekins, place a plate on top, and flip with a quick motion. Serve with some arugula and a lemony yogurt sauce on the side — no one will know you made this in under 40 minutes.
Tips & Tricks
- Make them the day before and reheat for 8 minutes in a low oven (150°C) the next day — they are just as good as freshly made, and you have nothing to manage at the last minute.
- If your flans release water at the bottom of the mold during baking, the tuna wasn’t drained enough or your eggs were very large. Next time, press harder and add the tablespoon of flour.
- For variety, add a handful of small diced raw zucchini to the mixture — it adds a slight crunch that contrasts beautifully with the melting flan texture.
Can I prepare tuna flans the day before?
Yes, and it’s actually a great idea. Prepare them, let them cool, and store them in the refrigerator in their molds covered with plastic wrap. The next day, reheat for 8 minutes in a low oven (150°C).
Why did my flans release water during baking?
It’s almost always a matter of draining the tuna correctly. Press very hard on the lid before adding it to the mixture. If the problem persists, add a tablespoon of flour to the prep to absorb excess moisture.
Can I replace heavy cream with something lighter?
Yes: 20% fat fromage blanc, plain yogurt, or 15% light cream work. The texture will be a bit less creamy and firmer, but the result is still very good. Add the spoon of flour in this case to help with the structure.
Muffin molds or ramekins — what’s the difference?
Silicone muffin molds produce smaller, bite-sized flans, perfect for appetizers. Individual ramekins provide a more generous portion and an elegant look for a seated starter. In both cases, lightly oil even if the mold is non-stick.
Can I freeze these little tuna flans?
Yes, for up to a month in an airtight container. Defrost in the refrigerator overnight, then reheat in a low oven at 150°C for 10 minutes. The texture remains good, just slightly less creamy than fresh.
What can I use instead of tuna?
Canned salmon works very well and gives an even more delicate result. Crabmeat or minced shrimp are also good options for a more festive version. Always follow the same rule: drain well before mixing.

Melting Tuna Flans
French
Starter
Soft and golden individual flans, ready in 35 minutes with a tin of tuna and a few pantry staples. Perfect as a starter or a light meal.
Ingredients
- 200g canned tuna in water, well drained
- 3 eggs
- 200ml heavy cream (30%)
- 50g grated cheese (Emmental or Gruyère)
- 1 tbsp flour (optional, for firmer flans)
- 1 tsp Herbes de Provence or chopped parsley
- salt and ground black pepper
Instructions
- 1Preheat the oven to 180°C. Thoroughly drain the tuna by pressing the lid, then flake it with a fork in a mixing bowl.
- 2In a bowl, whisk the eggs with the cream until smooth.
- 3Add the grated cheese, herbs, salt, and pepper. Gently fold in the tuna. Add flour if you prefer firmer flans.
- 4Lightly oil silicone muffin molds or ramekins. Pour the mixture into each mold, filling them about three-quarters full.
- 5Bake for 20 to 25 minutes, until the surface is light caramel gold and the center is set.
- 6Let cool for 5 minutes in the molds before unmolding. Serve hot or at room temperature.
Notes
• Storage: keeps for 2 to 3 days in the refrigerator in an airtight container. Reheat for 8 minutes at 150°C. Can also be eaten cold.
• Freezing: possible for up to 1 month. Defrost in the fridge before reheating in a low oven.
• Variations: add diced raw zucchini, cherry tomatoes, or replace tuna with canned salmon for a change.
Nutrition Facts (per serving, estimated)
| 150 kcalCalories | 12gProtein | 2gCarbs | 10gFat |