It’s Friday night, 5 p.m., and you still have time. Homemade pizza dough is exactly that kind of project: accessible, satisfying, and so much better than the store-bought pre-packaged versions. Six ingredients, one hour of resting, and the weekend takes on a whole new vibe.

When you pull the dough from the bowl after rising, it has this slightly creamy ivory color, almost alive. It gently exhales under your fingers. The smell is both acidic and sweet—the yeast having done its job, the sugar having disappeared. Under your palm, it yields without resistance, elastic, with that characteristic little bounce of a well-developed dough.
Why you’ll love this recipe
Ingredient Notes
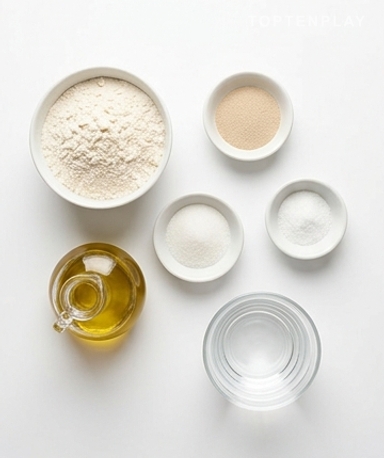
Only 6 simple ingredients for a dough that rivals the pizzerias.
- Active dry yeast (2¼ teaspoons) : This is the engine. Not baking powder—that’s different, it won’t rise. Active dry yeast must be rehydrated in warm water with sugar first. If after 10 minutes you don’t see small bubbles and a light foam forming on the surface, the yeast is dead. Start over, don’t go any further.
- T55 flour (or all-purpose) : American all-purpose flour roughly corresponds to our French T55. Avoid T80 or whole wheat—the dough will be too dense and won’t rise well. If you want to get closer to professional pizzerias, bread flour (high in gluten) makes a real difference in elasticity.
- Warm water (43-46°C) : This is the only technical constraint of the recipe, and it matters. Too cold, the yeast doesn’t activate. Too hot, it dies. Dip your wrist in: it should feel comfortable, like slightly warm bath water.
- Olive oil (2 tablespoons) : It softens the dough and gives it flavor. A basic oil does the trick—no need to break out the expensive bottle you save for salads. It also makes rolling easier by making the dough less sticky.
The part everyone misses: activating the yeast
Yeast is alive. And like everything living, it has its quirks. Pour the warm water into a bowl, add the sugar, crumble the yeast in. Wait ten minutes. That’s it. But if you skip this step or if the water is too hot, you’re kneading for nothing. The foam that forms on the surface, light and slightly lumpy, is the signal you’re looking for. A bakery-like fermentation smell gently rises from the bowl. Now, you can continue.
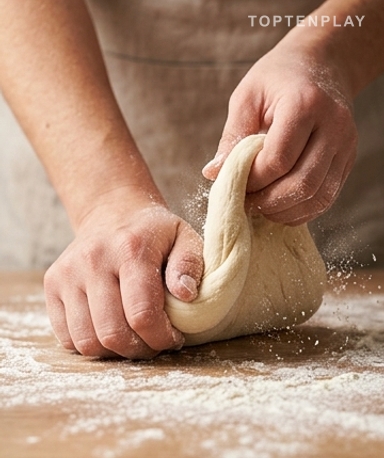
Knead until it truly changes
Mix the flour, salt, oil, and your activated yeast. It starts out sticky. That’s normal. On a lightly floured surface, start kneading by pressing with your palm and folding the dough over itself. After two minutes, it’s still rough. After five, it starts to smooth out. After eight to ten minutes, something shifts: the dough is soft as a rabbit’s ear, it no longer sticks to the counter, it bounces back when you poke it. This transformation doesn’t happen gradually—it happens all at once, and you feel it in your hands.
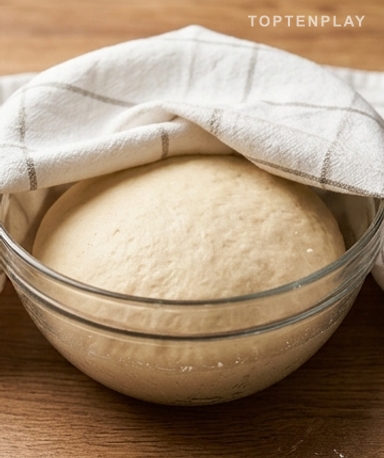
An hour of nothing, and everything happens
Place your ball in an oiled bowl, cover with a clean towel, and set in a warm place. Not in a hot oven—next to a radiator is enough. For an hour, the dough doubles in size. When you lift the towel, it’s puffy, slightly shiny, and gives off a slightly tangy fermentation smell. Press two fingers into it: if the indentation rises slowly, the rise is successful. If it snaps back immediately, let it sit for another fifteen minutes.
Rolling out without ruining everything
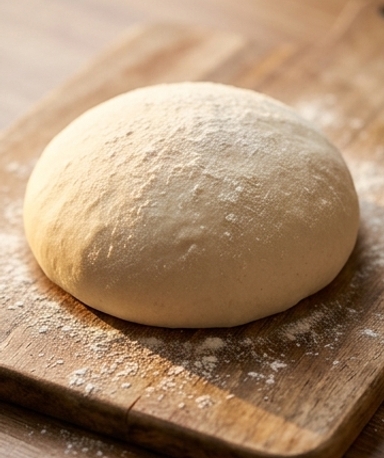
Take the dough out of the bowl and press down gently to punch out the gas. Divide into index two equal balls. On a floured surface, stretch with your hands rather than a rolling pin—this preserves the air bubbles that provide the bounce during baking. Start from the center, push outward while rotating the dough. It will resist and pull back. Normal. Let it rest for two minutes, then resume—it will be much more cooperative.
Tips & Tricks
- If your kitchen is cold, put the bowl in a turned-off oven with just the light on—this creates a temperature of about 27°C, ideal for rising without risking killing the yeast.
- Never put salt in direct contact with yeast—it inhibits it. Mix the flour and salt together first, then add the activated yeast.
- The dough keeps for 48h in the fridge after rising, well-wrapped in plastic film. It even develops more flavor with a slow cold rise—professional pizzerias do this systematically.
- If the dough tears while stretching, it’s too tight. Cover for two minutes and try again: the gluten will have had time to relax.

My dough isn’t rising—what happened?
In 90% of cases, it’s the yeast. Either it was expired, or the water was too hot and killed it. Always do the activation test: warm water + sugar + yeast, and wait 10 minutes. If you don’t see foam forming, start over with new yeast.
Can I use fresh yeast instead of dry yeast?
Yes, no problem. Replace the 7g of dry yeast with 20g of fresh brewer’s yeast. Crumble it directly into the warm sugary water; it activates the same way.
Can I prepare the dough the day before?
It’s actually recommended. After kneading, place the ball in an oiled bowl wrapped in plastic and refrigerate for a slow rise of 12 to 24h. The dough develops more flavor and is easier to roll out. Take it out 30 minutes before use.
Is a stand mixer mandatory?
No, hands do the job very well. Count on 8 to 10 minutes of manual kneading versus 5 minutes with a mixer’s dough hook. The final result is identical—the dough will tell you itself when it’s ready.
How do I freeze the dough?
After the first rise, degas, divide into individual balls and wrap each one. They keep for up to 3 months in the freezer. To thaw, place in the fridge the night before or at room temperature for 2h.
Which flour gives the best result?
Classic T55 gives a balanced, soft, and easy-to-work dough. For a more elastic Neapolitan-style dough, go for bread flour (high in gluten). Avoid whole wheat or semi-whole wheat flour for this recipe—the dough won’t rise well.
Homemade Pizza Dough
Italian
Basic / Dough
A supple and airy dough, ready in 1h15 with six pantry staples. The base that changes everything.
Ingredients
- 315g (2½ cups) T55 or all-purpose flour
- 7g (1 packet) active dry yeast
- 1 teaspoon sugar
- 240ml (1 cup) warm water (43-46°C)
- 30ml (2 tablespoons) olive oil
- 6g (1 teaspoon) salt
Instructions
- 1In a bowl, mix the warm water, sugar, and dry yeast. Let rest for 10 minutes until a foam forms on the surface.
- 2In a large bowl, mix the flour and salt. Form a well in the center.
- 3Pour the activated yeast and olive oil into the well. Mix until a rough ball forms.
- 4Knead on a lightly floured surface for 8 to 10 minutes, until you get a smooth, supple, and elastic dough that no longer sticks.
- 5Place the ball in an oiled bowl, cover with a clean towel and let rise for 1 hour in a warm place.
- 6Degas the dough by pressing on it, divide into two equal balls and roll out according to use.
Notes
• Storage: the dough keeps for 48h in the refrigerator well-wrapped in plastic, or up to 3 months in the freezer after rising.
• Slow rise: for more flavor, replace the room temperature rise with a 12 to 24h rise in the fridge—the dough will be more aromatic and easier to work with.
• Baking: preheat the oven to at least 250°C (maximum setting) for at least 20 minutes. A pizza stone or a very hot inverted baking sheet makes a real difference in crispiness.
Nutrition Facts (per serving, estimated)
| 700 kcalCalories | 16gProtein | 120gCarbs | 16gFat |