That smell coming out of the oven — toasting oats, maple syrup gently caramelizing — is one of the best signals that the weekend is here. Homemade granola is one of those rare things where homemade is objectively better than anything you can buy, for less money. Ten minutes of prep, three quarters of an hour in the oven, and you have a jar full for two weeks.
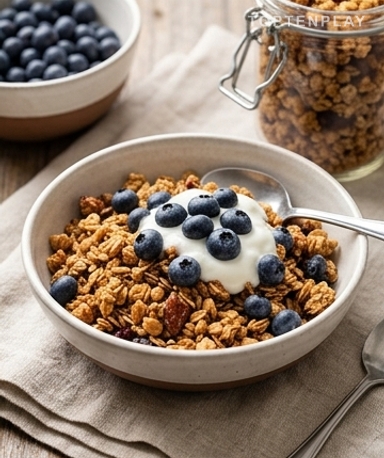
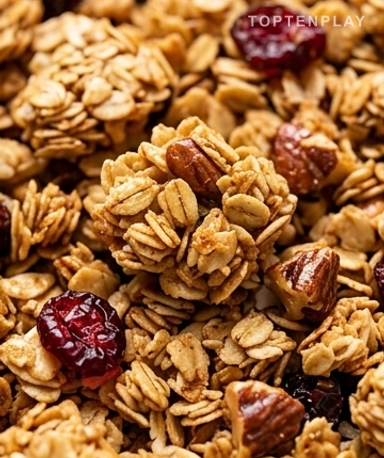
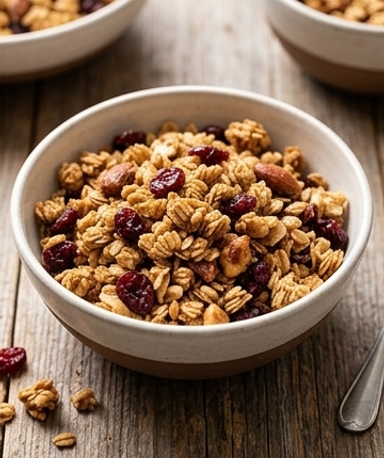
The clusters are a light golden caramel, irregular, slightly domed on top. Some are small, others very compact — real little rocks that crunch between your teeth. The cranberries stand out in bright red against the amber background of the toasted flakes. You take a handful, it feels cold and dry in your hand, and the aftertaste of maple syrup lingers for a few seconds on the palate.
Why you’ll love this recipe
Ingredient Notes
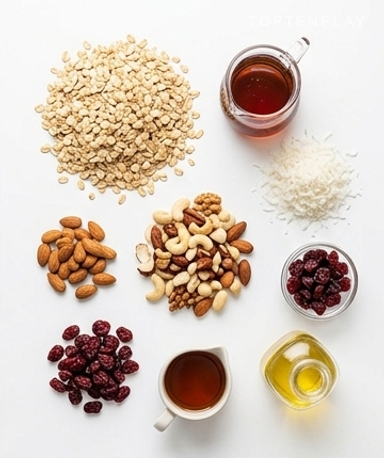
Everything you need for custom granola: oats, dried fruit, nuts, and maple syrup.
- The oats : Get old-fashioned oats, the large ones — not instant oats or thin porridge oats. Instant oats are too crumbly and turn into powder in the oven. Large flakes keep their structure, toast evenly, and form clusters. A basic supermarket brand is more than enough.
- Maple syrup : This is what gives that light caramel color and that slightly smoky woody depth that you don’t get with anything else. You can replace it with honey — the granola will be a bit sweeter and the clusters denser. Avoid agave syrup; it’s more expensive and adds nothing in terms of taste.
- The oil : Oil is what makes it crunchy and ‘glues’ the clusters together. A neutral vegetable oil works very well. Melted coconut oil adds a light tropical note — nice if you add shredded coconut or exotic fruits. Avocado oil also works; it holds up well to heat.
- Nuts and seeds : This is where you improvise. Flaked almonds, halved cashews, pecans, pumpkin seeds, sunflower seeds — use what you have. One practical rule: cut large nuts into medium pieces so they toast evenly without burning on the surface.
- Dried fruits : These are added after baking. Always after. Dried fruits put in the oven harden, dry out, and lose all their chewiness. Cranberries, raisins, dried blueberries, chopped apricots — add them while the granola is still warm, and they will slightly melt into the clusters.
Mix the liquid separately — don’t pour directly
The oven is at 135°C. No higher. It’s this low temperature that forces the granola to dry and brown slowly without burning — if you go up to 180°C like for a cake, you’ll have charred flakes on the surface and raw ones underneath. On the baking sheet, assemble the oats, nuts, and coconut if using. In a separate bowl, mix the maple syrup, oil, salt, vanilla, and cinnamon. This pre-mixing is important: if you pour the syrup directly onto the tray, you end up with very sweet patches and completely uncoated areas. One bowl, one minute of whisking, and everything balances out naturally.
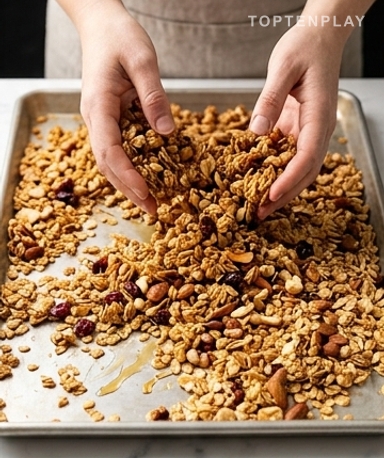
Spread in a thin layer across the entire surface
Once everything is well mixed by hand, spread the granola in as thin a layer as possible across the entire tray. If you have too much granola for one tray, use two — this is really where it all happens. A thick layer steams rather than dries: the bottom stays soft, and the top burns before the inside is ready. In a thin layer, every flake is in contact with hot air and browns evenly. The final color you’re looking for is a golden caramel — not brown, not pale, exactly in between.
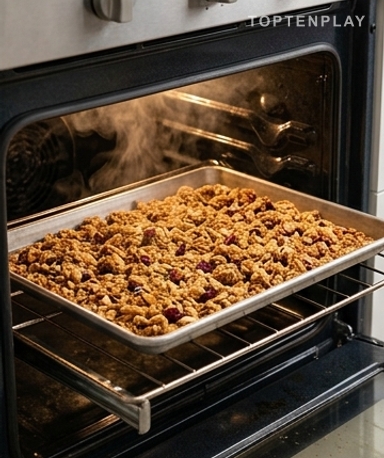
Stir every 15 minutes — no more often
Forty-five to fifty minutes of total baking time, with a sweep of the spatula about every 15 minutes. Every time you stir, you break the formation of clusters and lower the tray’s temperature — so leave it alone between turns. Halfway through, a sweet and slightly woody smell starts to fill the kitchen. That’s the maple syrup caramelizing. The edges of the tray will brown faster than the center: move them towards the middle each time you stir.
Do not touch anything until completely cool
When you take the tray out, the granola looks soft. This is normal — it hardens as it cools, not in the oven. Do not put it back in thinking it’s not ready. Let it cool on the tray in the open air without touching it: it’s during this cooling that the clusters solidify. If you want large, compact chunks, apply slight pressure with the back of a flat spatula before the last baking session and don’t stir again. You’ll get sheets that you can break by hand into whatever size pieces you want.
Tips & Tricks
- Wait until the granola is completely cold before closing the jar — if you close it while still warm, condensation will soften all the clusters and you’ll end up with soggy granola the next morning.
- If using shredded coconut, get the unsweetened kind. Commercial sweetened coconut browns much faster than the flakes, and you’ll end up with blackened edges before the oats are even cooked.
- Taste your nuts before adding them. Nuts that have been sitting in a cupboard for six months often have a slightly rancid taste — a pencil-like or old oil aftertaste that will ruin the whole granola. If that’s the case, replace them.
Why is my granola soft right out of the oven?
This is completely normal. Granola hardens as it cools, not in the oven. Let it cool completely on the tray in the open air without touching it — if you put it back in thinking it’s not ready, you’ll simply burn it.
How do I get large, compact clusters?
Just before the last baking session (the last 15 minutes), press down lightly on the entire surface with the back of a flat spatula to compact the granola, then don’t stir again until the end. The clusters form and solidify during cooling.
Can I replace the maple syrup?
Yes, honey works very well — the granola will be slightly sweeter and the clusters denser. Avoid agave syrup; it doesn’t add much to the flavor and costs more. Brown rice syrup is also a good option if you want something less sweet.
My granola is burning on the edges but staying pale in the center — what should I do?
Two possible reasons: the layer is too thick, or your oven heats unevenly. Spread it thinner and move the edges toward the center each time you stir. If the problem persists, lower the temperature by 10°C and slightly lengthen the baking time.
When should I add the dried fruit?
Always after baking, never before. Dried fruits put in the oven harden, dry out, and lose their chewiness. Add them when the granola has just come out of the oven and is still warm — they will slightly soften and blend into the clusters.
How long does homemade granola keep?
Three weeks in an airtight jar at room temperature, one month in the refrigerator, and up to four months in the freezer. Make sure it is completely cold before closing the jar — condensation from warm granola will soften all the clusters.
Homemade Granola
American
Breakfast
A simple and flexible base recipe to make your own homemade granola at a lower cost, less sugary than store-bought and completely customizable according to your desires.
Ingredients
- 270g (3 cups) old-fashioned rolled oats (large flakes)
- 200g (1.5 cups) nuts or seeds of choice (flaked almonds, cashews, pecans, pumpkin seeds, sunflower seeds)
- 60g (¾ cup) unsweetened shredded coconut (optional)
- 80ml (¼ cup) maple syrup
- 60ml (¼ cup) vegetable oil, avocado oil, or melted coconut oil
- 3g (½ tsp) fine salt
- 5ml (1 tsp) vanilla extract (optional)
- 2g (¾ tsp) ground cinnamon (optional)
- 160g (1 cup) dried fruits of choice (cranberries, raisins, blueberries, apricots, mango)
Instructions
- 1Preheat the oven to 135°C (275°F). Line a large baking sheet with parchment paper.
- 2On the tray, mix the oats, nuts/seeds, and coconut if using.
- 3In a separate bowl, whisk together the maple syrup, oil, salt, vanilla, and/or cinnamon until smooth.
- 4Pour the liquid mixture over the oats and mix by hand until completely coated. Spread in a thin, even layer across the entire tray.
- 5Bake for 45 to 50 minutes, stirring every 15 minutes. Move the edges (which brown faster) toward the center at each stir.
- 6Remove from the oven as soon as the granola is an even golden caramel. Let cool completely on the tray without stirring.
- 7Once cold, stir in the dried fruit and mix gently. Transfer to an airtight jar.
Notes
• For large compact clusters: before the final 15 minutes of baking, press down on the entire surface with the back of a flat spatula and do not stir again until the end.
• Wait for complete cooling before closing the jar. Warm granola creates condensation that softens the clusters.
• Storage: 3 weeks at room temperature in an airtight jar, 1 month in the refrigerator, 4 months in the freezer.
Nutrition Facts (per serving, estimated)
| 330 kcalCalories | 7gProtein | 37gCarbs | 18gFat |