Bone broth is probably the most underrated recipe in modern cooking. We’ve forgotten it in favor of bouillon cubes and industrial stocks — and it’s a mistake we pay for in every dish. Making your own homemade broth is the foundation of everything else.

In the pot, the color gradually shifts from pale brown to a deep amber, almost the color of light caramel. It smells of roasted meat, warm thyme, and something mineral that you can’t quite name but smells wonderful from the moment you walk through the door. The liquid barely simmers — a few lazy bubbles on the surface, nothing more. When you taste it the next morning, straight out of the fridge and slightly gelled, you immediately understand what you were missing.
Why you’ll love this recipe
Ingredient Notes
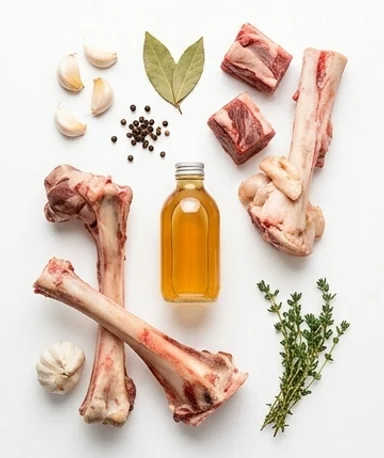
Everything you need for a homemade bone broth: bones, apple cider vinegar, and a few simple aromatics.
- The bones (beef or chicken) : This is where it all happens. For beef, ask for marrow bones or feet — they yield a broth that truly gels. For chicken, keep your carcasses after a roast chicken or buy necks and backs from the butcher for almost nothing. Mixing both works very well and adds complexity.
- Apple cider vinegar : A tablespoon in the cold water at the start. It seems anecdotal, but it isn’t. The acidity helps extract minerals from the bones during simmering. You won’t taste it at all in the final broth — it completely disappears.
- Garlic and onion : No need to peel them if you’re going to strain the broth at the end. Cut the onion in half, place it cut-side down directly in the dry pot to char it a bit — it adds depth and a deeper amber hue to the broth.
- Bay leaf and thyme : Two or three bay leaves and a few sprigs of thyme, fresh if you have them. These are what give the broth that simmering kitchen smell you recognize from the hallway. Dried works too, but fresh is better.
Why I never skip roasting the bones first
Most recipes tell you to throw the bones directly into the water. That’s where it goes wrong. Raw bones yield a pale, somewhat bland broth without that depth we’re looking for. Twenty minutes in the oven at 200°C, and everything changes. They caramelize on the surface, turn dark brown on the edges, and the kitchen smells like roasted meat — which is already a good sign. This process creates the complex aromas found in the final broth. It only adds twenty minutes to the recipe. It doubles the result.
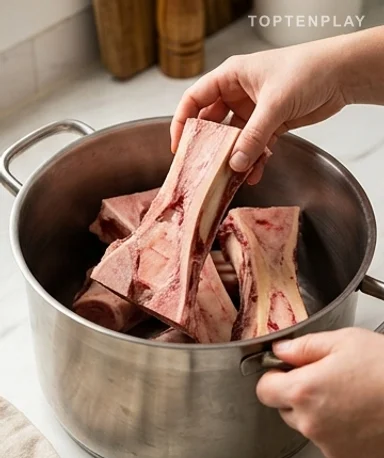
The part everyone fails: the cold start
After the oven, the bones go into the large pot with cold water — not hot, cold. Cold water allows proteins and impurities to gradually rise to the surface rather than being trapped in the broth. During the first hour, you’ll see a grayish foam appear. Skim it off with a spoon. It’s slightly tedious but only lasts ten minutes in total, and it makes the difference between a cloudy broth and a clear one. After that, you have nothing left to do.
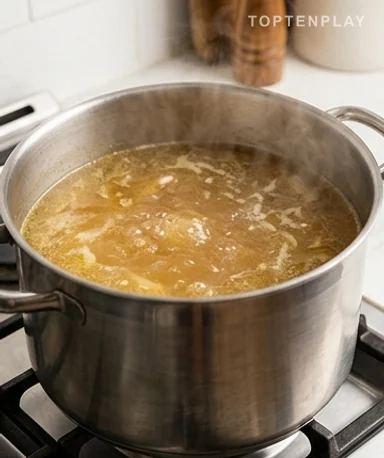
Ten hours on very low heat — and not an hour less
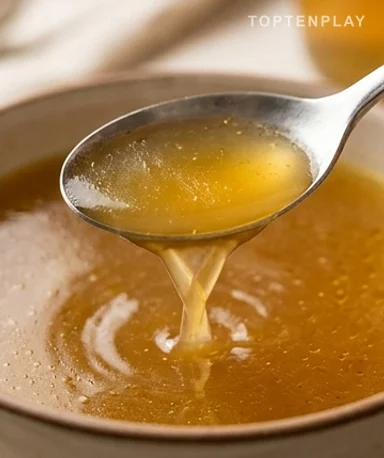
The heat must be set to the absolute minimum. Barely visible ripples, not a boil. If it really boils, the broth becomes cloudy and a bit bitter. It should just murmur. During the first few hours, a warm and slightly sweet smell begins to fill the kitchen — the collagen slowly dissolving. After six hours, the liquid has already taken on a beautiful amber tint. After ten hours, it is concentrated, deep, and if you take a spoonful and let it cool, it gels slightly — exactly what we’re looking for.
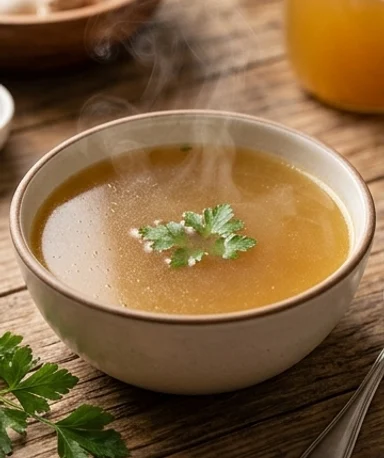
How to serve this to guests without looking like you’re serving hot water
Plain bone broth in a bowl is fine. Bone broth with a few details is an appetizer that speaks volumes. A drizzle of olive oil, a few leaves of cilantro or flat-leaf parsley, a pinch of turmeric and freshly grated ginger if you have it. Serve it in wide, shallow soup bowls, very hot — the broth cools quickly and must be drunk piping hot. Your guests will feel like you’ve done something sophisticated. The reality is, you were just patient.
Tips & Tricks
- Strain the broth through a fine sieve — or even a cheesecloth if you have one — and put it in the fridge overnight before using. The next day, the fat solidified on the surface can be removed in one single block. Cleaner, lighter, and the taste is even better after resting.
- Freeze the broth in portions using ice cube trays or 500 ml Mason jars. Each frozen broth cube is worth infinitely more than any store-bought cube — and you can add it directly to a pan without thawing.
- If you want a more concentrated broth — for a sauce or a jus — reduce it over high heat after straining until it lightly coats the back of a spoon. This is called a ‘fond’ or stock, and it’s what restaurants use.
How long does bone broth keep in the refrigerator?
A well-strained and quickly cooled broth keeps for 5 to 7 days in the refrigerator in an airtight container. For longer storage, freeze it in 500 ml portions — it easily lasts 3 months in the freezer without loss of quality.
Can I make this recipe without a pressure cooker, just using a normal pot?
Absolutely, and that is actually the recommended method here. A large heavy-bottomed pot over very low heat for 8 to 12 hours yields a result superior to a pressure cooker in terms of depth and clarity. The pressure cooker reduces the time to 2-3 hours but also compresses the aromas differently.
My broth doesn’t gel when cold — what happened?
Two possible reasons: either the bones lacked collagen (prefer beef feet, chicken necks, or marrow bones), or the broth wasn’t concentrated enough — too much water relative to the bones. Next time, slightly reduce the amount of water or extend the simmering by an hour or two.
Can I reuse the same bones for a second batch of broth?
Technically yes, but the second broth will be much lighter and less gelatinous — most of the collagen has already been extracted. It can serve as a base for a vegetable soup, but don’t expect the same result as the first run.
Can I add vegetables from the start?
For aromatics (garlic, onion, bay leaf, thyme), yes, right from the start. For softer vegetables like carrots or celery, it’s better to add them in the last 2 hours — too long in the pot and they give off a slight bitterness that makes the broth heavy.
What can I replace bone broth with if I don’t eat meat?
A well-constructed vegetable broth — with plenty of roasted onions, celeriac, dried mushrooms, and soy sauce — approaches the depth of an animal stock. It won’t gel, but in terms of concentrated flavor, it’s a serious alternative.
Homemade Bone Broth
French
Broth & Stock
A broth slowly simmered from oven-browned bones, rich in collagen and deep flavors. The foundation of any good home-cooked meal.
Ingredients
- 1,5 kg marrow bones or chicken carcasses (or a mix of both)
- 2,5 litres cold water
- 1 tablespoon apple cider vinegar
- 1 large onion, halved (unpeeled)
- 6 cloves of garlic, unpeeled, lightly crushed
- 3 leaves of bay
- 4 sprigs of fresh thyme
- 1 teaspoon of black peppercorns
- 1 teaspoon of salt
Instructions
- 1Preheat the oven to 200°C. Arrange the bones in a single layer on a tray and roast for 20 minutes until well browned.
- 2Meanwhile, heat a large dry pot over medium heat. Place the onion cut-side down and let it char for 3 to 4 minutes without moving it.
- 3Transfer the roasted bones to the pot. Add the cold water, apple cider vinegar, garlic, bay leaves, thyme, and peppercorns.
- 4Bring very slowly to a simmer — never let it boil. Skim off the grayish foam that rises to the surface during the first hour.
- 5Maintain a very gentle simmer (a few lazy bubbles) for 8 to 10 hours. Partially cover and check occasionally that the heat remains low.
- 6Strain the broth through a fine sieve. Salt lightly. Let it cool then refrigerate overnight.
- 7The next day, remove the layer of solidified fat from the surface. The broth is ready to use or freeze.
Notes
• Storage: 5 to 7 days in the refrigerator, up to 3 months in the freezer in 500 ml portions. Broth ice cubes in the freezer are handy for sauces.
• For a more concentrated broth (stock), reduce the strained broth over high heat until it lightly coats the back of a spoon.
• Spicy variant: add 1 cinnamon stick, 2 star anise, and 1 piece of fresh ginger in the last 2 hours for a broth with Asian accents.
Nutrition Facts (per serving, estimated)
| 45 kcalCalories | 6gProtein | 1gCarbs | 2gFat |