Have you ever gazed at a kringle in a Scandinavian bakery window, wondering if it’s really doable at home? The answer is yes — and without professional equipment or pastry chef skills. This homemade almond kringle is exactly what you serve when you want to impress without spending the night in the kitchen.
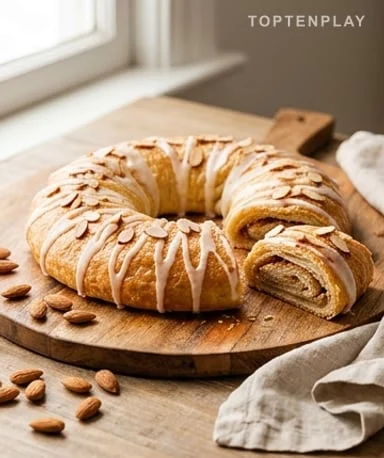
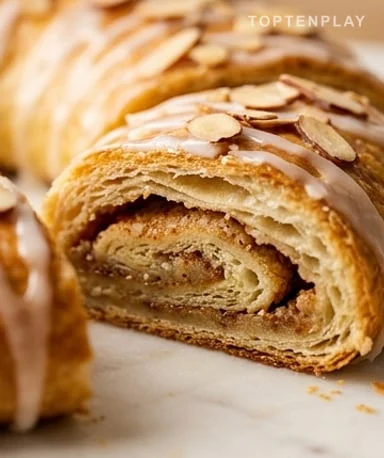
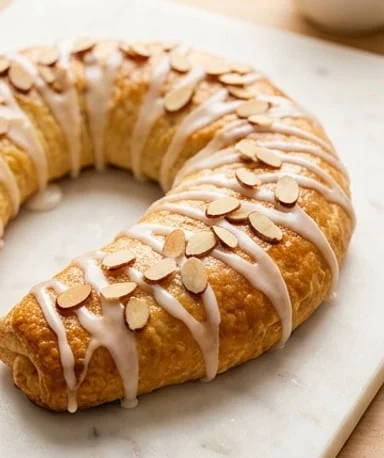
The golden dough spirals around a creamy toasted almond filling, with a white glaze that sets on the surface and cracks slightly under the knife. The smell coming from the oven — butter, almond, vanilla — is hard to describe as anything other than an invitation. When sliced, the layers are clearly visible: the thin, flaky dough, the dense almond cream, the slightly caramelized edges where the filling has overflowed. It’s visually generous, and the taste delivers on every promise.
Why you’ll love this recipe
Ingredient Notes
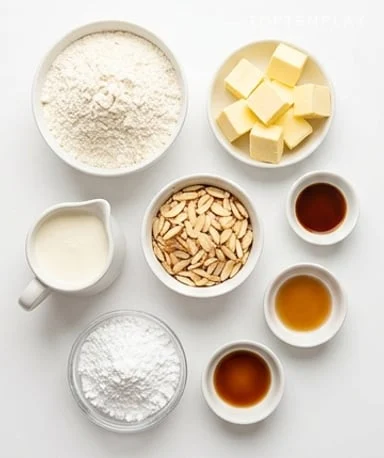
Everything you need for a homemade kringle: flour, very cold butter, sliced almonds, cream, almond and vanilla extracts.
- Cold unsalted butter : This is what creates the flaky layers in the dough. The colder it is when incorporated, the less it melts into the flour — preserving those little lumps that steam during baking and separate the layers. Take it out of the fridge at the last moment, cut it into small cubes, and work quickly. If you feel your hands warming the dough, return everything to the fridge for five minutes before continuing.
- Blanched sliced almonds : They form the heart of the filling. Toasting before use is not optional: raw almonds give a bland taste and a soft texture in the cream. When toasted, they develop a pronounced nutty flavor and add chew. Choose almonds with uniform color and no stale smell — a rancid almond ruins the entire filling.
- Pure almond extract : This is the signature aroma of the kringle, to be dosed precisely as it quickly becomes cloying in large amounts. Half a teaspoon in the filling, a few drops in the glaze: that’s enough. Prefer pure extract to synthetic flavoring — the difference in taste is clear, one is round and deep, the other reminiscent of medicine.
- Heavy cream : It binds the ground almonds and sugar into a homogeneous cream that doesn’t break apart during baking. The fat prevents the sugar from burning too quickly on the pot walls and brings that richness in the mouth not found with milk. For a lactose-free version, a thick oat cream works adequately, as long as it’s at least 15% fat.
- Ice water : The secret to a flaky dough is temperature. Cold water prevents the butter from melting from the heat of your hands during mixing. Put a glass of water with a few ice cubes ten minutes before starting, and add it spoon by spoon — the exact amount varies based on your flour’s humidity and room temperature. It’s better to add too little and add more than to soak the dough from the start.
- Powdered sugar (for glaze) : It forms a smooth, grain-free glaze that adheres well to the surface of the still-warm kringle. The fineness of the grind is what gives that silky texture in the mouth — ordinary granulated sugar would leave a sandy sensation. The amount of liquid is adjusted to achieve a consistency that flows without being runny: it should coat the back of a spoon and fall in a thick ribbon.
Work cold for truly flaky dough
The dough for this kringle resembles an enriched shortcrust, but its success hinges on one discipline: keep everything as cold as possible, at all times. Start by mixing the flour and salt, then incorporate the butter cut into small cubes using your fingers or a pastry cutter. The goal is not a uniform texture like for a shortbread — on the contrary, you want to preserve small visible lumps of butter in the flour, like irregular flakes. These intact pieces are what create the flaky layers: during baking, the butter vaporizes and lifts the dough into strata. Then add the ice water spoon by spoon, just enough for the dough to come together when pressed in your hand without being sticky. Too much water and it becomes elastic and hard to roll; too little, it crumbles under the rolling pin and cracks during assembly. Form a rectangular block, wrap it in plastic wrap, and forget it in the fridge for at least two hours — overnight is even better. This rest allows the gluten to relax and the butter to firm up before rolling.
The filling: toasting the almonds changes everything
While the dough rests, prepare the filling, which is both simple and decisive for the final result. Start by toasting the sliced almonds on a sheet at 175°C for about ten minutes, stirring halfway. The signal it’s ready: an even golden color and a smell reminiscent of lightly buttered caramel. Let them cool completely — warm almonds would melt the butter in the filling and make it too runny to hold in the dough. Once cold, process them without going all the way to a fine powder: a few larger pieces add chewiness in the final result. In a saucepan over medium heat, combine the processed almonds with sugar, cream, flour, extracts, and salt. The mixture thickens progressively over five to seven minutes of cooking, stirring constantly — it’s ready when it pulls away slightly from the sides and the spoon leaves a clean furrow that closes slowly. Remove from heat and let cool completely before assembling, without rushing this process.
Shaping the kringle without intimidation
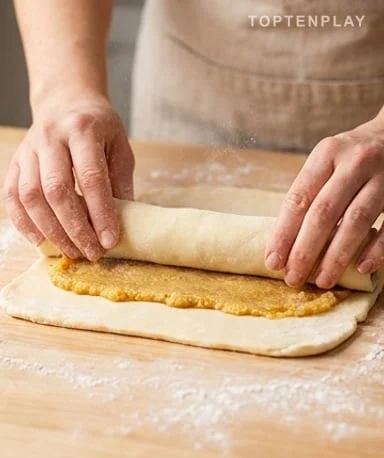
This is where many people get discouraged unnecessarily. Divide the cold dough into two equal blocks, and roll each half on a lightly floured surface into a rectangle about 30 by 45 cm. The dough must stay cold throughout this step: if it starts sticking to the surface or softening, return it to the fridge for five minutes before continuing. Spread the filling in an even layer over each rectangle, leaving a 1 cm border all around — this border prevents the filling from escaping completely during baking. Then roll the filled dough onto itself lengthwise, tight enough for the layers to adhere, but without pressing so hard as to crush the filling. Curve this roll into a horseshoe and place it on the baking sheet lined with parchment. If the ends open, seal them with slightly damp fingers. Before baking, the shaped kringle must go back to the cold for ten minutes — this final chill stabilizes the shape and prevents the dough from collapsing in the oven’s initial heat.
Baking: watch the color, not just the timer
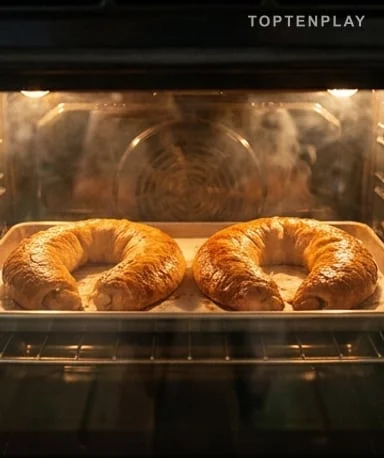
The oven must be preheated to 190°C before the kringle goes in — insufficient temperature would melt the butter in the dough before the structure sets, producing a greasy base and a soft crust. Bake for twenty-five to thirty-five minutes depending on the oven, looking for a deep golden-brown color over the entire surface — not just light golden on top with raw dough underneath. A thermometer inserted into the thickest part should read between 93 and 99°C to confirm doneness. The filling may overflow slightly on the sides during baking: those caramelized edges on the parchment are often the most delicious parts. Let cool on the sheet for about fifteen minutes before transferring to a rack — too early, and the kringle breaks under its own weight. The glaze is drizzled in steady streams over the still slightly warm kringle, which allows it to melt slightly then set into a matte, smooth surface at room temperature.
Glazing and final rest: patience rewarded
The glaze is prepared by whisking powdered sugar with a little milk or cream until a consistency that flows without being runny — it should coat the back of a spoon and fall in a thick ribbon. Drizzle over the kringle in tight streams, sprinkle with sliced almonds before the glaze sets, and wait at least fifteen minutes before slicing. This resting time is not trivial: the still-soft glaze makes slices slide and doesn’t give the clean cut that reveals the beautiful spirals. Once the glaze is set, each slice clearly shows the spiral of filling and the layers of dough — that’s when you understand why the effort was worth it.
Tips & Tricks
- Do not work the dough beyond the bare minimum to bring it together: the more you knead, the more gluten develops and makes the dough elastic — it shrinks during baking and loses its characteristic crispness.
- Let the filling cool completely before assembling, even if it already seems thick. A warm filling softens the cold dough on contact and makes rolling difficult without tearing — all the work on the dough is compromised in ten seconds of impatience.
- Add the liquid for the glaze drop by drop, not all at once: an excess of milk at once turns the glaze into a syrup that runs entirely onto the sheet rather than staying on the surface of the kringle.
- To reheat slices without drying the dough, wrap them in aluminum foil and place them in a 150°C oven for ten minutes. The dough regains its crispness without the filling becoming dry or the glaze hardening.
Can I prepare the dough the day before?
Yes, and it’s even recommended. Dough that rests overnight in the fridge is easier to roll the next day because the gluten has had time to relax and the butter is well firm. Wrap it in plastic wrap and take it out ten minutes before working on it — not more, otherwise it softens too quickly.
Can the kringle be frozen?
Yes, the kringle freezes very well, preferably without glaze. Let it cool completely, wrap it in plastic wrap then aluminum foil, and freeze for up to a month. To serve, let it thaw at room temperature for two to three hours then prepare the glaze at the last moment — a frozen then thawed glaze loses its smooth appearance.
The filling overflows during baking, is that normal?
Absolutely. A slight overflow on the edges is inevitable, especially at the ends of the roll. That’s not a problem as long as you left a 1 cm border during assembly. Those caramelized edges on the parchment are often the most delicious parts of the kringle.
I don’t have almond extract, what can I use?
Almond extract is hard to replace exactly because it gives the characteristic aroma of Scandinavian kringle. As a substitute, double the vanilla quantity and add a few drops of lemon extract for depth. The result will be very good, but the aromatic profile will be different — closer to a classic pastry than a traditional kringle.
How do I know if the kringle is baked through?
The outside color is a good indicator — a deep golden-brown rather than pale yellow. For absolute certainty, use a kitchen thermometer: the internal temperature at the thickest point should reach between 93 and 99°C. If you don’t have a thermometer, check that the dough doesn’t feel soft or creamy underneath when you lightly press the top.
Can I replace the almonds with another nut?
Yes, hazelnuts and pecans work very well with the same technique — just toast them the same way and process finely. Adjust the extract accordingly: with hazelnuts, you can use hazelnut paste instead of almond extract. Avoid cashews and peanuts, as their texture becomes pasty when baked.
Homemade Almond Kringle
Scandinavian
Pastry
A Scandinavian horseshoe-shaped pastry: homemade flaky dough wrapped around a toasted almond cream, topped with a smooth glaze and sprinkled with sliced almonds.
Ingredients
- 312 g all-purpose flour
- 1/2 tsp fine salt
- 226 g cold unsalted butter, cubed
- 90 ml ice water (about 5-6 tablespoons)
- 150 g blanched sliced almonds
- 150 g granulated sugar
- 120 ml heavy cream
- 24 g all-purpose flour (for filling)
- 1 tsp pure almond extract
- 1/2 tsp pure vanilla extract
- 1 pinch salt (for filling)
- 180 g powdered sugar
- 3 tbsp milk or heavy cream (for glaze)
- 1/4 tsp almond extract (for glaze, optional)
- 2 tbsp sliced almonds (for final garnish)
Instructions
- 1In a large bowl, mix flour and salt. Incorporate the cold cubed butter using fingertips until irregular pea-sized lumps form — do not aim for complete homogeneity. Add ice water spoon by spoon, mixing with a fork, until dough comes together when pressed without sticking. Form a rectangular block, wrap in plastic wrap, and refrigerate for at least 2 hours, ideally overnight.
- 2Preheat oven to 175°C. Spread sliced almonds on a baking sheet and toast for 10 minutes, stirring halfway, until evenly golden and fragrant. Let cool completely, then process finely in a food processor without reducing to a complete powder — some small pieces add texture.
- 3In a saucepan over medium heat, combine processed almonds, sugar, cream, flour, both extracts, and salt. Cook stirring constantly for 5 to 7 minutes until thickened — the mixture is ready when the spoon leaves a clean furrow that closes slowly. Remove from heat and let cool completely at room temperature.
- 4Preheat oven to 190°C. Line a large baking sheet with parchment paper. Divide dough into two equal blocks. On a lightly floured surface, roll each half into a 30×45 cm rectangle, working quickly to keep dough cold.
- 5Spread half of the cooled filling over each rectangle, leaving a 1 cm border all around. Roll each rectangle tightly lengthwise into a log. Curve each log into a horseshoe and place on prepared sheet. Seal ends with slightly damp fingers if needed. Refrigerate for 10 minutes before baking.
- 6Bake in center of oven for 25 to 35 minutes, until deep golden brown all over. Internal temperature should reach 93 to 99°C at the thickest point. Let cool on sheet for 10 to 15 minutes, then transfer carefully to a wire rack.
- 7Whisk powdered sugar with milk or cream and almond extract (if using) until smooth and flowing in a thick ribbon. Drizzle in even streams over the still slightly warm kringles. Immediately sprinkle with sliced almonds. Let glaze set for at least 15 minutes before slicing to reveal the spirals.
Notes
• The dough can be made the day before without issue: it is even easier to work after an overnight rest in the fridge.
• The kringle keeps for 2 days at room temperature, well wrapped in plastic wrap or aluminum foil. To reheat, wrap slices in aluminum foil and warm in a 150°C oven for 10 minutes.
• For freezing, let cool completely before wrapping carefully, without glaze. Prepare the glaze once the kringle is thawed and at room temperature.
• Almonds can be replaced with hazelnuts or pecans using the same toasting and processing technique.
Nutrition Facts (per serving, estimated)
| 365 kcalCalories | 5 gProtein | 47 gCarbs | 19 gFat |