Why pay restaurant prices for something that can be made in twenty minutes with five ingredients? Garlic butter shrimp scampi is one of those recipes that looks impressive but asks for very little. Butter, garlic, shrimp — and a technique we’re going to break down together.
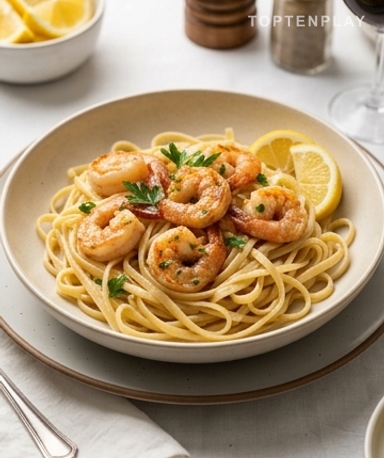
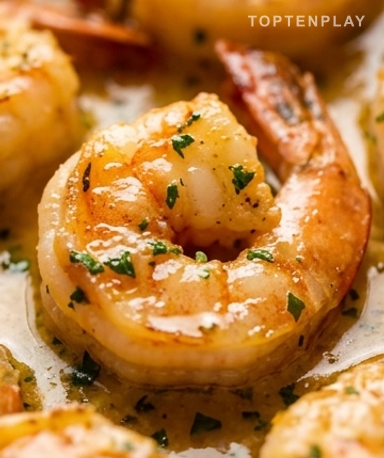
Imagine a shallow dish, pink and slightly plump shrimp under a layer of glossy sauce, a golden color verging on amber. The garlic has melted into the warm butter to the point of almost disappearing, but its scent fills the entire kitchen the moment you open the oven. Lemon juice cuts through it all with a sharp, clean acidity. And under the fork, the shrimp yields with that little elastic snap that indicates it’s cooked perfectly — neither rubbery nor mushy.
Why you’ll love this recipe
Ingredient Notes
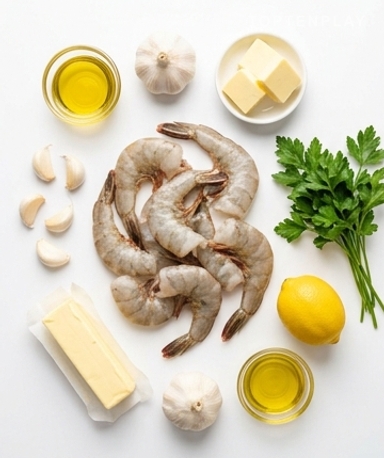
All the scampi ingredients gathered: fresh shrimp, garlic, butter, and parsley.
- Shrimp : Get them large if you can — tiger shrimp or prawns are perfect here. Fresh or frozen, it doesn’t matter, but if they are frozen, thaw them completely in the fridge overnight and dry them well with paper towels before putting them in the pan. A wet shrimp will never brown properly in hot butter.
- Garlic : Fresh. Mandatory. Garlic powder is another recipe — not this one. Count on 4 to 6 cloves depending on your tolerance, finely minced so they melt into the sauce without leaving bits that burn.
- Butter : A decent quality unsalted butter — no need to buy the most expensive one on the shelf, but avoid margarines. It makes up 80% of the sauce, so its quality is felt directly. You can cut it with a drizzle of olive oil to prevent it from burning too quickly.
- Vegetable Broth : It replaces the white wine from the original recipe. Use a low-sodium broth — if you use broth that’s too salty, the sauce reduces and becomes inedible. Two to three tablespoons are more than enough.
- Lemon : The juice of half a lemon at the end of cooking is enough. It brightens everything without dominating. Keep a few slices for serving — squeezing them directly into the plate while eating is even better.
The sauce, above all
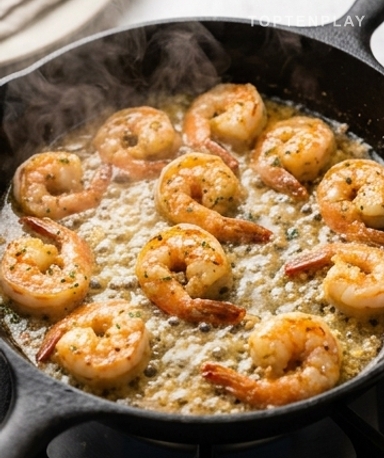
Start with the butter in a large skillet over medium heat. Wait until it melts completely and begins to foam slightly — that’s the signal. Toss the minced garlic in and you’ll immediately hear that characteristic whisper, that soft sizzle that indicates the heat is starting to work. Thirty seconds, no more. The garlic should turn golden, not brown — the nuance is thin, but if you leave it too long it turns bitter and the sauce is ruined. Add the vegetable broth, let it reduce for a minute. The sauce takes on a slightly syrupy consistency and a translucent buttery yellow color. This is your base.

Shrimp in the pan
Add the shrimp in a single layer. If your pan is too small, do it in two batches — an overcrowded pan boils instead of searing, and it’s a failure. Two minutes on each side. The shrimp changes color very precisely: it goes from translucent gray to opaque pink with a slight orange tint on the edges. As soon as you see this change reach the center, flip it. Two minutes on the second side, not a second more. An overcooked shrimp is detected by touch: it becomes compact and resistant instead of being slightly flexible. Lemon juice, salt, pepper, chopped parsley. A quick mix.
Two minutes under the broiler
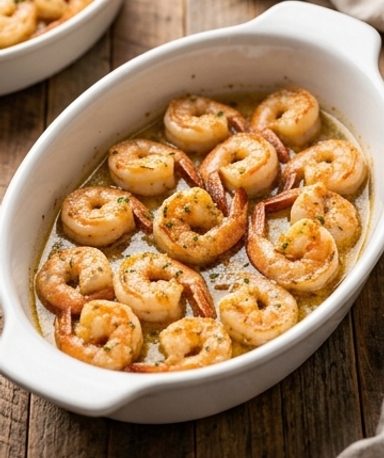
This is the step that makes all the difference compared to the classic pan version. Pour everything into an oven-safe dish — the shrimp, all the sauce. Slide under the broiler at 220°C for exactly two minutes. The surface of the shrimp takes on a light caramel color, almost like the start of a crust, and the sauce begins to bubble at the edges of the dish. This broiler step gives that slightly grilled taste and that scent that comes out of the oven just like in a real restaurant. Serve immediately — shrimp doesn’t wait.
Tips & Tricks
- Dry your shrimp well before putting them in the pan. A wet shrimp will make the butter splatter, drop the temperature suddenly, and you’ll end up with steamed shrimp instead of seared. A paper towel, thirty seconds, and everything changes.
- If serving with pasta, save a ladle of cooking water before draining. Add it to the sauce at the last moment to stretch it and make it more coating without needing cream.
- Never prepare the shrimp in advance and do not reheat them. They toughen as they cool. This dish is meant to be eaten within five minutes of leaving the oven — plan accordingly.
Can I use frozen shrimp?
Yes, no problem. Thaw them completely in the fridge overnight, then dry them carefully with paper towels before cooking. The drying step is essential: a damp shrimp steams instead of searing in the hot butter.
How to avoid rubbery shrimp?
The rule is simple: two minutes per side, no more. The shrimp is cooked as soon as it turns from translucent gray to opaque pink all the way through. If it curls into a complete circle and becomes very firm to the touch, it’s too late.
Can I prepare scampi in advance?
No, this dish doesn’t tolerate waiting. Shrimps become rubbery as they cool and reheating doesn’t fix much. Prepare all your ingredients in advance, but cook at the last minute — it really takes 15 minutes.
What to serve with this scampi?
Linguine or spaghetti are the classic choice. Crusty bread for dipping in the sauce works very well too, or even better if you want to lighten the meal. Basmati rice is a valid alternative if you don’t have pasta on hand.
Can I skip the broiler step?
Yes, the 100% pan version works. The broiler adds a slight surface caramelization and a characteristic grilled scent, but if you’re in a hurry or don’t have an oven, the pan alone gives a very decent result.
Garlic Butter Shrimp Scampi
American
Main course
Shrimp seared in a generous garlic-butter sauce, finished for two minutes under the broiler for a light golden caramelization. Inspired by Red Lobster, ready in 25 minutes.
Ingredients
- 700g large raw shrimp, peeled and deveined (tiger shrimp or prawns)
- 90g unsalted butter
- 2 tablespoons (30ml) olive oil
- 6 garlic cloves, finely minced
- 60ml (4 tablespoons) low-sodium vegetable broth
- 1 lemon (juice + slices for serving)
- 30g fresh parsley, coarsely chopped
- 1 pinch red pepper flakes (optional)
- 320g linguine or spaghetti for serving
- Salt and black pepper to taste
Instructions
- 1Cook the linguine al dente according to package instructions. Reserve a ladle of cooking water, drain, and set aside.
- 2Carefully dry the shrimp with paper towels. Season with salt and pepper.
- 3Heat the butter and olive oil in a large skillet over medium heat. As soon as the butter foams, add the garlic and sauté for 30 seconds while stirring — it should turn golden without browning.
- 4Pour in the vegetable broth and let reduce for 1 minute over medium-high heat.
- 5Add the shrimp in a single layer and cook for 2 minutes without moving them.
- 6Flip the shrimp and cook for 2 minutes on the other side. Add the lemon juice, pepper flakes, and parsley. Mix.
- 7Preheat the oven broiler to 220°C. Transfer the shrimp and all the sauce to an oven-safe dish.
- 8Place under the broiler for 2 minutes, until a light caramel color forms on the surface. Serve immediately over the linguine.
Notes
• Storage: 24h maximum in the refrigerator, but the shrimp lose much of their texture. This dish is best eaten fresh out of the oven.
• Without pasta: excellent served with crusty bread for dipping the sauce, or over basmati rice.
• Sauce too thick: add the reserved pasta cooking water, one spoonful at a time, to adjust consistency.
Nutrition Facts (per serving, estimated)
| 630 kcalCalories | 43gProtein | 56gCarbs | 25gFat |