People who resist a bite of melted cheese inside a buttery garlic dough simply haven’t tried the right version yet. It’s as simple as that. Cheese bombs are the ultimate comfort food recipe that silences an entire room — everyone eats, no one talks.
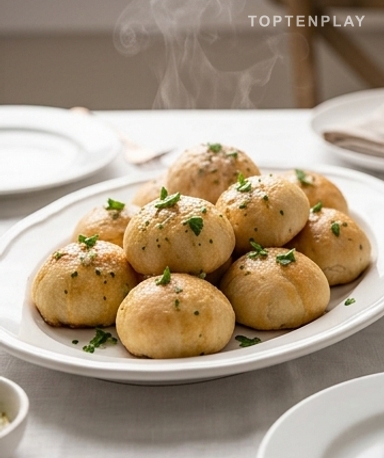
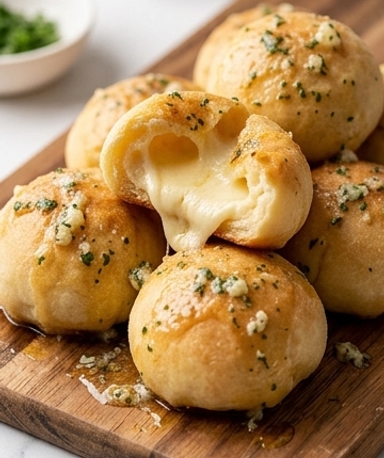
Before you, about twenty small golden bombs, amber like caramel, still steaming on the board. The smell of garlic butter that took over the kitchen during the 18-minute bake still lingers in the air. You pick one up — the dough is warm, slightly tacky, and when you tear it in half, the cheese resists for a fraction of a second before stretching into a long, shiny, perfect string. It’s comforting on a level that’s hard to explain.
Why you’ll love this recipe
Ingredient Notes
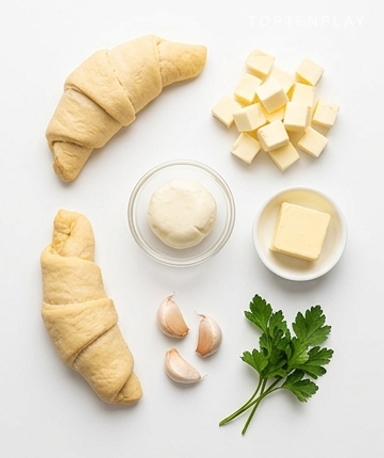
Everything you need for successful cheese bombs: dough, mozzarella, and garlic butter.
- Canned crescent roll dough : This is the base, and it really does the job. Pre-portioned and slightly buttery, it puffs up well and browns easily. Canned pizza dough works too, but it results in a denser, bread-like bite — a matter of preference depending on your mood.
- Block mozzarella : Not fresh mozzarella in water — too much moisture will soak the dough before it even cooks. Use ‘low-moisture’ pizza mozzarella in a block and cut it into 2 cm cubes. It melts perfectly with that signature stretch when you open the bite.
- Semi-salted butter : Real butter, no margarine. Melted gently — it shouldn’t foam or brown. Semi-salted provides a nice contrast with the cheese. If you have unsalted, add a good pinch of sea salt to the mixture.
- Fresh garlic : Finely minced, not crushed with a garlic press which makes it too pasty. Fresh garlic stays sweet while cooking and very fragrant. Garlic powder works in a pinch, but it burns quickly and turns bitter — avoid it if possible.
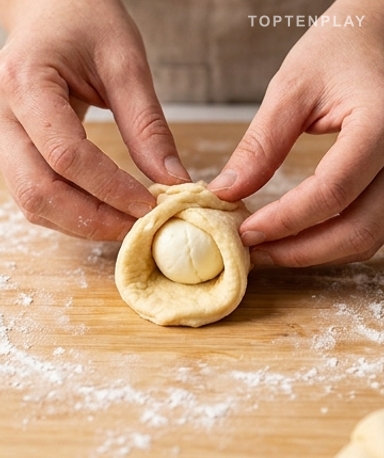
Pinch the seams twice to be sure
Preparation comes down to two moves: wrapping and sealing. Stretch each dough triangle slightly with your fingers — just enough to have space in the center, no rolling pin needed. Place a cube of cheese, bring all edges to the top, and pinch firmly. Very firmly. At 190°C, the cheese wants to escape. It will find the smallest crack, and you’ll end up with a golden puddle on your tray instead of a bite. Place each cheese bomb seam-side down on the parchment paper — gravity does the rest of the work during baking.
Let the butter infuse off the heat
Melt the butter over very low heat in a small saucepan — it should liquefy silently, without crackling or making a sound. Off the heat, add the finely minced garlic, chopped parsley if you have it, and a pinch of salt. The aroma that rises at this moment — sweet garlic, warm butter, herbs — is a preview of what’s to come. Two minutes of infusion is enough. Brush each bite generously before baking, don’t hold back on the quantity.
Don’t touch a thing for 18 minutes
Oven at 190°C, preferably convection. The cheese bombs need this time to puff up slowly, brown evenly, and for the cheese to melt to the core without burning. They will bulge, take on that amber caramel hue, and the whole kitchen will start to smell like garlic and warm butter. If your oven is temperamental and runs hot, a check at 15 minutes is enough. The base shouldn’t be dark, just golden.
A second coat of butter right out of the oven
This is the step most people skip. As soon as the tray comes out of the oven, still steaming, brush a second layer of garlic butter over each bite. The hot, porous dough absorbs everything in seconds — it becomes shiny, slightly tacky to the touch, and the garlic flavor intensifies. This second pass is what separates a decent bite from one you can’t stop eating.

Tips & Tricks
- Add some grated Parmesan to the garlic butter before brushing — it melts onto the hot dough and creates a thin umami crust that you can’t see but can definitely taste.
- You can assemble the bites in advance and keep them raw in the fridge for up to 4 hours. Bake them straight from the cold, just adding 2 extra minutes in the oven.
- Eat them hot. The cheese sets as it cools and loses its meltiness — they are cheese bombs, not cheese bricks.

Why did my cheese leak out during baking?
The problem is almost always a poorly sealed seam. The dough must be pinched very firmly all around, with no gaps. Placing each bite seam-side down on the tray also helps maintain the seal during baking.
Can I make them in advance?
Yes, cheese bombs can be assembled raw up to 4 hours in advance and kept covered in the refrigerator. You can also freeze them raw flat on a tray, then bake them directly from frozen at 190°C, adding 4 to 5 minutes to the cooking time.
What dough should I use if I don’t have canned crescent rolls?
Canned pizza dough works very well — it gives a denser bite, closer to a small bun. Homemade or store-bought pizza dough also works, provided you cut it into approximately 8 cm squares.
Can I use a cheese other than mozzarella?
Absolutely. Cheddar gives a sharper flavor, Gouda a smoother melt, and a mozzarella-cheddar blend is truly excellent. Avoid high-moisture cheeses like fresh mozzarella or fresh goat cheese — they will soak the dough before baking.
How do I reheat them without them getting soggy?
In the oven at 180°C for 5 to 7 minutes — this is the only method that preserves the crispy texture. The microwave softens the dough in 30 seconds and should be avoided at all costs.
How long do they keep after cooking?
Two days in the refrigerator in an airtight container. After that, the dough softens and loses its appeal. They are truly at their best within 10 minutes of leaving the oven.
Garlic Butter Cheese Bombs
American
Appetizer
Melted cheese bites wrapped in golden dough and topped with garlic-parsley butter. Ready in 30 minutes, gone in two.
Ingredients
- 230g (1 tube) refrigerated crescent roll dough
- 200g block mozzarella (not fresh)
- 75g semi-salted butter
- 4 garlic cloves, finely minced
- 1 tbsp chopped fresh parsley
- 1 pinch salt
Instructions
- 1Preheat the oven to 190°C (convection). Line a baking sheet with parchment paper.
- 2Cut the mozzarella into approximately 2 cm cubes (you should get 8 to 10).
- 3Unroll the dough and separate the triangles. Stretch each triangle slightly with your fingers.
- 4Place a cheese cube in the center of each triangle. Bring all edges up and pinch firmly to seal without leaving any gaps.
- 5Place each bite seam-side down on the baking sheet.
- 6Melt the butter over very low heat. Off the heat, add the minced garlic, parsley, and a pinch of salt. Let infuse for 2 minutes.
- 7Brush each bite generously with half of the garlic butter.
- 8Bake for 16 to 18 minutes, until the bombs are beautifully golden and amber-colored.
- 9Immediately after removing from the oven, brush with the remaining garlic butter. Serve immediately.
Notes
• For a more decadent version, add 30g of grated Parmesan to the garlic butter before brushing — it forms a thin golden crust on the dough.
• Freezing: Assemble the raw bites, freeze them flat on a tray for 1 hour, then transfer to a freezer bag. Bake straight from frozen at 190°C for 22 to 24 minutes.
• Variation: Slip a small cube of cheddar in with the mozzarella for a stronger flavor. A drizzle of honey on the bombs before serving is surprising but very good.
Nutrition Facts (per serving, estimated)
| 390 kcalCalories | 14gProtein | 24gCarbs | 26gFat |