Fried tacos are overrated. A hot oven and two baking sheets pressing from both sides — that’s all you need to get a shell that cracks under your teeth without a drop of hot oil to deal with. The simplest method gives the best results, and this recipe proves it.
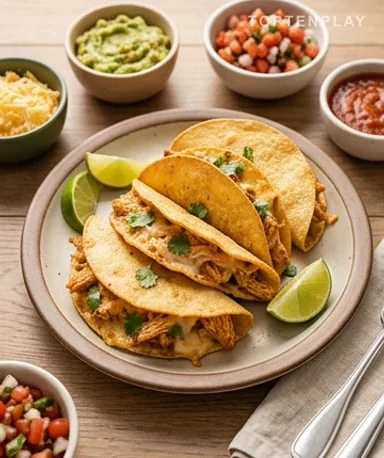
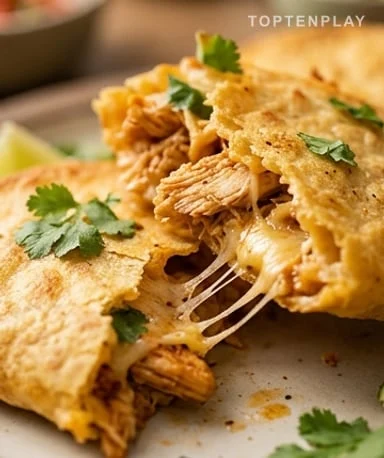
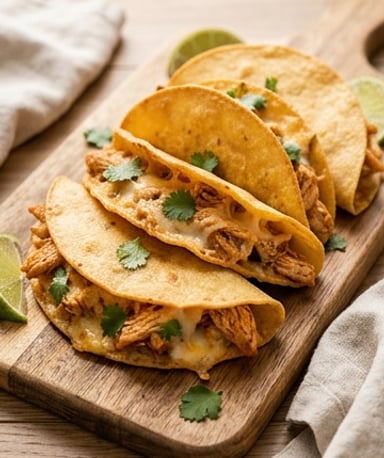
The surface of the tortilla is matte and slightly grainy under your fingers — before you bite and hear that dry, almost crisp crack that confirms the cooking was right. Inside, the cheese has melted into a compact layer, clinging to the shredded chicken that smells of cumin and roasted garlic, not fast-food — something rounder, warmer. The top color is light amber, almost caramel. A squeeze of lime over the top, a few cilantro leaves crushed between your fingers, and it’s ready.
Why you’ll love this recipe
Ingredient Notes
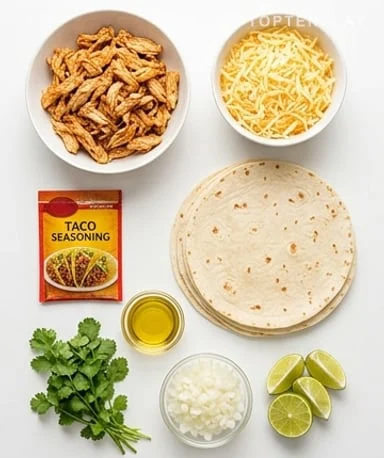
All the ingredients for flavorful tacos: shredded chicken, melty cheese, spices, and fresh tortillas.
- Shredded chicken : No need to cook chicken specifically. A breast poached for five minutes in salted boiling water, a leftover roasted thigh — it works just as well. The important thing: shred finely, not in big chunks. A uniform filling distributes better and the taco closes without forcing.
- Taco seasoning mix : The store-bought packet works perfectly here. But be careful: salt content varies a lot between brands. Taste the filling before assembling, and if it’s too salty, use only three-quarters of the packet. If the mixture seems a bit dry after incorporating everything, a tablespoon of water is enough to loosen it.
- Mexican cheese blend : This blend — usually cheddar, Monterey Jack, and asadero — melts into a stringy, compact texture that holds well inside the taco without running everywhere. If you can’t find it, young cheddar or Monterey Jack alone gives a very similar result.
- Tortillas : Corn or flour: both work, but not the same. Flour browns easily and bends without effort. Corn gives a crunchier shell and a more pronounced flavor, but it cracks if you fold it cold — a thirty-second microwave in a damp cloth solves the problem.
- Lime : Not just decorative. The juice squeezed into the filling brings a sharp acidity that cuts through the spices and wakes up the chicken. Without it, the whole thing falls a bit flat. Half a lime per bowl of filling is the right measure.
Put the baking sheets in the oven before touching the ingredients
This is the step everyone skips and yet changes everything. Two rimmed baking sheets in a preheated oven at 220°C while you prepare the filling — nothing else. When the tacos land on already blazing metal, the tortilla starts cooking from underneath immediately. That’s what creates the crispy bottom, not oil. Without this preheating, you get a soggy base that compromises everything else. Five minutes in the oven is enough.
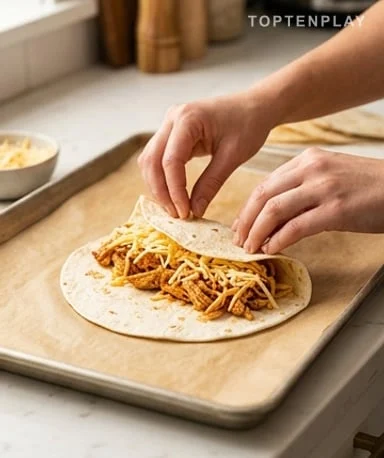
Fill lightly — the filling must not exceed the edge
Place the oiled tortilla with the oiled side down, spread the filling on only one half, and resist the urge to add more. A layer of chicken barely thicker than your little finger, a good handful of cheese on top, and you fold. If the edge gapes a little, pinch a bit of cheese on the seam: it will melt and glue the two sides together. Too much filling and the taco opens in the oven, cheese runs onto the sheet, and you get something rubbery rather than crispy. Keep it light — that’s the only truly important rule here.
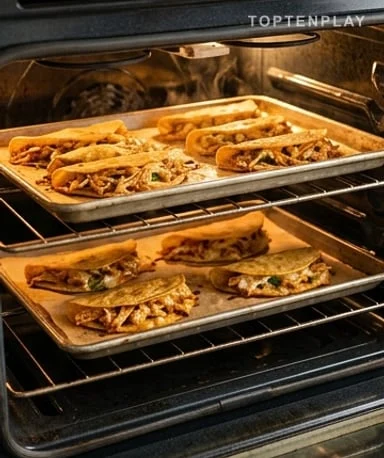
Place the second sheet and forget the tacos for eighteen minutes
Transfer the folded tacos onto the first sheet lined with parchment paper, cover with a second sheet of parchment, then place the second hot sheet on top, pressing down for a second to stabilize. That’s all the effort needed. Close the oven. Around the fifteenth minute, a smell of grilled, almost roasted spices starts coming out of the oven — that’s the signal it’s going well. When you lift the top sheet at eighteen minutes, the surface should be light amber. Let rest for two minutes before serving: the shell firms up a bit more as it cools and holds better in the hand.
Tips & Tricks
- If making multiple batches, put the empty sheets back in the oven between each batch — a cold sheet starts from zero and gives you a soft bottom for the next batch.
- The filling alone freezes well. Make double, put half in a flat bag in the freezer, and you have a base ready for the following week.
- For tacos that hold together well: add a little cheese on the outer edge before baking. It melts and glues the two sides together like a weld — no more taco opening mid-cook.
Can I prepare the filling in advance?
Yes, and it’s even recommended. The chicken mixed with spices and lime juice keeps for two days in the refrigerator in an airtight container. Just assemble and bake when needed.
Corn or flour tortillas: which to choose?
Both work, but differently. Flour tortillas brown easily, fold without resistance, and forgive beginner mistakes. Corn gives a crunchier shell and a stronger flavor, but it cracks if folded cold — a 30-second microwave in a damp cloth is essential.
How to reheat leftovers without softening them?
Avoid the microwave: it turns the shell into a soft rag in under two minutes. Reheat the tacos in an oven at 190°C or an air fryer for 5 to 7 minutes — they regain their crispness. They keep for 4 days in the refrigerator in an airtight container.
I don’t have taco seasoning. How to replace it?
Mix 1 teaspoon ground cumin, 1 teaspoon sweet paprika, ½ teaspoon garlic powder, ½ teaspoon dried oregano, and a pinch of cayenne pepper. That’s the essence of what a store-bought packet contains, without the additives.
Can I get by without the two-sheet technique?
Yes. Arrange the tacos on a single preheated sheet and flip them halfway through with a spatula. The result is slightly less uniform — one side will brown better than the other — but still very good.
What sides to serve with these tacos?
Salsa, guacamole, pico de gallo, and finely shredded lettuce cover the basics. To go further: sour cream mixed with lime juice and a pinch of salt — that’s homemade crema in two minutes.
Crispy Oven-Baked Chicken Tacos
Mexican
Main course
Golden, crispy tacos on both sides, filled with spiced shredded chicken and melted cheese — no frying, thanks to a simple double-sheet technique.
Ingredients
- 280g (about 2 cups) cooked shredded chicken (roasted, poached, or breast)
- 1 packet (30g) taco seasoning mix
- 1 lime (juiced)
- 8 small flour or corn tortillas (6-inch diameter)
- 1 tablespoon olive oil
- 200g (about 2 cups) shredded Mexican blend cheese (cheddar, Monterey Jack, or asadero)
- a few leaves fresh cilantro (optional)
Instructions
- 1Preheat oven to 220°C. Place two rimmed baking sheets inside and heat for 5 minutes.
- 2In a bowl, mix shredded chicken with taco seasoning and lime juice. Add a tablespoon of water if the filling seems dry.
- 3If using corn tortillas, wrap them in a damp cloth and microwave for 30 seconds to soften.
- 4Brush one side of each tortilla with oil, then flip them oiled side down.
- 5Spread chicken filling and cheese on one half of each tortilla, without overfilling the edge. Fold gently in half.
- 6Line one hot sheet with parchment paper and arrange the tacos. Cover with a second sheet of parchment, then place the second hot sheet on top, pressing down lightly.
- 7Bake for 18 to 22 minutes, until the tacos are golden and crispy. Let rest for 2 minutes before serving.
Notes
• Storage: 4 days in the refrigerator in an airtight container. Reheat in oven at 190°C or air fryer — not microwave.
• Make ahead: prepare filling up to 2 days in advance. Assemble and bake at the last moment to keep tortillas crispy.
• If cooking in multiple batches, put empty sheets back in the oven between batches to keep them hot.
Nutrition Facts (per serving, estimated)
| 620 kcalCalories | 48gProtein | 44gCarbs | 27gFat |