The smell that fills the kitchen when this pie comes out of the oven—warmed nutmeg, light caramel on the golden crust—is hard to describe without sounding excessive. It’s an Amish recipe: no fuss, no exotic ingredients, just a mastered technique that turns milk, eggs, and sugar into something remarkably elegant. The kind of dessert you unhesitatingly file under timeless classics.
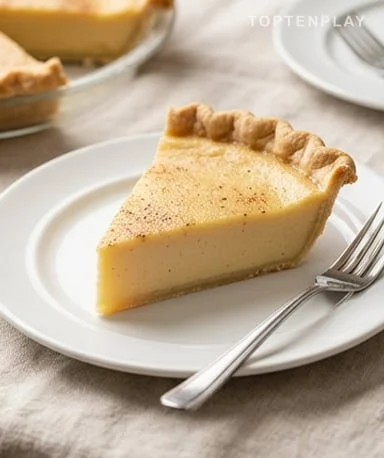
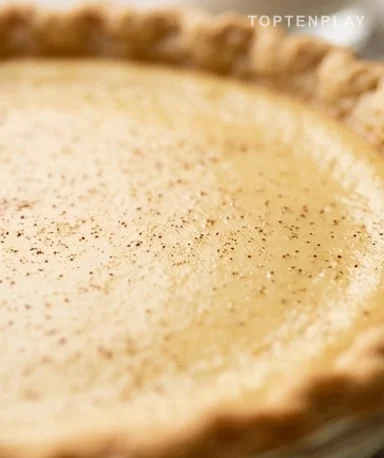
In cross-section, the custard reveals a creamy, dense texture, pale yellow almost ivory, without a single bubble or irregularity. The fork sinks in with a gentle resistance, like a crème brûlée without the sugar shell. The edges of the filling, slightly firmer, give way to a center that barely trembled upon unmolding—a sign the baking was just right. The crust, thin and flaky, provides the crunchy contrast that keeps the whole thing from being too heavy.
Why you’ll love this recipe
Ingredient Notes
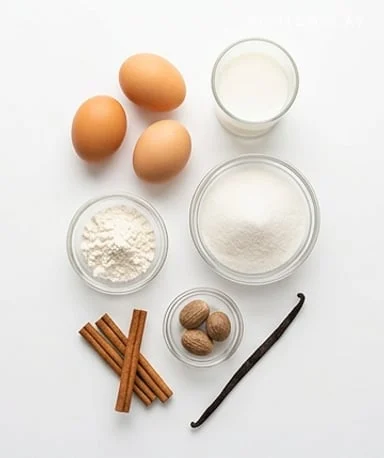
Eggs, whole milk, sugar, flour, vanilla, cinnamon, and nutmeg—that’s all you need.
- Whole milk : This is the liquid base of the custard, and the fat it contains is responsible for the final creamy texture. Avoid reduced-fat or skim milk: the filling will be too thin and won’t hold together when sliced. If you only have reduced-fat on hand, compensate with a tablespoon of heavy cream.
- Whole eggs + extra yolk : The whites coagulate and stabilize the custard structure, while the yolks provide the lipids responsible for tenderness and richness in the mouth. That extra yolk alone is a subtle adjustment that makes a big difference: the pie stays silky rather than rubbery. Take them out of the refrigerator at least 30 minutes before starting.
- White granulated sugar : Basic granulated sugar is preferable here to brown sugar or raw sugar: it dissolves more easily in the cold mixture and doesn’t alter the ivory color of the custard. An unrefined sugar would add molasses notes that would directly compete with the vanilla.
- Flour (1 tablespoon) : This small amount may seem trivial but plays a precise role: it stabilizes the custard by absorbing excess moisture and slows egg coagulation under heat. Don’t give in to the temptation to increase the amount—you’d get a floury, compact texture far from the desired lightness.
- Pure vanilla extract : Vanilla softens the overly pronounced egg flavor and gives the custard its character. Use pure extract, not artificial flavoring—the difference is noticeable in such a simple preparation where each ingredient is exposed. If you have a pod, scrape the seeds directly into the mixture.
- Nutmeg and cinnamon : These two spices are the aromatic signature of Amish cuisine. Nutmeg has a woody, slightly peppery quality; cinnamon brings sweet warmth. Grate fresh nutmeg if you have it: the smell is absolutely nothing like the already-oxidized powder sold in supermarkets.
Prepare the crust without overbaking it
The Amish crust is a rich shortcrust pastry, which gives it that melting, slightly crumbly character not found in commercial versions. Unlike many cream pie recipes, you don’t blind-bake it here—the custard is moist enough that the pie crust bakes properly along with the filling, without drying out. Before pouring in the liquid, brush the inside of the crust with an unbeaten egg white in a very thin layer: this creates a waterproof barrier that prevents the filling from softening the bottom during the first minutes in the oven. Place the dough in the pan, crimp the edges, and chill it while you prepare the custard—a cold crust shrinks less during baking.
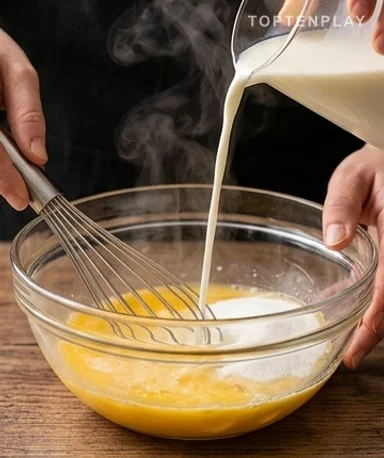
Whisk the eggs without incorporating air
In a large bowl, whisk together the eggs, extra yolk, sugar, flour, salt, and vanilla until smooth and slightly thickened. The goal here is not to incorporate air—so avoid whisking too vigorously or too long. Bubbles in the mixture will rise to the surface during baking and leave a less smooth, less clean texture when sliced. A hand whisk applied steadily for about a minute is plenty. The texture at this stage should resemble raw custard cream: a bit thick, pale yellow, with no visible lumps.
Temper the hot milk to avoid ruining everything
Heat the milk in a small saucepan over medium heat until the first simmer—not a vigorous boil, just the small bubbles starting to form at the edges, with a slight steam rising. The next step is the most critical in the entire recipe: pour this hot milk over the egg mixture in a thin, steady stream, whisking constantly. This technique is called tempering, and it gradually raises the temperature of the eggs without cooking them all at once. Pour all the milk at once, and you get scrambled eggs. Start with a small ladleful, mix well, then a second, another, and so on. Once half the milk is incorporated, you can pour the rest more freely. Then strain the whole mixture through a fine sieve to remove any small egg-white clumps—this takes ten seconds and really changes the final texture quality.
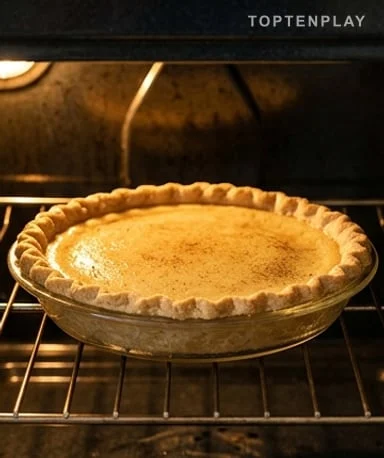
Bake at the right temperature without exceeding the perfect point
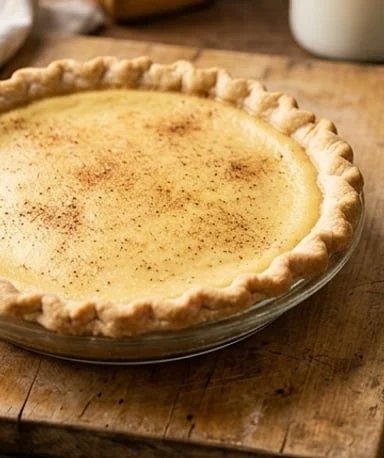
Place the oven rack in the lower position and preheat to 175°C. Pour the strained filling into the cold pie crust, sprinkle the surface with grated nutmeg and a pinch of cinnamon, then gently rotate the pan so the spices mingle at the surface without sinking. Bake for 45 to 50 minutes. The pie is done when the edges are firm and the surface lightly colored, but the center still jiggles slightly when you gently shake the pan—like a flan at the end of baking; that jiggle will disappear as it cools. Do not leave it longer in the oven hoping it will set completely: an overbaked custard becomes grainy and loses all its silkiness. When you take it out, the smell of warmed nutmeg mingled with caramelized crust fills the entire room.
Let it rest so the custard truly reveals itself
Place the pie on a wire rack and let it cool completely at room temperature—allow at least two hours, uncovered. Then cover it and refrigerate for at least four hours, ideally overnight. The cold dramatically transforms the texture: what was still slightly jiggly becomes firm, dense, and cleanly sliceable, without the filling running or sagging. It’s also the cold rest that rounds out the flavors—vanilla and nutmeg express themselves differently, the custard becomes deeper without being heavy. Serve directly from the refrigerator, with an extra sprinkle of cinnamon on each slice at the last minute.
Tips & Tricks
- Take the eggs out of the fridge at least 30 minutes ahead. A cold egg incorporated into a hot liquid creates thermal shocks that cause small albumen pieces to coagulate—result: lumps in the custard even after thorough whisking. At room temperature, eggs blend uniformly and the cream stays smooth.
- Always strain the custard through a sieve before pouring into the crust. Even if you’ve whisked well, there are almost always a few strands of egg white or micro-lumps invisible to the naked eye. The sieve catches them in seconds and guarantees a perfectly smooth surface after baking.
- Rely on the central jiggle rather than the timer. A custard that no longer jiggles at all at the end of baking is an overbaked custard—the texture will be firm and grainy rather than silky. The center should still move slightly, like a firm jelly, when you gently shake the pan.
- Wait until the pie is completely cold before covering it for the refrigerator. The condensation that forms under plastic wrap placed too early falls in droplets onto the still-warm custard surface and creates unsightly moisture spots—and moistens the top in a way that’s hard to fix.
How do I know when the custard pie is done without cutting it?
Gently shake the pan near the end of baking: the edges should be completely firm and the surface lightly colored, but the center should still jiggle slightly, like jelly. This residual jiggle disappears as it cools—it’s normal and exactly what to look for. A pie that doesn’t jiggle at all when removed from the oven will be too firm and grainy after cooling.
Can this pie be made the day before?
Yes, and it’s even recommended. A night in the refrigerator allows the custard to firm up gradually and the vanilla and nutmeg flavors to fully develop. The pie also slices much more cleanly after a cold rest than when barely warm. Prepare it up to two days in advance, covered with plastic wrap placed directly on the surface once it’s completely cold.
Why is my custard grainy or lumpy?
Two common causes: eggs straight from the refrigerator, or hot milk poured too quickly over the egg mixture. In both cases, the egg proteins coagulate abruptly before they have time to blend. Always take the eggs out ahead of time and pour the milk in a very slow stream while whisking constantly. Straining the mixture through a fine sieve before pouring into the crust removes any remaining lumps.
Can I use store-bought shortcrust pastry?
Yes, a ready-made shortcrust pastry will work fine for the pie crust. The result will be slightly less flaky and buttery than homemade, but the custard is the star of the recipe and will more than compensate. Still remember to brush the inside with an unbeaten egg white before pouring in the filling, regardless of the crust used.
How long do leftovers keep?
The pie keeps for up to four days in the refrigerator, covered. The custard remains creamy and the crust holds up a bit, though it softens slightly over time. Do not freeze this pie: the egg-and-whole-milk custard separates upon thawing and completely loses its smooth texture.
Can I add flavors or vary the recipe?
Yes, the neutral custard base lends itself well to variations. Incorporate two tablespoons of sifted unsweetened cocoa for a chocolate version, or replace the vanilla with almond extract for a more floral note. You can also drizzle each slice with salted caramel sauce when serving. Keep the egg and flour amounts unchanged—that balance guarantees the texture.
Creamy Amish Custard Pie
American
Dessert
An old-fashioned custard pie, silky and scented with nutmeg, with a thin, flaky crust. Simple recipe that can be made the day before, ideal for stress-free entertaining.
Ingredients
- — Crust —
- 250g all-purpose flour
- 115g cold butter, diced
- 1 tsp fine salt
- 1 tsp sugar
- 3-4 tbsp ice water
- — Custard filling —
- 480ml whole milk
- 3 whole eggs, at room temperature
- 1 egg yolk, at room temperature
- 150g white granulated sugar
- 1 tbsp all-purpose flour (about 10g)
- 1 tsp pure vanilla extract
- 1 pinch fine salt
- 1/4 tsp ground nutmeg, plus more for finishing
- 1/4 tsp ground cinnamon, plus more for finishing
- 1 unbeaten egg white (for brushing crust)
Instructions
- 1Prepare the crust: mix flour, salt, and sugar. Cut in cold butter with fingertips until the mixture is sandy with visible small butter pieces. Add ice water one tablespoon at a time until the dough comes together. Form a disk, wrap in plastic, and refrigerate for at least 30 minutes.
- 2Roll out the dough on a floured surface into a 30cm disk. Line a 24cm (9.5-inch) pie pan, crimp the edges, and return to the fridge while preparing the filling.
- 3Preheat the oven to 175°C (350°F) with the rack in the lower position.
- 4In a large bowl, whisk together whole eggs, egg yolk, sugar, flour, salt, and vanilla until smooth and slightly thickened. Do not incorporate air—whisk steadily without overdoing it for about 1 minute.
- 5Heat the milk in a small saucepan over medium heat until the first simmer. Then pour the hot milk over the egg mixture in a very slow, steady stream, whisking constantly. Start with one small ladleful at a time, then increase the flow once half the milk is incorporated.
- 6Strain the entire mixture through a fine sieve to remove any lumps. Brush the inside of the cold crust with the unbeaten egg white in a very thin layer.
- 7Pour the strained filling into the crust. Sprinkle the surface with nutmeg and cinnamon, then gently rotate the pan so the spices slightly incorporate.
- 8Bake for 45 to 50 minutes. The pie is done when the edges are firm and the surface lightly colored, but the center still jiggles a bit when gently shaken.
- 9Let cool completely on a wire rack at room temperature (about 2 hours) before covering and refrigerating for at least 4 hours, ideally overnight.
- 10Serve directly from the refrigerator, with an extra pinch of cinnamon on each slice.
Notes
• Eggs must be at room temperature: cold eggs combined with hot milk cause protein coagulation and create lumps even after whisking.
• Do not blind-bake the crust: the moist filling cooks it perfectly at the same time, and pre-baking would make it too dry.
• The egg white brushed on the raw crust creates a waterproof barrier that prevents the bottom from getting soggy.
• Do not cover the pie while still warm in the refrigerator: condensation falls in droplets onto the custard and marks its surface.
• For a chocolate version, incorporate 2 tbsp sifted unsweetened cocoa into the egg mixture. For a floral note, replace vanilla with 1/2 tsp almond extract.
Nutrition Facts (per serving, estimated)
| 295 kcalCalories | 8gProtein | 37gCarbs | 13gFat |