The best Sunday cake doesn’t require three hours in the kitchen. Three ingredients, a microwave, less than ten minutes: this Oreo cake is a no-brainer. Those who still doubt express desserts have never eaten this hot.
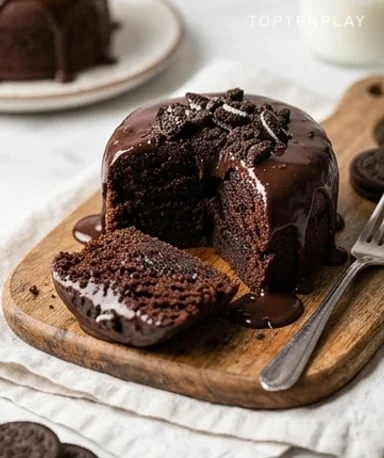
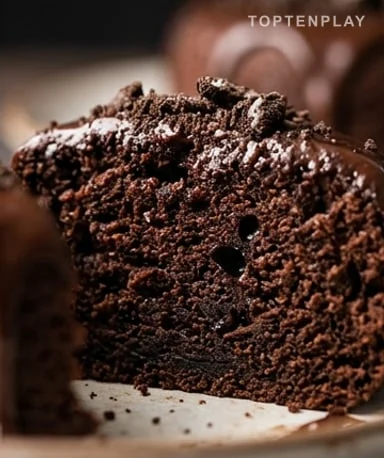
The cake comes out of the microwave with a slightly domed, almost matte surface, hiding a dense, moist crumb. A warm chocolate cookie smell fills the room as soon as you lift the film. The texture sits somewhere between brownie and mug cake—compact, melting, with that characteristic Oreo vanilla cream note in every bite. You pour the still-warm ganache, it flows slowly over the edges without you touching it.
Why you’ll love this recipe
Ingredient Notes
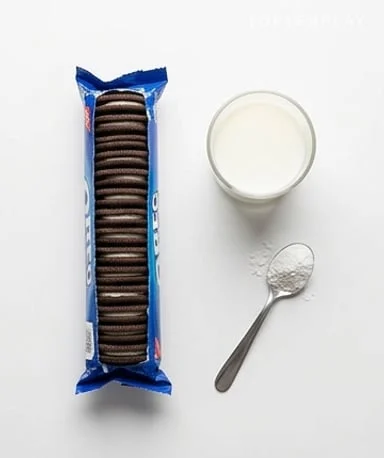
Oreos, milk, baking powder—that’s really all you need.
- Oreos : The heart of the recipe. Whole biscuits—filling included—bring sugar, cocoa, and that industrial vanilla note that makes Oreos so recognizable. Double cream ones give an even more intense, slightly softer result.
- Semi-skimmed or whole milk : No skimmed milk here: you need some fat for the texture to hold. The exact amount depends on how finely you crush the Oreos—you want a thick batter that slides slowly off the spoon, not runs.
- Baking powder : One teaspoon, no more. It gives just enough rise to avoid a compact block. Any more, and the chemical taste takes over, ruining everything else.
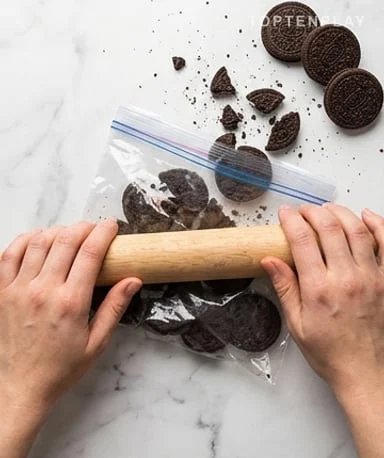
Crush the Oreos finer than you think
The final texture depends almost entirely on this step. Pieces too large give an uneven cake with dry and wet parts that never really mix. Ideally, blend the biscuits into a fine powder, or crush them in a zip-lock bag with a rolling pin, pressing firmly. Aim for something like breadcrumbs. A few small bits can remain—they’ll add crunch—but no large chunks. This fine powder absorbs the milk evenly and gives the crumb that beautiful chocolatey grain, with a very tempting smell already when mixing.
Measure the milk with some care
This is the only real point of attention. Too much milk, and the center stays liquid even after cooking. Too little, and the cake will be dry and crumbly, with a dusty texture. The method: pour three-quarters of the indicated amount, mix, observe. The batter should fall slowly from the spoon in one blob. If it runs freely, it’s too liquid. Add the rest gradually, a tablespoon at a time. A well-measured batter has a consistency close to thick brownie batter—and that same intense chocolatey smell you recognize immediately.
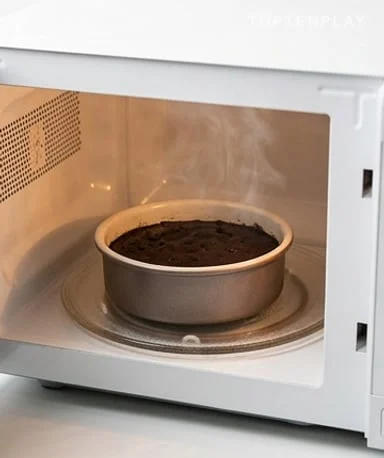
Watch the microwave: every appliance has its own character
This is where TikTok recipes can be misleading. An 800W microwave and a 1100W one don’t cook at the same speed, and the difference is really felt with this type of preparation. The basic rule: 3 minutes at full power, then check. The center should be set—not liquid, not wobbly when you tilt the ramekin. The surface will always remain slightly sticky to the touch, that’s normal and not a reliable indicator. Insert the tip of a knife in the center: it should come out clean or almost. If not, continue in 30-second increments.
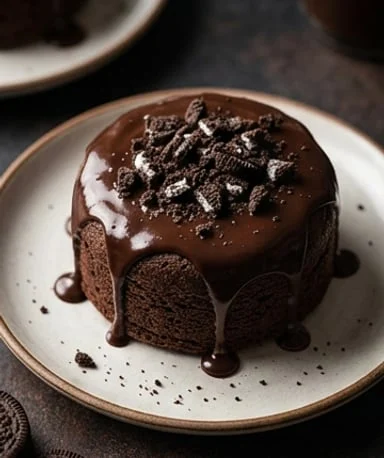
Ganache turns an express dessert into something that looks polished
Technically optional. In practice, it completely changes the perception of the cake. Melt dark chocolate cut into pieces with heavy cream—two parts chocolate to one part cream—in the microwave in 20-second intervals, stirring between each. The sauce should be smooth, shiny, and flow in a thick ribbon from the spoon. Pour it still warm over the cake straight from the microwave, and let it flow naturally over the edges without spreading. A few roughly crushed Oreos on top: the crunch contrasts with the smooth ganache, and visually it’s perfect for so little effort.
Tips & Tricks
- For an even softer crumb, replace one third of the milk with plain yogurt. Same total liquid amount, but the texture gains creaminess and the crumb is slightly airier.
- Do not overmix once the milk is incorporated. As with any cake, excessive mixing develops gluten and gives a rubbery result. Twenty seconds of vigorous mixing is enough.
- Without a ramekin, a mug of at least 300ml works very well—the cake will be taller and cylindrical, cooking slightly longer. Check from 4 minutes.
Can I use any variety of Oreos?
Yes, all variants work—double cream, golden, intense cocoa. Double cream gives a slightly softer crumb and a more pronounced taste. Flavored variants (strawberry, lemon) change the flavor profile but the structure remains the same.
How do I know if the cake is really cooked?
Insert the tip of a knife into the center: it should come out clean or with very few moist crumbs. The surface will always remain slightly sticky to the touch, that’s not a reliable indicator. If the knife comes out with liquid batter, continue in 30-second increments.
Does the cake keep well?
It’s really best warm, within 10 minutes of cooking. It can keep for 24 hours at room temperature under plastic wrap, but the texture becomes firmer and less pleasant. In the fridge, it hardens too much—better to avoid it.
Can I replace milk with a plant-based drink?
Yes, no problem. Oat milk gives the best results thanks to its creamy texture and slight sweetness that complements the chocolate well. Almond milk also works. Avoid very watery plant drinks like rice milk, which make the batter too liquid.
Can I bake this cake in the oven instead of the microwave?
Yes, at 180°C fan-assisted for 18 to 22 minutes in a greased individual mold. The texture will be slightly different—drier on the surface, with a more pronounced crust. The microwave gives a moister and denser crumb, which is characteristic of this type of recipe.
Is the recipe suitable for children?
Absolutely—no raw eggs, no hot oven, minimal handling. Children can crush the Oreos in the bag and mix the batter safely. The only precaution: the ramekin comes out very hot from the microwave, let it rest for 2 minutes before touching.
3-Ingredient Microwave Oreo Cake
International
Dessert
A quick chocolate cake made without an oven, without eggs, and without flour. Three ingredients, five minutes of cooking, a dense and melting crumb with that vanilla cream note only found in Oreos. The ganache is optional, but honestly hard to resist.
Ingredients
- 150g Oreos (about 15 biscuits), whole with filling
- 120ml semi-skimmed or whole milk
- 1 tsp baking powder
- 100g dark chocolate (for the ganache, optional)
- 60ml heavy cream (for the ganache, optional)
- 2-3 additional Oreos, roughly crushed (decoration)
Instructions
- 1Place the 150g whole Oreos in a zip-lock bag and crush vigorously with a rolling pin until you get a fine, even powder without large pieces.
- 2Pour the Oreo powder into a bowl, add the baking powder, and mix dry for a few seconds.
- 3Gradually incorporate the milk while mixing with a fork. Start with three-quarters of the milk, observe the consistency—the batter should be thick and slide slowly off the spoon. Add the rest if needed.
- 4Pour the batter into a greased ramekin or microwave-safe dish (grease with a knob of butter).
- 5Microwave at full power for 3 minutes. Check doneness by inserting a knife tip in the center—it should come out clean. If batter is still liquid, continue in 30-second increments.
- 6Let the cake rest in the ramekin for 2 minutes before unmolding.
- 7For the ganache: melt the broken dark chocolate with heavy cream in the microwave in 20-second intervals, stirring between each, until smooth and shiny.
- 8Pour the warm ganache over the cooled cake, let it flow naturally over the edges without spreading. Sprinkle with some crushed Oreos and serve immediately.
Notes
• Replacing one third of the milk with plain full-fat yogurt gives a creamier and slightly airier crumb.
• Do not overmix the batter once the milk is incorporated: twenty seconds of vigorous mixing is enough. Beyond that, the texture becomes rubbery.
• Without a ramekin, a mug of at least 300ml works perfectly—cooking will be slightly longer, check from 4 minutes.
Nutrition Facts (per serving, estimated)
| 218 kcalCalories | 3gProtein | 31gCarbs | 10gFat |